iOS Subscription Offers
Implementing iOS Subscription Offers with Purchases SDK
This guide assumes you already have your iOS products set up in App Store Connect.
Subscription Offers allow developers to apply custom pricing and trials to new customers and to existing and lapsed subscriptions.
Subscription Offers are supported in the Purchases SDK, but require some additional setup first in App Store Connect and the RevenueCat dashboard.
Types of Subscription Offers
| Offer Type | Applies To | Subscription Key Required | Notes | Auto-Renewal |
|---|---|---|---|---|
| Introductory Offers | New Users | 🔑 Required (in StoreKit2) | Applied by Apple to eligible purchases automatically. You can check the customer's eligibility for the offer to determine if Apple will apply it. | ✅ |
| Promotional Offers | Existing and Lapsed Users | 🔑 Required | Not applied automatically, see implementation guide below | ✅ |
| Offer Codes | New and Existing Users | 🔑 Required | Requires iOS SDK 3.8.0+, see implementation guide below | ✅ |
| Win-Back Offers | Lapsed Users | 🔑 Required | Win-Back Offers are only available to users on iOS18.0+. | ✅ |
| ⚠️ Not recommended In-App Purchase Promo Codes | New and Existing Users | Not Required | Treated as a regular purchase, revenue will not be accurate in Charts and Integrations due to Apple/StoreKit limitations. Codes don't auto-renew, aren't compatible with presentCodeRedemptionSheet, restricted to non-commercial use, and restricted to 1,000 codes every 6 months. New promo codes cannot be created after March 26, 2026. Any existing promo codes created before then can be redeemed until they expire. | ❌ |
In-App Purchase Keys
For RevenueCat to securely authenticate and validate a Subscription Offer request with Apple, you'll need to upload an In-App Purchase Key following our guide.
Promotional Offers
In iOS 12.2, Apple announced a new feature for subscription developers called “Promotional Offers.”
1. Configure the Offer in App Store Connect
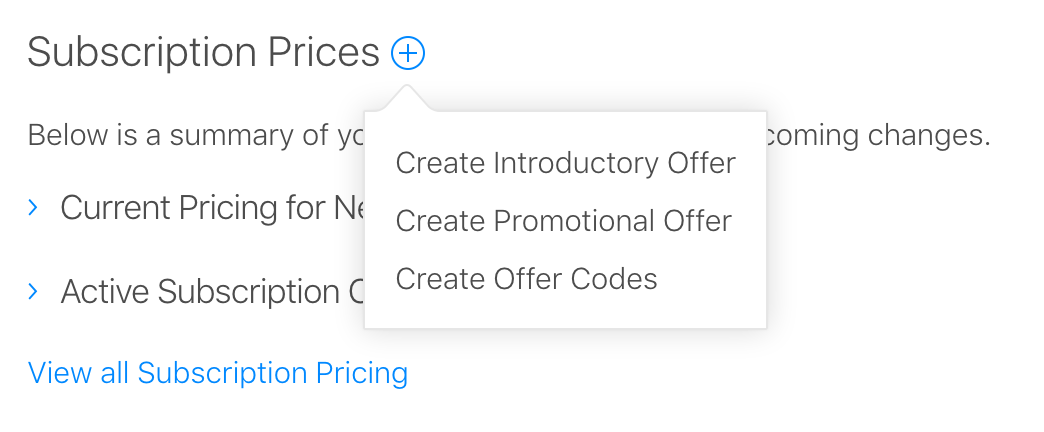
Promotional Offers are created from within App Store Connect and are included as a pricing option to an existing subscription product. When you click the "+" option next to Subscription Prices, you'll see an option to Create Promotional Offer.
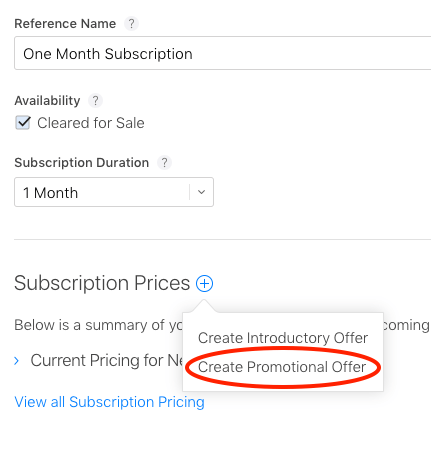
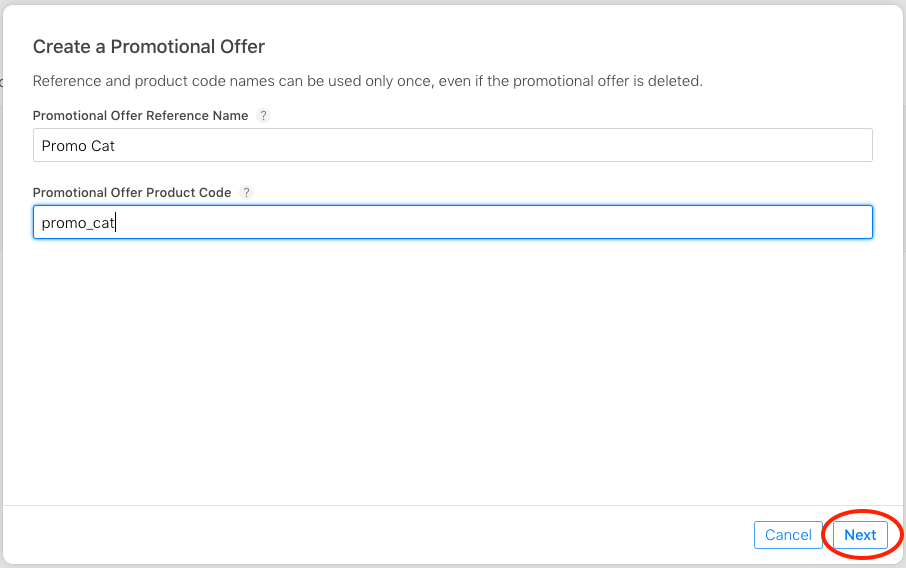
To create the offer there are two fields that you need to specify: Reference Name, which is just used for your reference, and the Promotional Offer Product Code, which is what you will actually use to activate a specific offer in your app.
On the next screen you'll select the type of offer you wish to provide. Just like introductory offers, there are three types of Promotional Offers:
- Pay-up-front — The customer pays once for a period of time, e.g. $0.99 for 3 months. Allowed durations are 1, 2, 3, 6 and 12 months.
- Pay-as-you-go — The customer pays a reduced rate, each period, for a number of periods, e.g. $0.99 per month for 3 months. Allowed durations are 1-12 months. Can only be specified in months.
- Free — This is analogous to a free trial, the user receives 1 of a specified period free. The allowed durations are 3 days, 1 week, 2 weeks, 1 month, 2 months, 3 months, 6 months, and 1 year.
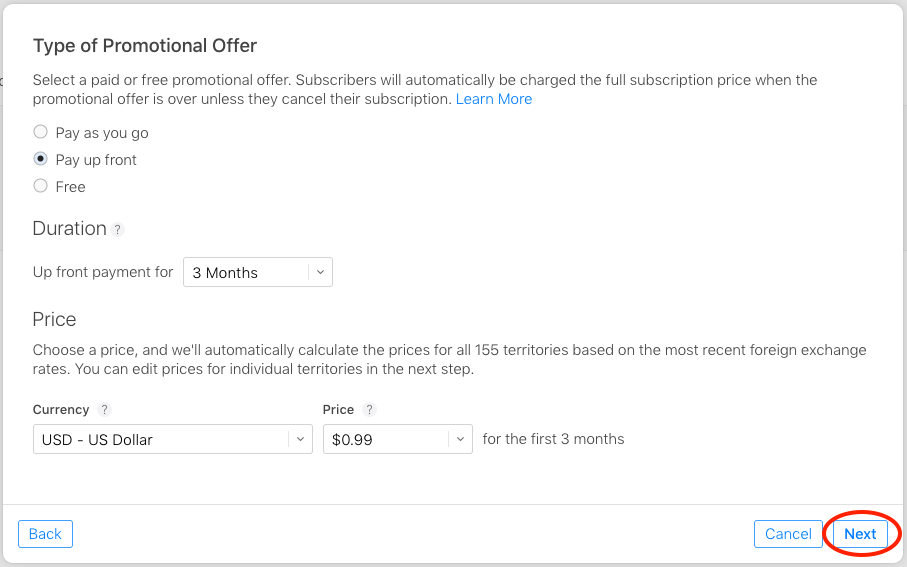
Don't forget to click Save in the upper right after you configure the offer.
2. Show the Promotional Offer to Desired Users
Display via Customer Center
You can display a Promotional Offer to a user via Customer Center. Read more in our guide on displaying promotional offers via Customer Center.
Display manually
When displaying a Promotional Offer manually, it's up to you to decide which users you want to present the offer to. The only eligibility requirements are that the user had (or currently has) an active subscription. Apple automatically enforces this requirement for you - if it's not met users will be shown the regular product regardless of the offer you try to present.
Fetch the PromoOffer
Before you can present a Promotional Offer to a user, you first need to fetch the PromoOffer. This is done by passing the StoreProduct and a StoreProductDiscount to the .getPromotionalOffer method, which uses the Subscription Key from above to validate the discount and to provide a valid PromoOffer:
- Swift
- Objective-C
- React Native
if let discount = package.storeProduct.discounts.first {
    Purchases.shared.getPromotionalOffer(forProductDiscount: discount,
                                         product: package.storeProduct) { (promoOffer, error) in
        if let promoOffer {
            // Promotional Offer validated, show terms of your offer to your customers
        } else {
            // Promotional Offer was not validated, default to normal package terms
        }
    }
}

// OR: if using async/await
let promoOffers = await package.storeProduct.eligiblePromotionalOffers()
[RCPurchases.sharedPurchases getPromotionalOfferForProductDiscount:product.discounts[0]
                                                       withProduct:product
                                                    withCompletion:^(RCPromotionalOffer * _Nullable discount, NSError * _Nullable error) {
	if (discount) {
  	// Payment discount fetched
  }
}];
const paymentDiscount = await Purchases.getPromotionalOffer(product, product.discounts[0]);
if (paymentDiscount) {
  	// Payment discount fetched
}
Purchase the Product with the Promotional Offer
After successfully fetching the PromoOffer, you can now display the Promotional Offer to the user however you'd like. If the user chooses to purchase, pass a Package and PromoOffer to the .purchase(package:promotionalOffer:) method.
- Swift
- Objective-C
- React Native
Purchases.shared.purchase(package: package,
                          promotionalOffer: promoOffer) { transaction, customerInfo, error, userCancelled in
    if customerInfo?.entitlements.all[<your_entitlement_id>]?.isActive == true {
        // Unlock that entitlements content
    }
}
[RCPurchases.sharedPurchases purchasePackage:package withDiscount:discount
                             completionBlock:^(RCStoreTransacction * _Nullable transaction, RCCustomerInfo * _Nullable purchaserInfo, NSError * _Nullable error, BOOL userCancelled) {
  if (purchaserInfo.entitlements[<your_entitlement_id>].isActive) {
    // Unlock that great "pro" content
  }
}];
const purchaseMade = await Purchases.purchaseDiscountedPackage(package, paymentDiscount);
Offer Codes
With iOS 14, Apple announced a new feature for subscription developers called “Offer Codes.” Offer Codes allow developers to offer custom pricing and trials, in the form of a redeemable code, to their customers.
1. Configuring an Offer Code
Offer Codes are configured similarly to Subscription Offers in App Store Connect.
2. Redeeming an Offer Code
Option 1: In-app Redemption Sheet
Since launch, Apple's in-app Offer Code redemption sheet has proven to be extremely unstable. For example, the sheet may not connect, may not dismiss after a successful redemption, and may not accept valid codes. Additionally, sandbox and TestFlight behavior has been seen to be inconsistent.
A workaround may be to instead redirect customers to the App Store app to redeem codes as described below.
To allow your users to redeem Offer Codes, you'll need to present the Offer Code redemption sheet. In Purchases SDK 3.8.0, you can call the presentCodeRedemptionSheet method.
- Swift
Purchases.shared.presentCodeRedemptionSheet()
Apple does not provide a callback to determine if the code redemption was successful. Since the Purchases SDK will automatically pick up on new transactions that enter the underlying transaction queue, you should implement the receivedUpdated delegate or listener to respond to changes in CustomerInfo. Once we sync the Offer Code transaction, we'll automatically refresh CustomerInfo.
The Offer Code redemption sheet may not display on a device if you haven't yet launched the App Store app and accepted the terms agreement.
Option 2: Redirect to App Store app
You can link to the App Store with a prefilled code for redemption with the following URL format:
https://apps.apple.com/redeem?ctx=offercodes&id={apple_app_id}&code={code}
You can find your Apple App ID in your app settings in App Store Connect (General -> App Information).
When users click your link within your app to redeem the offer code, it will take them outside of the app to complete the purchase. It is important to call syncPurchases when the user returns back to your app to retrieve their purchase. This may be done by recording when the user leaves the app due to the link, and calling syncPurchases when the user returns to the app. If not, the user may need to trigger a restore within your app when they come back.
Considerations
- In order for RevenueCat to accurately track revenue for offer codes, you will need to upload an in-app purchase key. See our guide on In-App Purchase Key Configuration for step-by-step instructions.
Win-Back Offers
Apple introduced win-back offers with iOS 18, which allow developers to provide custom pricing and trials to subscribers who have canceled a subscription and meet specific eligibility criteria set by the developer.
1. Configuring a Win-Back Offer
Win-Back Offers can only be configured for subscription products that have been approved by App Review. Please ensure that your subscription product has been approved by App Review before setting up a Win-Back offer for it.
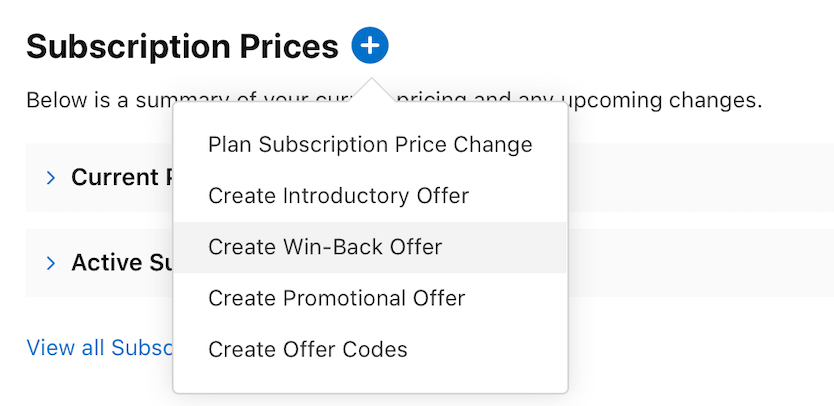
Navigate to your subscription's page under Apps → Your App → Subscriptions (in the left sidebar) → Your Subscription Group → Your Subscription Product and click the "+" button by "Subscription Prices". If your subscription product has been approved by App Review, you'll see the option "Create Win-Back Offer". Select it.
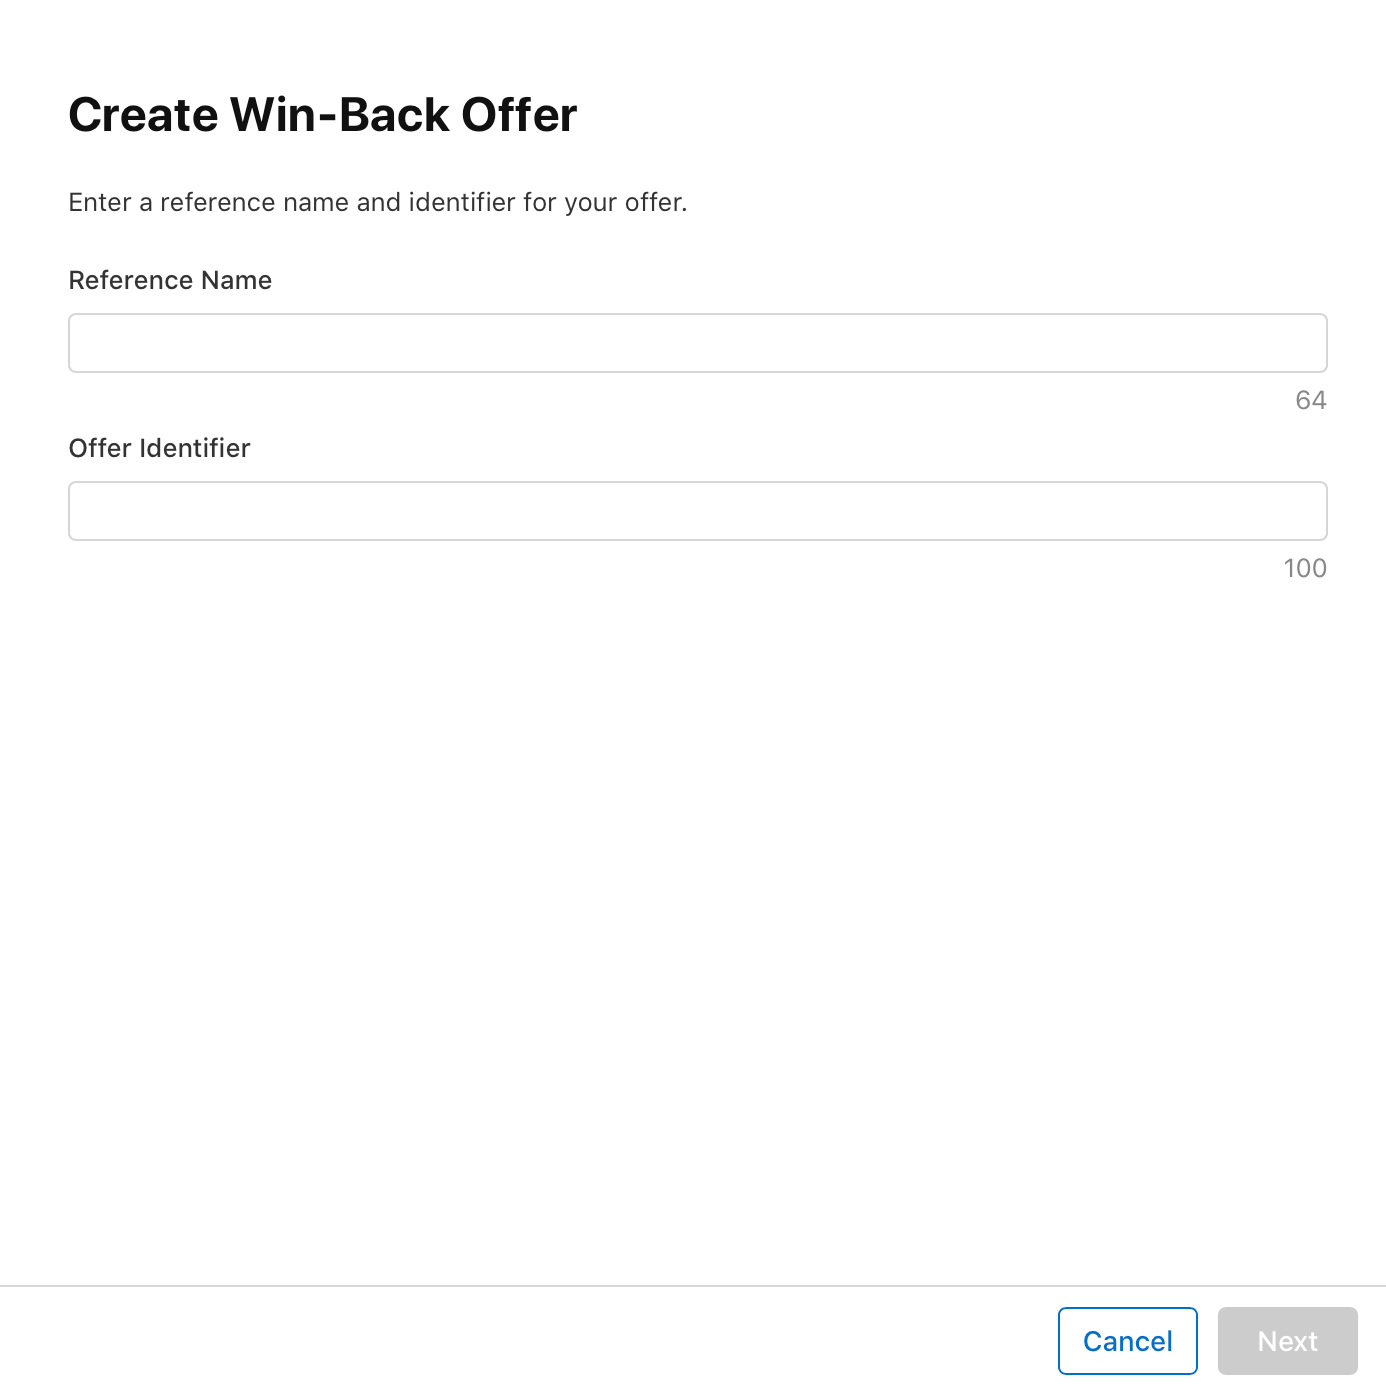
To create the win-back offer there are two fields that you need to specify: Reference Name, which is just used for your reference, and the Offer Identifier, which is a distinct ID for the win-back offer.
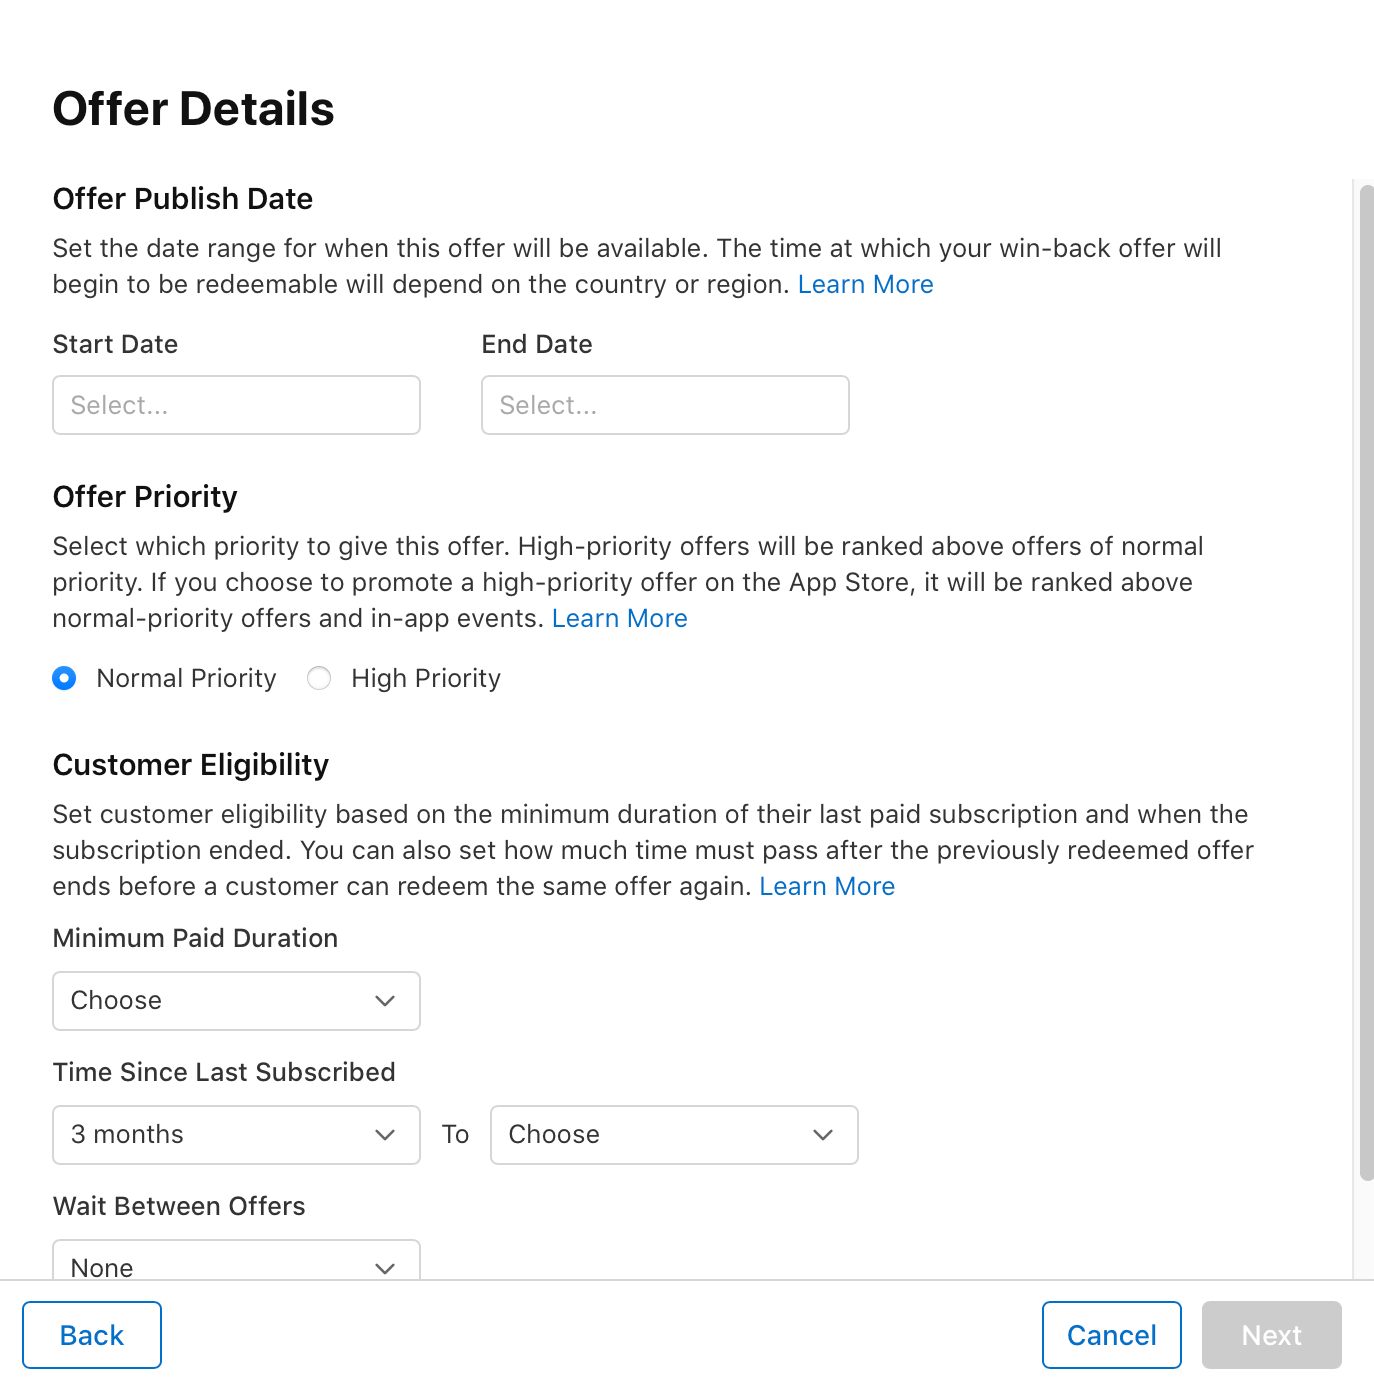
Next, you’ll be asked to provide the specifics of your win-back offer, including:
- Offer Publish Date: The date interval that the win-back offer will be available to churned subscribers. (More Info)
- Offer Priority: Determines if this win-back offer takes precedence over other offers available for its product.
- If a subscriber is eligible for multiple offers on the same subscription product, offers with a with a high priority will be displayed instead of offers with a normal priority in StoreKit views.
- Customer Eligibility: Developer-provided eligibility criteria that determines whether a churned subscriber can purchase a win-back offer.
- Minimum Paid Duration: The time that a subscriber must have been subscribed to that product to be eligible for the offer.
- Time Since Last Subscribed: A time interval describing how long a subscriber must have been lapsed to be eligible for the offer.
- Wait Between Offers: The required time a subscriber must wait after a win-back offer ends before redeeming the same offer again. This does not prevent a subscriber from redeeming a different win-back offer. Optional.
2. Redeeming a Win-Back Offer
Subscribers can redeem a win-back offer in several ways, detailed in the chart below:
| Win-Back Offer Purchasing Method | Notes |
|---|---|
| Through the App Store with Streamlined Purchasing Enabled | Should not be used if you require a subscriber to perform an action before purchasing (e.g. signing in). Requires iOS SDK version 5.0.0+ |
| Through Your App From a StoreKit Message | Requires iOS SDK version 5.6.0+ |
| Through the App Store with Streamlined Purchasing Disabled | Requires iOS SDK version 5.9.0+ |
| With a Unique Win-Back Offer URL | Requires iOS SDK version 5.9.0+ |
| Through Your Paywall | Requires iOS SDK version 5.10.0+ |
| Through a StoreKit StoreView | Requires iOS SDK version 5.0.0+ |
| Through Your App with Your Own IAP Code | Supported, you can find more info on using your own IAP code here |
Redeeming a Win-Back Offer Through the App Store with Streamlined Purchasing Enabled
Use this method only if you do not require subscribers to perform an action, like signing in before purchasing. If you do require such actions, disable Streamlined Purchasing (instructions here). By default, Streamlined Purchasing is enabled for all apps.
Purchasing win-back offers through the App Store uses Streamlined Purchasing by default, meaning that subscribers can complete the entire win-back offer redemption flow in the App Store. In addition to the steps mentioned above to configure your win-back offer, we recommend doing the following:
- Mandatory: Upload an image for your win-back offer in App Store Connect (instructions).
- Enable Apple App Store Notifications so that RevenueCat can be notified of win-back offers redeemed through the App Store, even if the user does not open your app.
Please note that win-back offers redeemed through the Manage Subscriptions page in user's Apple account always behave as if Streamline Purchasing is on, so your app should be prepared to handle this flow even if you disable Streamline Purchasing in App Store Connect.
Testing Win-Back Offers Redeemed Through the App Store with Streamlined Purchasing Enabled
Testing win-back offers redeemed through the App Store with Streamlined Purchasing enabled can only be performed in the sandbox environment on a physical device. To test win-back offers redeemed this way:
- Create a sandbox test account
- Add the sandbox test account to your device
- Configure a win-back offer on a subscription product in App Store Connect as described above.
- Make note of the product ID and the win-back offer ID. You'll need it later!
- Cancel any subscriptions that are from the same subscription group as the win-back offer’s subscription.
- Open your app and purchase the subscription product that contains the win-back offer.
- Cancel the subscription. This can be done easily in the Settings app by navigating to your sandbox test account's page:
- On iOS < 18.1: (Settings → App Store → Sandbox Account → Manage → Subscriptions → Cancel Subscription)
- On iOS 18.1+: (Settings → Developer → Sandbox Apple Account → Manage → Subscriptions → Cancel Subscription)
- Close your app.
- Wait for your subscription to expire.
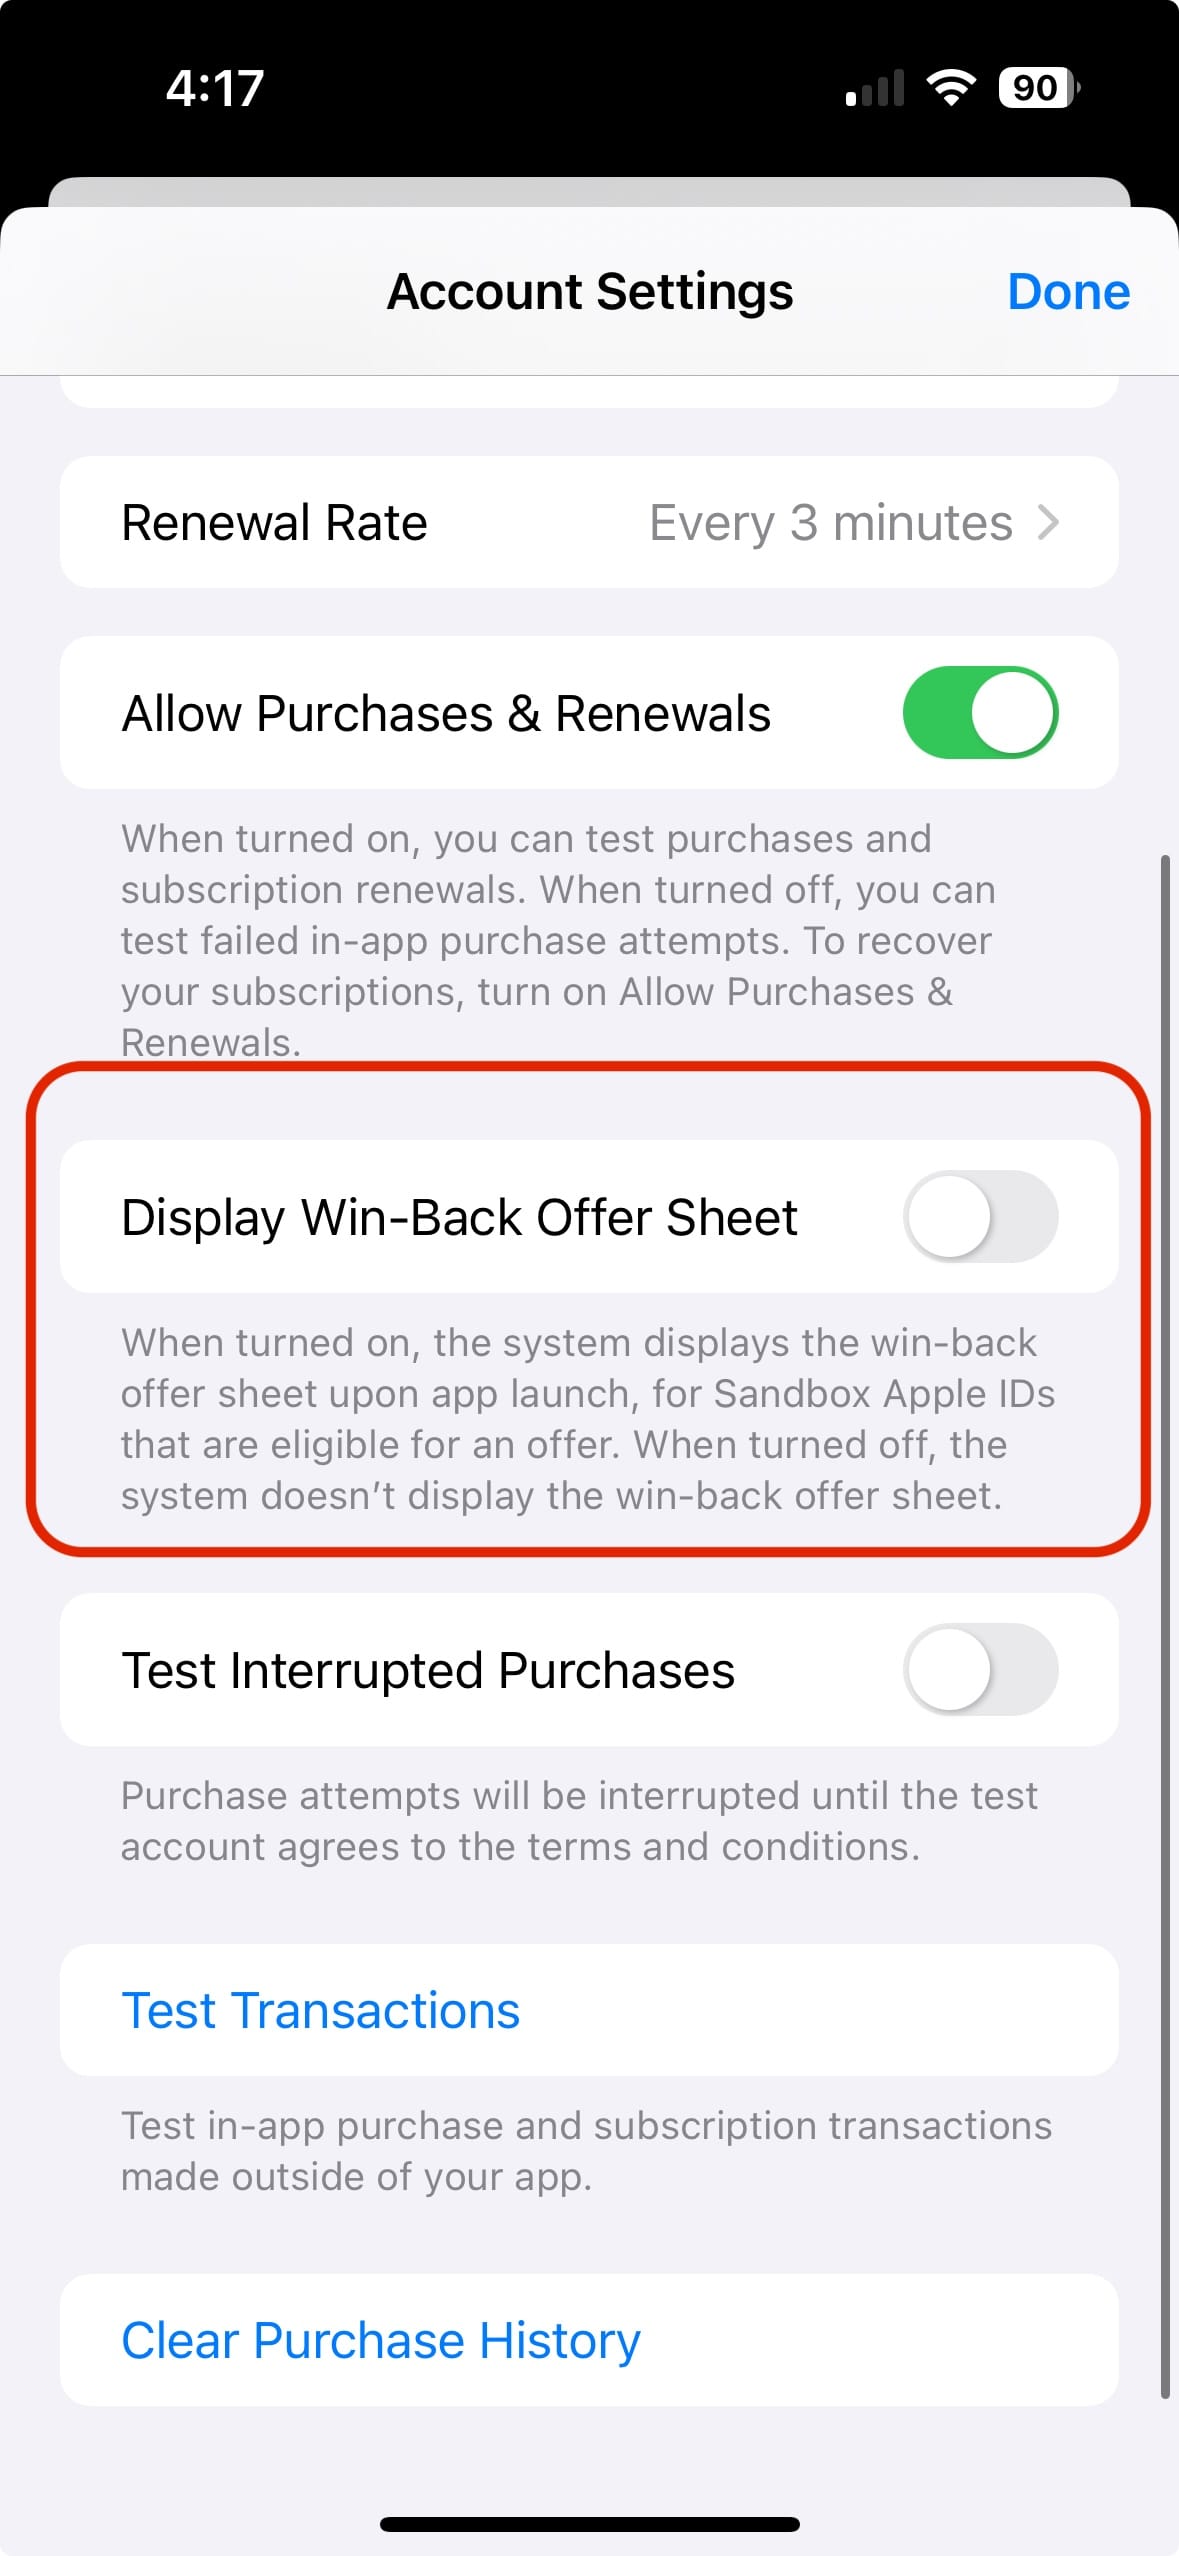
- In your sandbox test account's Account Settings page, turn off the "Display Win-back Offer Sheet" toggle
- Select "Test Transactions"
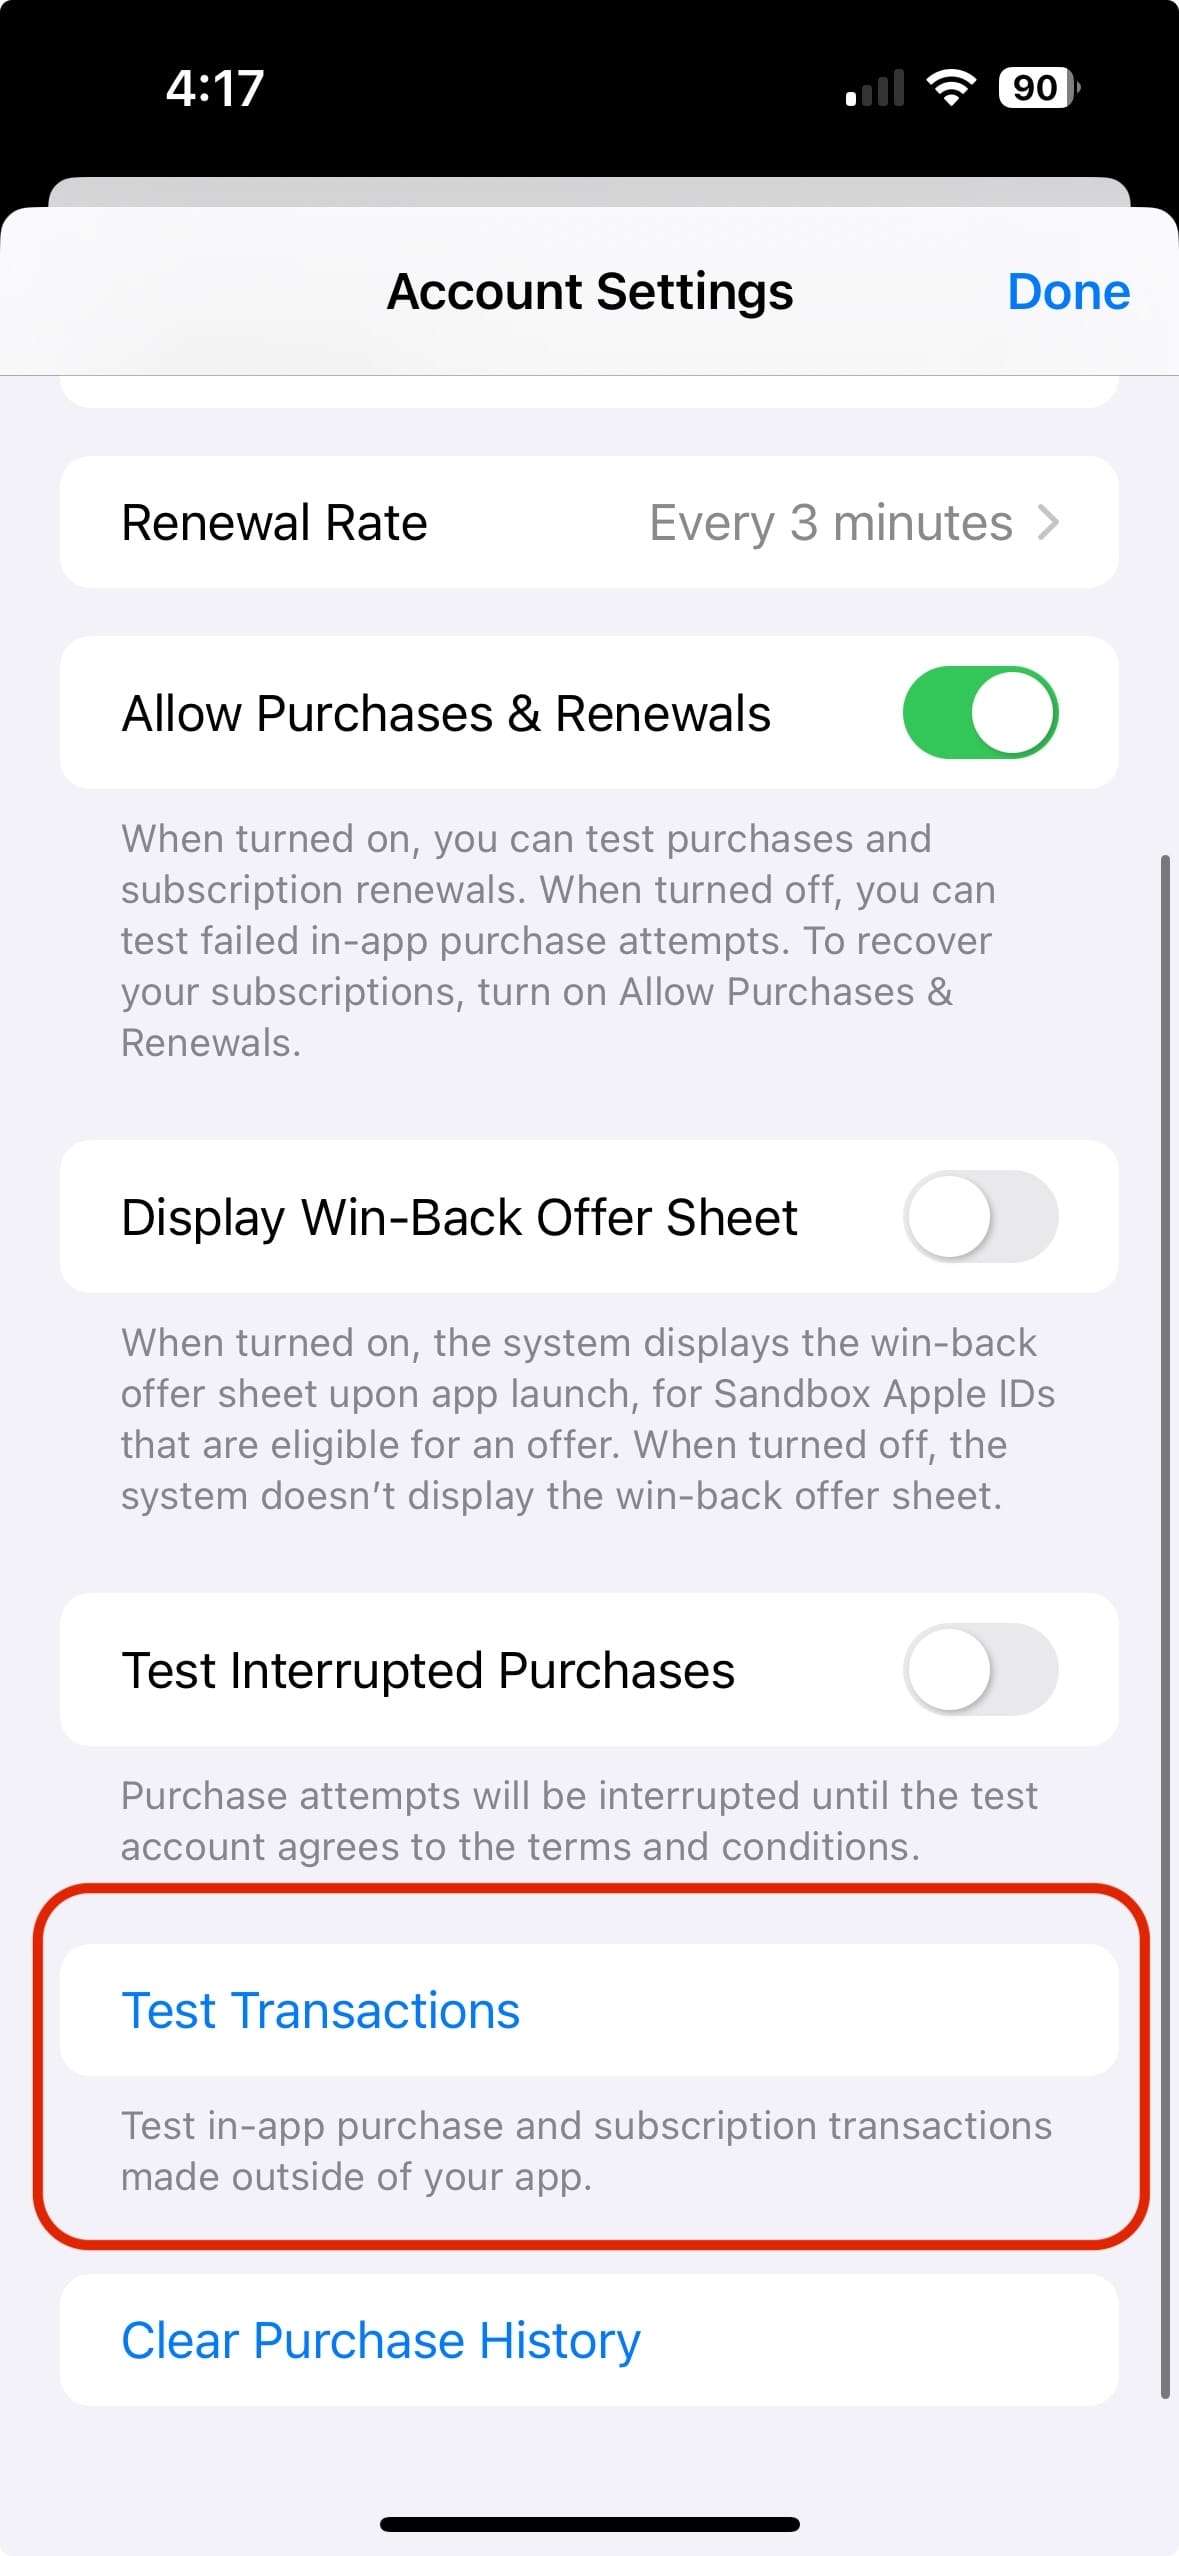
- Enter the product ID of the product you're testing, your app's bundle ID, and the win-back offer's identifier. These values must be valid IDs entered into App Store Connect.
- Tap the "Test Transactions" button at the bottom of the page.
- The system presents the App Store [Sandbox] payment sheet for the sandbox environment. Confirm the purchase.
- Open your app.
- Check that your subscriber receives the proper entitlements from RevenueCat, and that the purchase appears in your RevenueCat dashboard with "Sandbox data" enabled.
Repeat steps 5-16 to test redeeming win-back offers multiple times.
Redeeming a Win-Back Offer In Your App from a StoreKit Message
In iOS 18+, StoreKit will send your app a message when a subscriber is eligible to redeem a win-back offer. When this message is received, our SDK will automatically present the associated StoreKit win-back offer sheet to the subscriber, which allows them to redeem the win-back offer:

If you'd like to defer displaying the win-back offer sheet until a later time, you can do so in iOS SDK versions 5.6.0 and above by setting the showStoreMessagesAutomatically flag to false in the Purchases.configure function. When this flag is set to false, the win-back offer sheet will not be displayed automatically, and you will need to manually display the offer sheet by calling the showStoreMessages function when you'd like it to be displayed:
- Swift
// Configure Purchases with showStoreMessagesAutomatically set to false
Purchases.configure(
  with: .init(withAPIKey: "${YOUR_API_KEY}")
        .with(showStoreMessagesAutomatically: false)
)

// Later, when you're ready to display the win-back offer sheet:
await Purchases.shared.showStoreMessages()
If you're running other win-back campaigns on non-iOS stores, we recommend deferring displaying the win-back offer message until after you've checked the subscriber's entitlements. If the subscriber has entitlements, then we'd recommend not displaying the message to avoid the subscriber signing up for multiple win-back offers at the same time.
Testing Win-Back Offers Redeemed In Your App from a StoreKit Message
- Create a sandbox test account
- Add the sandbox test account to your device
- Configure a win-back offer on a subscription product in App Store Connect as described above.
- Make note of the product ID and the win-back offer ID. You'll need it later!
- Cancel any subscriptions that are from the same subscription group as the win-back offer’s subscription.
- Open your app and purchase the subscription product that contains the win-back offer.
- Cancel the subscription. This can be done easily in the Settings app by navigating to your sandbox test account's page (Settings → App Store → Sandbox Account → Manage → Subscriptions → Cancel Subscription)
- Close your app.
- Wait for your subscription to expire.
- In your sandbox test account's Account Settings page, turn on the "Display Win-back Offer Sheet" toggle:
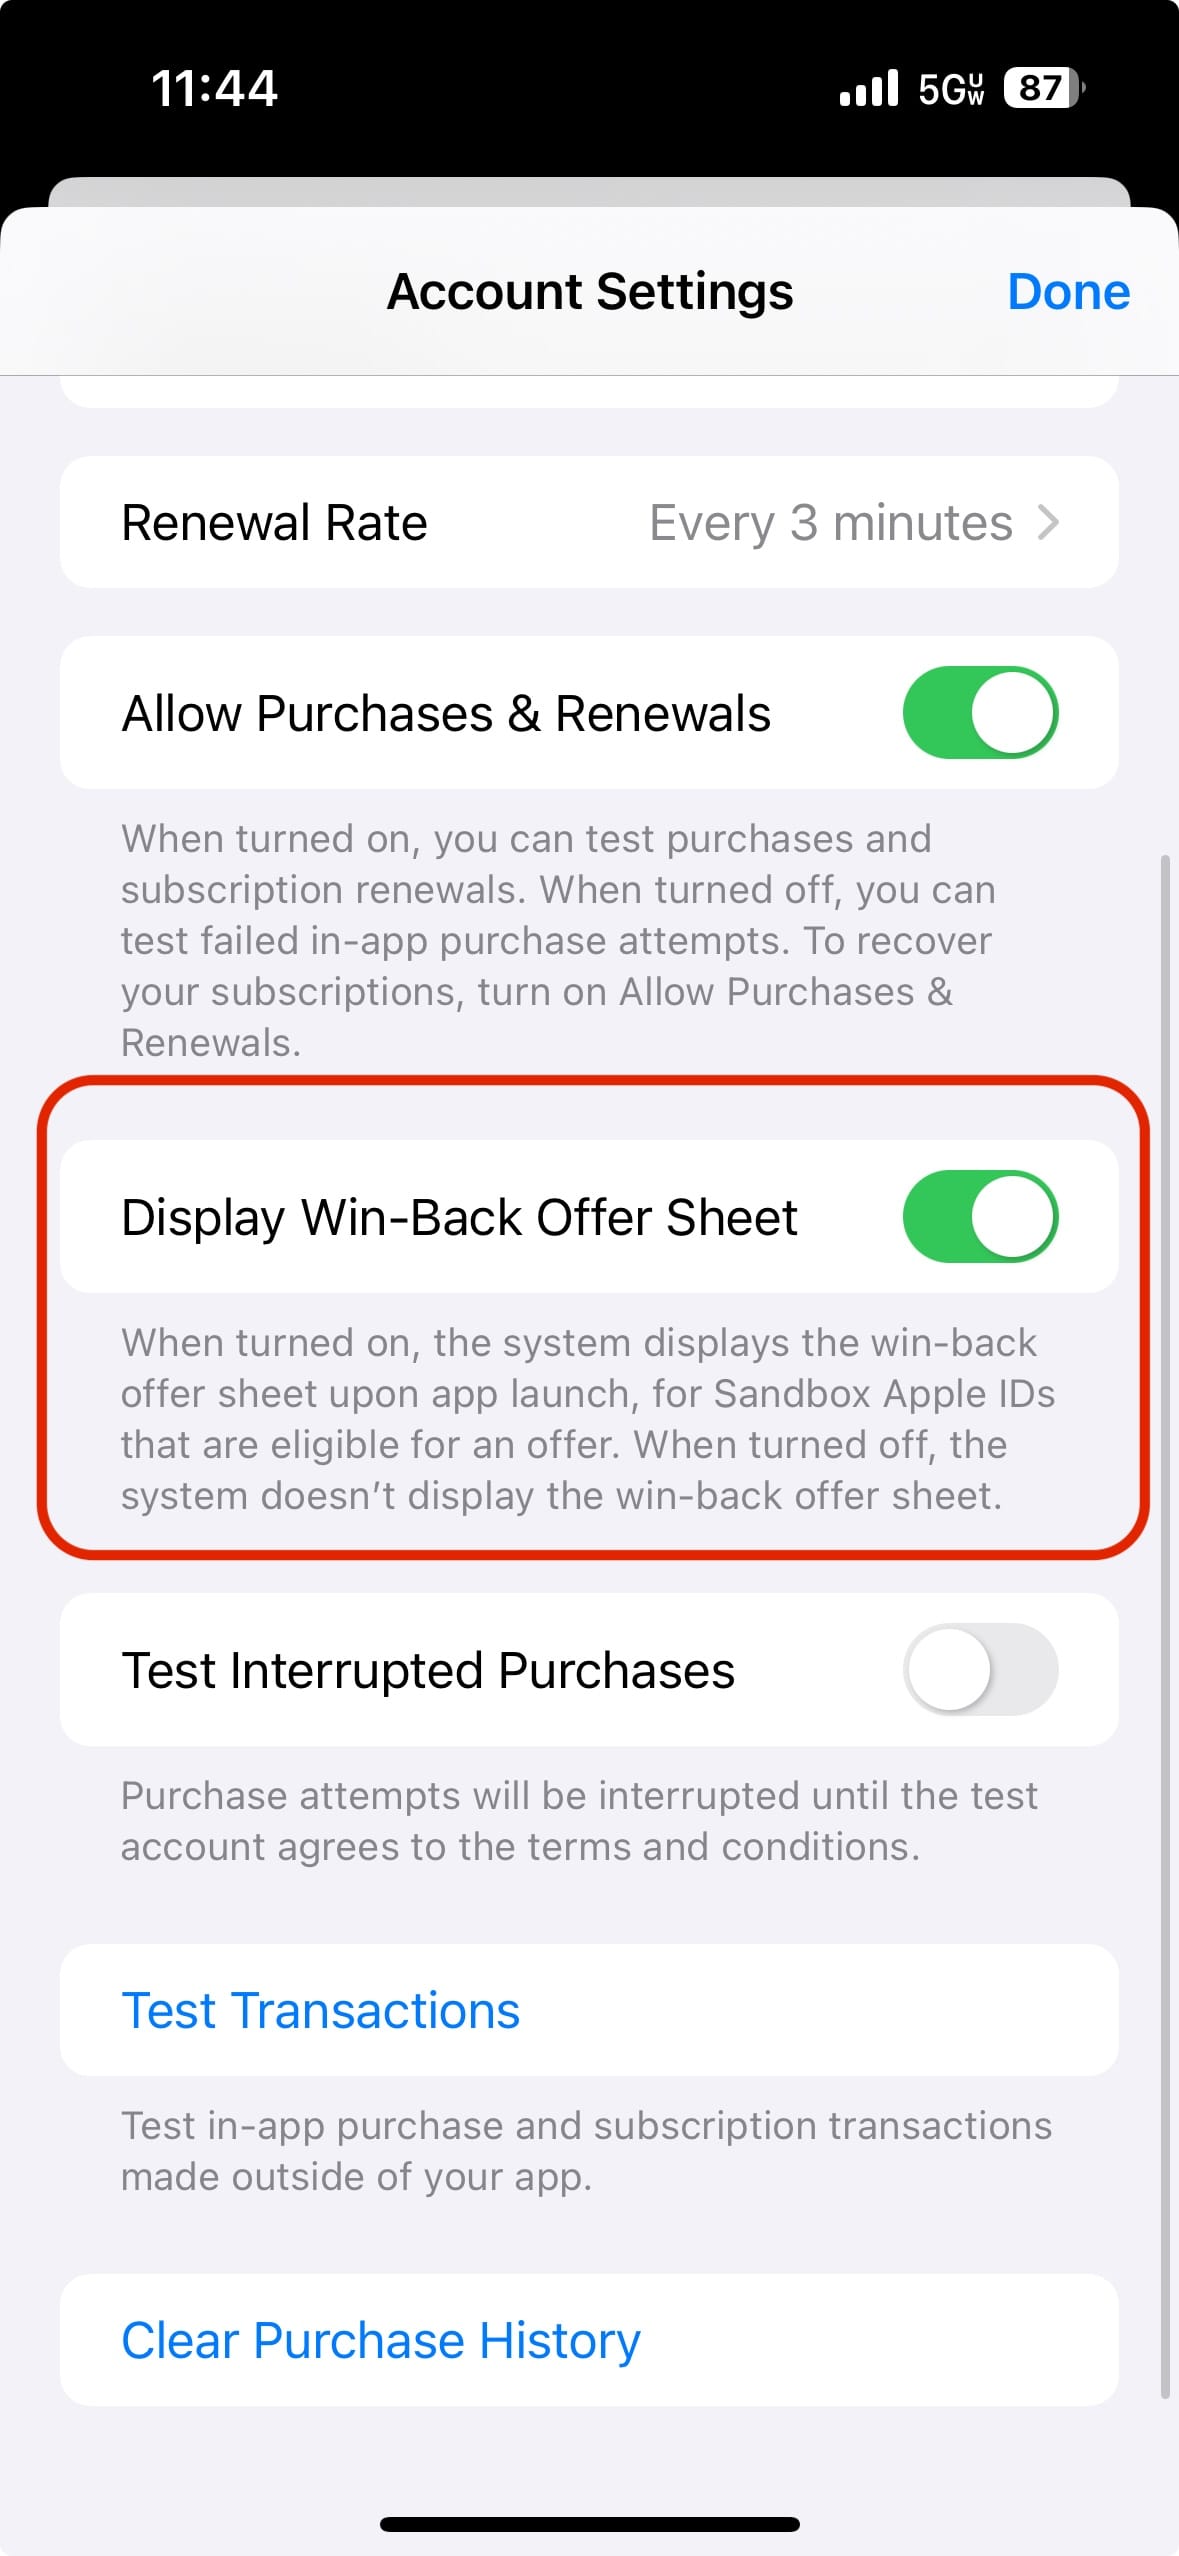
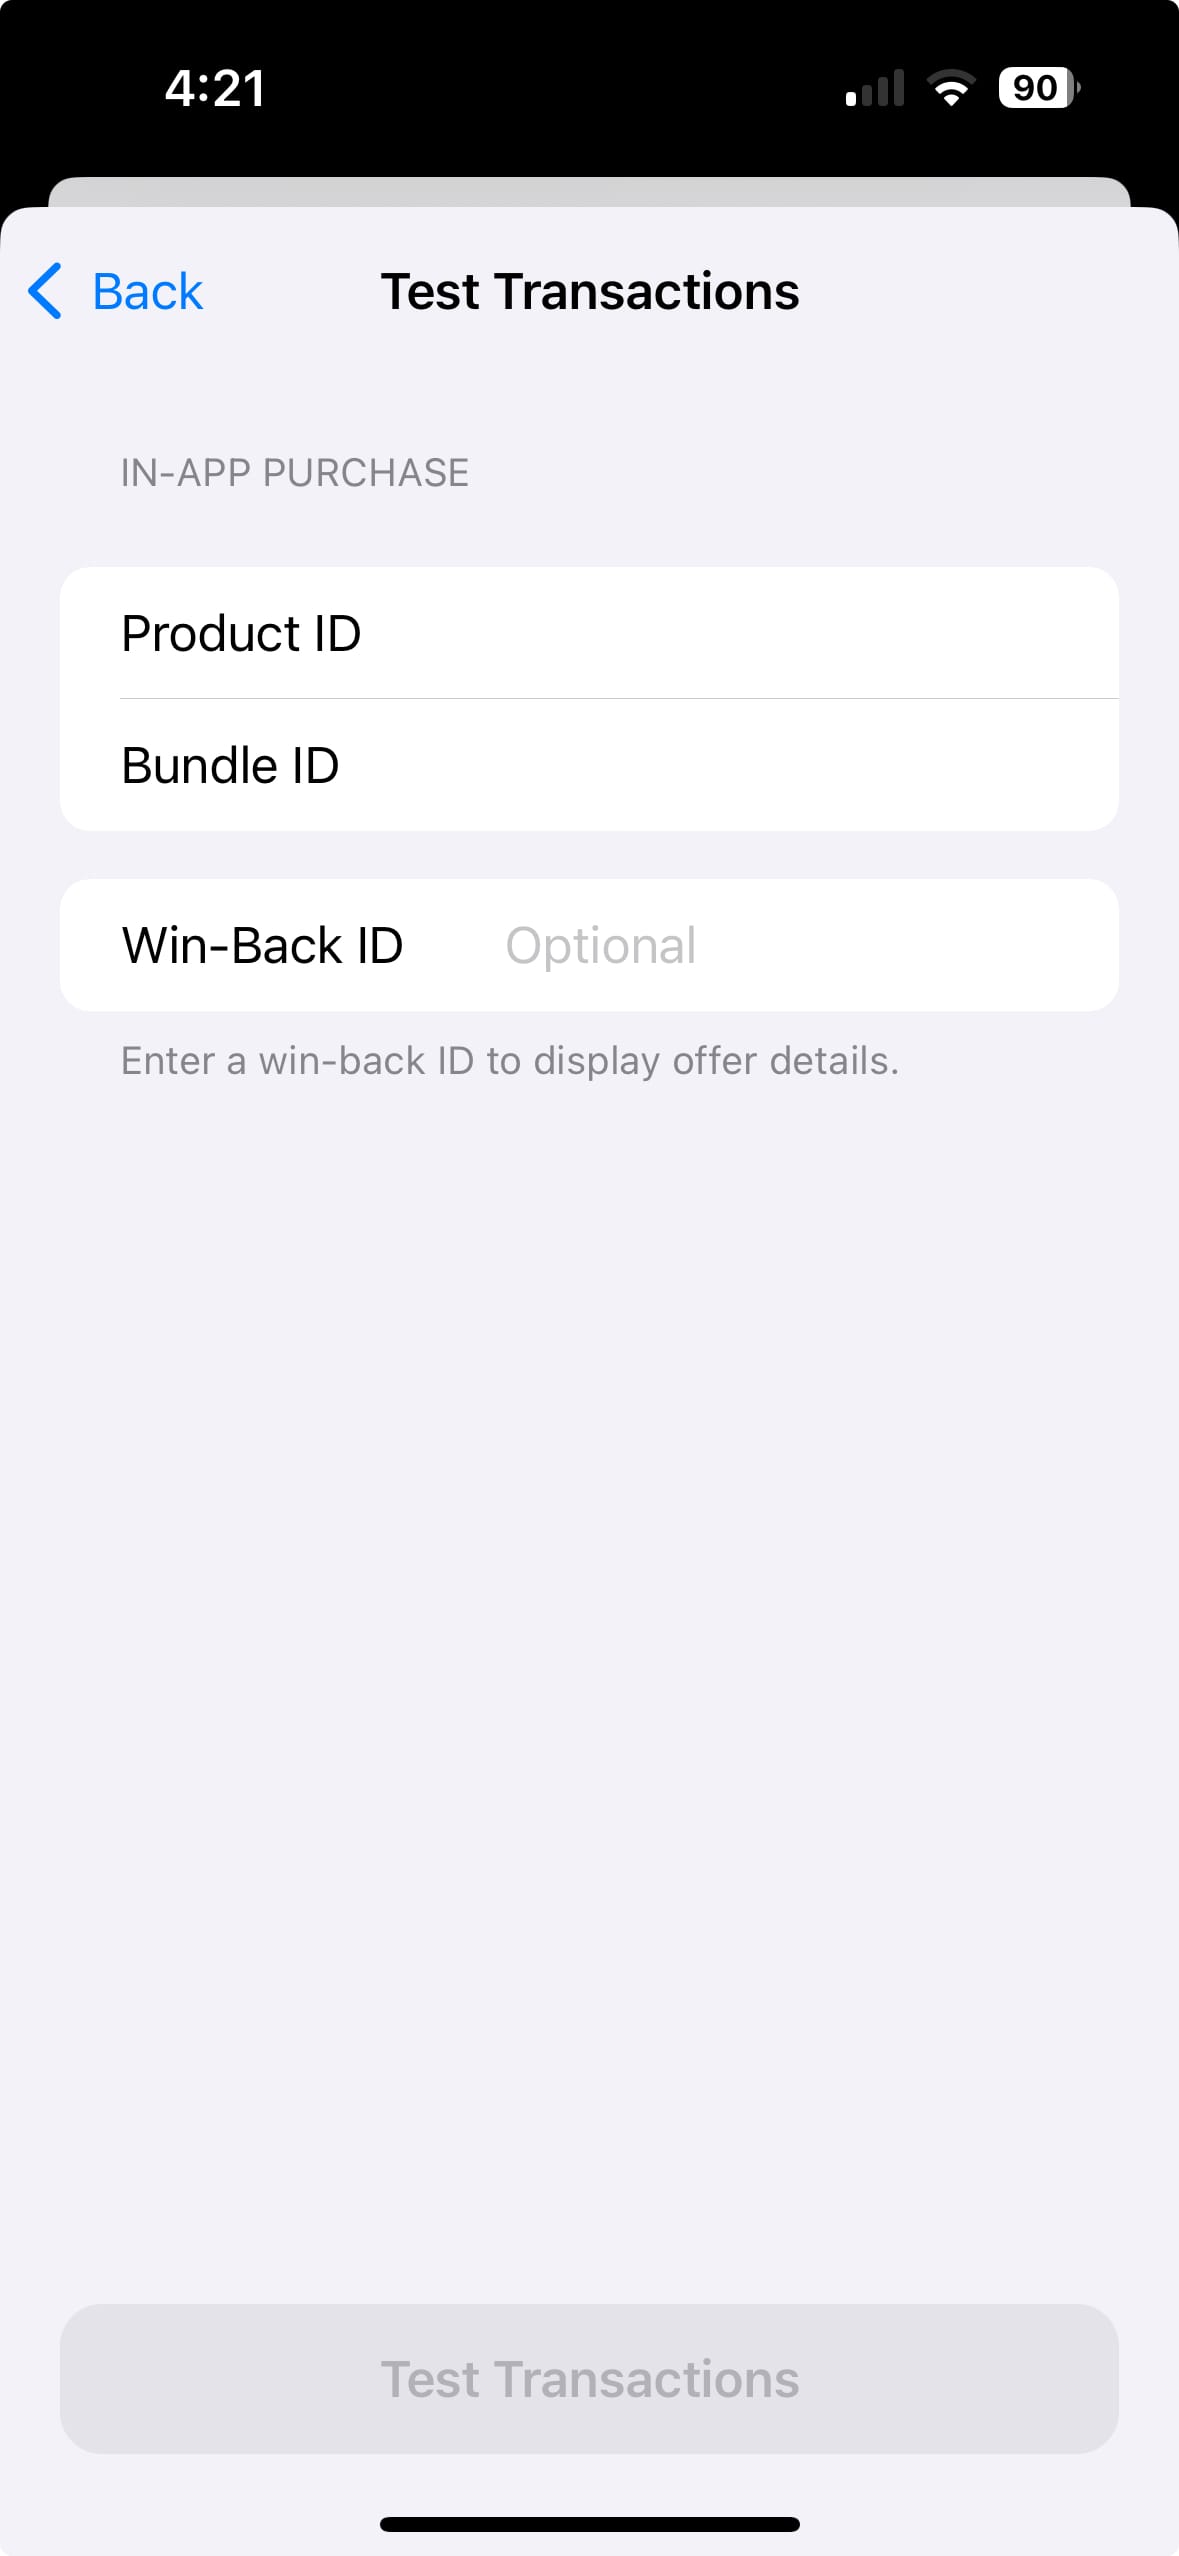
- Select "Test Transactions":
- Enter the product ID of the product you're testing, your app's bundle ID, and the win-back offer's identifier. These values must be valid IDs entered into App Store Connect.
- DO NOT tap the "Test Transactions" button at the bottom of the page. Instead, background the Settings app (do not force close it).
- Open your app.
- If the Purchases SDK is configured to show StoreKit messages automatically, the win-back offer redemption sheet will be displayed. If not, you can call
showStoreMessages()to display the offer sheet.
- Redeem the win-back offer.
- Check that your subscriber receives the proper entitlements from RevenueCat, and that the purchase appears in your RevenueCat dashboard with "Sandbox data" enabled.
Repeat steps 5-17 to test redeeming win-back offers multiple times.
Redeeming a Win-Back Offer Through the App Store with Streamlined Purchasing Disabled
Purchasing win-back offers through the App Store uses Streamlined Purchasing by default, meaning that subscribers can complete the entire win-back offer redemption flow in the App Store. If you require users to perform an action in your app before making a purchase, like signing in, you can disable Streamlined Purchasing. When Streamlined Purchasing is disabled, subscribers will start the win-back redemption flow in the App Store, but will complete the flow in your app. Support for redeeming win-back offers from the App Store with Streamlined Purchasing disabled is available in the iOS SDK versions 5.9.0+.
You can disable Streamlined Purchasing in App Store Connect under Apps → Your App → Subscriptions → Streamlined Purchasing.

After a user starts a win-back redemption flow on the App Store and opens your app, the RevenueCat SDK will call the PurchasesDelegate.purchases(readyForPromotedProduct:startPurchase) delegate function to let your app know that the user has started a redemption flow. Your app should then perform any actions it needs to do before the redemption flow continues. When your app is ready for the user to complete the redemption flow, you should call the startPurchase callback provided in the readyForPromotedProduct function.
- Swift
public class PurchasesDelegate: NSObject, PurchasesDelegate {

    var promotedProduct: StoreProduct?
    var completePurchaseFlow: StartPurchaseBlock?

    public func purchases(_ purchases: Purchases,
                          readyForPromotedProduct product: StoreProduct,
                          purchase startPurchase: @escaping StartPurchaseBlock) {
        self.promotedProduct = product
        self.completePurchaseFlow = startPurchase

        // Do what you need to do before letting the user complete the redemption flow
        // Once that is done, call self.completePurchaseFlow() to complete the redemption
    }
}

// Don't forget to register your PurchasesDelegate with the SDK, like so:
Purchases.shared.delegate = PurchasesDelegate()
In addition to the steps mentioned above to configure your win-back offer, we recommend doing the following:
- Mandatory: Upload an image for your win-back offer in App Store Connect (instructions).
- Enable Apple App Store Notifications so that RevenueCat can be notified of win-back offers redeemed through the App Store, even if the user does not open your app.
Redeeming a Win-Back Offer With a Unique Win-Back Offer URL
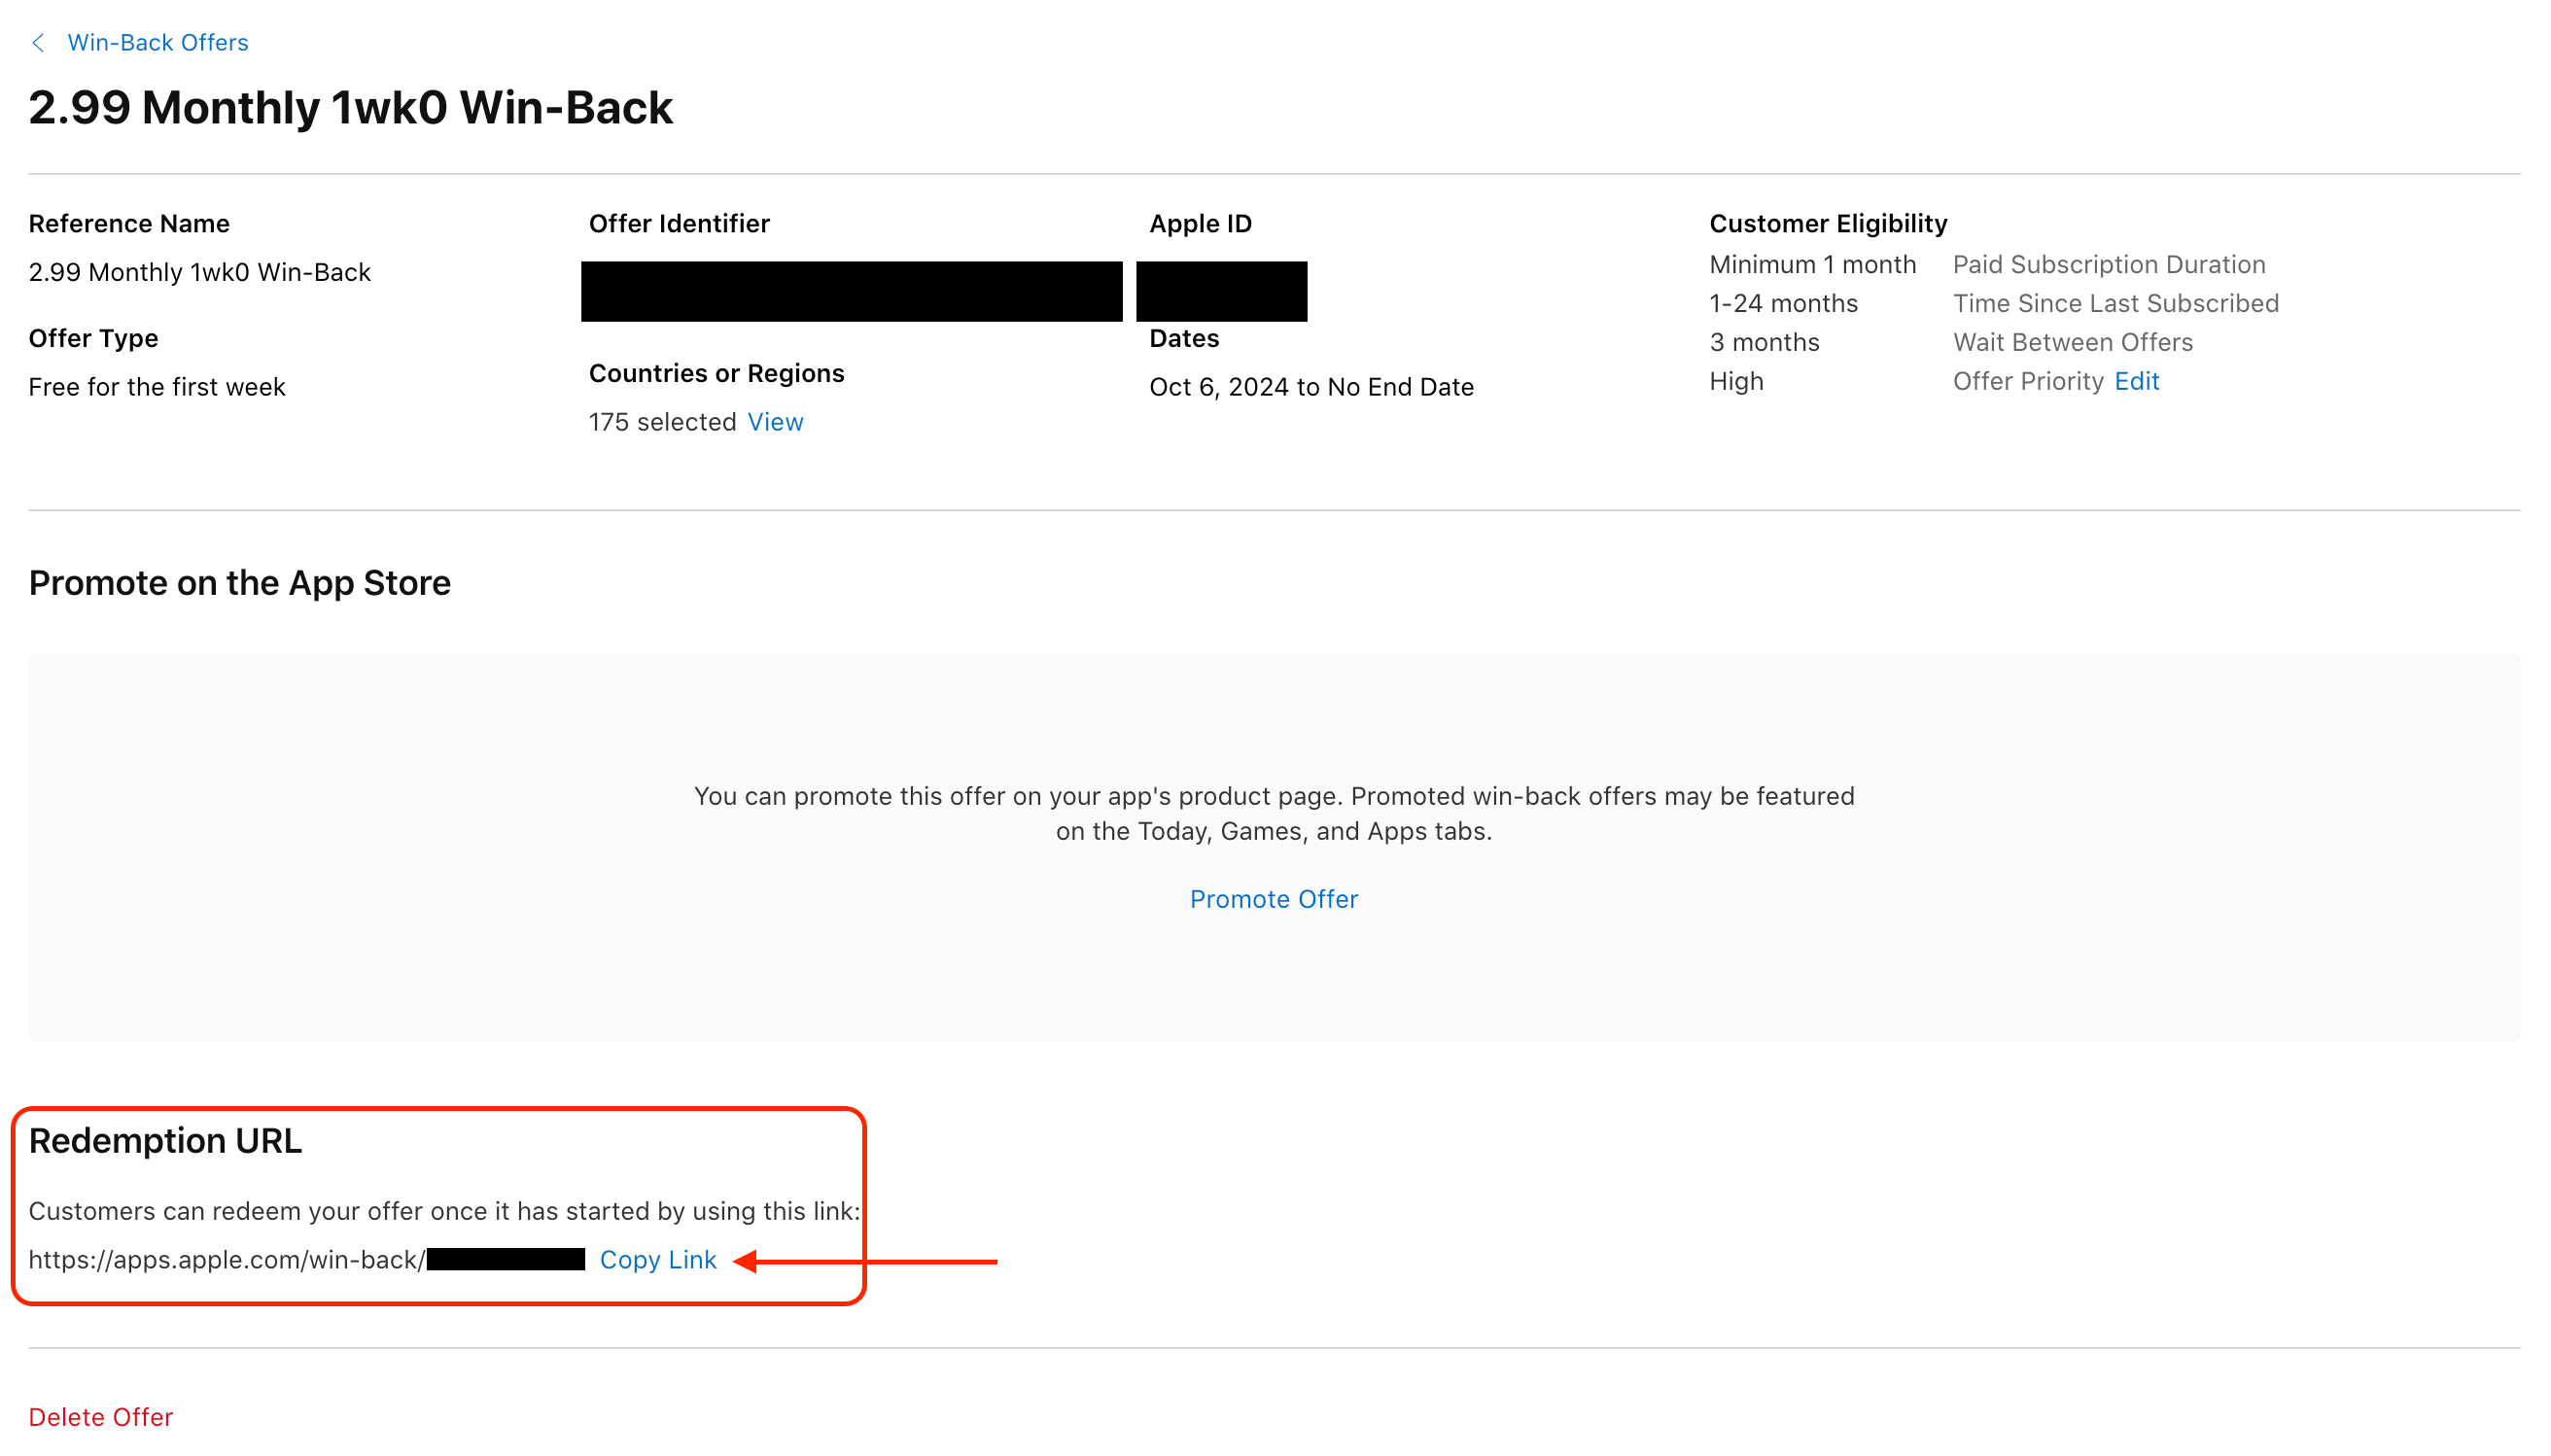
Apple generates a unique URL for your win-back offer upon creation, which you can find on the offer's page in App Store Connect. This URL uses the format https://apps.apple.com/win-back/{win_back_offer_id}. Eligible subscribers can use this URL to redeem the win-back offer in your app.
When a user redeems a win-back offer using a custom URL, the win-back offer will use the Streamlined Purchase setting used by your app (either enabled or disabled).
Redeeming a Win-Back Offer on your Paywall
You can display win-back offers to subscribers on your paywall for users to redeem using iOS SDK versions 5.10+. After configuring your win-back offers, you can use our SDK to fetch the win-back offers that a subscriber is eligible for for a given product:
- Swift
- React Native
- Flutter
- Cordova
- Capacitor
- Kotlin Multiplatform
- Unity
let eligibleWinBackOffers: [WinBackOffer] = try await Purchases.shared.eligibleWinBackOffers(
    forPackage: package
)

// TODO: display eligible win-back offers in your UI
const winBackOffers = await Purchases.getEligibleWinBackOffersForPackage(
  selectedPackage
);

// TODO: display eligible win-back offers in your UI
List<WinBackOffer>? offers = await Purchases.getEligibleWinBackOffersForPackage(package);

// TODO: display eligible win-back offers in your UI
Purchases.getEligibleWinBackOffersForPackage(
  package,
  (winBackOffers) => {
    // TODO: display eligible win-back offers in your UI
  },
  (error) => {
    // TODO: handle the error in your UI
  }
);
try {
  const { eligibleWinBackOffers } =
    await Purchases.getEligibleWinBackOffersForPackage({
      aPackage: aPackage,
    });

  // TODO: display eligible win-back offers in your UI
} catch (err) {
  // TODO: handle the error in your UI
}
Purchases.sharedInstance.getEligibleWinBackOffersForPackage(
    packageToCheck = packageToCheck,
    onError = { error: PurchasesError ->
        // TODO: handle the error in your UI
    },
    onSuccess = { eligibleWinBackOffers: List<WinBackOffer> ->
        // TODO: display eligible win-back offers in your UI
    }
)
Purchases purchases = GetComponent<Purchases>();
purchases.GetEligibleWinBackOffersForPackage(package, (winBackOffers, error) => {
    if (error != null)
    {
        // TODO: handle the error in your UI
    }
    else
    {
        // TODO: display eligible win-back offers in your UI
    }
});
Note: The eligibleWinBackOffers function only returns the win-back offers that the current subscriber is eligible for, not all of the win-back offers that you've created for a product. It will return an empty array when the subscriber is not eligible for any win-back offers.
Once the user has selected a win-back offer that they'd like to redeem, you can purchase it with the SDK:
- Swift
- React Native
- Flutter
- Cordova
- Capacitor
- Kotlin Multiplatform
- Unity
let purchaseParams = PurchaseParams.Builder(product: purchasedPackage.storeProduct)
    .with(winBackOffer: offer)
    .build()

try await Purchases.shared.purchase(purchaseParams)
try {
  const result = await Purchases.purchaseProductWithWinBackOffer(
    selectedProduct,
    winBackOffer,
  );
  console.log('Win-Back offer purchase successful:', result);
  // TODO: Handle successful purchase in your UI
} catch (err) {
  console.error('Win-Back Offer purchase failed:', err);
  // TODO: Handle failed purchase in your UI
}
try {
  final purchaseParams = PurchaseParams.package(package, winBackOffer: selectedWinBackOffer);
  final purchaseResult = await Purchases.purchase(purchaseParams);
  // TODO: Handle successful purchase in your UI
} catch (e) {
  print('Win-Back offer purchase failed: $e');
  // TODO: Handle failed purchase in your UI
}
Purchases.purchasePackageWithWinBackOffer(
  package,
  winBackOffer,
  ({ productIdentifier, customerInfo }) => {
    // TODO: Handle successful purchase in your UI
  },
  ({ error, userCancelled }) => {
    // TODO: Handle failed purchase in your UI
  }
);
try {
  const purchaseResult = await Purchases.purchasePackageWithWinBackOffer({
    aPackage: aPackage,
    winBackOffer: winBackOffer,
  });

  // TODO: Handle successful purchase in your UI
} catch (err) {
  // TODO: Handle failed purchase in your UI
}
Purchases.sharedInstance.purchase(
    packageToPurchase = packageToPurchase,
    winBackOffer = winBackOffer,
    onError = { error: PurchasesError, userCancelled: Boolean ->
        // TODO: handle failed purchase in your UI
    },
    onSuccess = { transaction: StoreTransaction, customerInfo: CustomerInfo ->
        // TODO: handle successful purchase in your UI
    }
)
Purchases purchases = GetComponent<Purchases>();
purchases.PurchasePackageWithWinBackOffer(
    package,
    winBackOffers[0],
    (productIdentifier, customerInfo, userCancelled, purchaseError) =>
    {
        if (purchaseError != null)
        {
            // TODO: handle failed purchase in your UI
            return;
        }

        // TODO: handle successful purchase in your UI
    }
);
For more information on displaying and purchasing products on your paywall, check out our Displaying Products and Making Purchases guides.
Redeeming a Win-Back Offer in a StoreKit StoreView
You can also redeem win-back offers in a StoreKit StoreView with the following SwiftUI code:
- Swift
StoreView.forOffering(
    offering,   // The offering you'd like to use
    icon: { product in
        // Return your custom icon view for each product
        Image(systemName: "dollarsign.circle")
            .resizable()
            .aspectRatio(contentMode: .fit)
            .frame(width: 50, height: 50)
            .padding()
    },
    placeholderIcon: {
        // Return a custom placeholder icon while loading
        ProgressView()
            .progressViewStyle(.circular)
    }
)
Considerations
- Since win-back offers use StoreKit 2 under the hood, you must upload an in-app purchase key to RevenueCat to use win-back offers. See our guide on In-App Purchase Key Configuration for step-by-step instructions.
Next Steps
- For a guided walkthrough of implementing Subscription Offers into a Swift app check out our blog →