Debugging
View and understand Purchases logs
This section assumes you've followed our Quickstart section of our Getting Started guide to install and configure our SDK.
RevenueCat's SDK will log important information and errors to help you understand what is going on behind the scenes. You can enable more detailed debug logs with the logLevel property. You can set this immediately in your app while testing, before you configure Purchases.
- Swift
- Obj-C
- Kotlin
- Java
- React Native
- Flutter
- Code
- Cordova
- Capacitor
Purchases.logLevel = .debug
Purchases.configure(withAPIKey: <public_sdk_key>, appUserID: <my_app_user_id>)
RCPurchases.logLevel = RCLogLevelDebug;
[RCPurchases configureWithAPIKey:@<public_sdk_key> appUserID:@<my_app_user_id>];
Purchases.logLevel = LogLevel.DEBUG
Purchases.configure(PurchasesConfiguration.Builder(context, apiKey = "")
            .appUserID(<my_app_user_id>)
            .build()
Purchases.setLogLevel(LogLevel.DEBUG);
Purchases.configure(new PurchasesConfiguration.Builder(context, <api_key>).appUserID(<my_app_user_id>).build());
Purchases.setLogLevel(Purchases.LOG_LEVEL.DEBUG);
Purchases.configure({
    apiKey: "<public_sdk_key>",
    appUserID: "<my_app_user_id>",
});
await Purchases.setLogLevel(LogLevel.debug);
PurchasesConfiguration pc = PurchasesConfiguration(<public_sdk_key>);
await Purchases.configure(pc);
Purchases.SetLogLevel(Purchases.LogLevel.Debug);
Purchases.setLogLevel(LOG_LEVEL.DEBUG);
Purchases.setLogLevel({ level: LOG_LEVEL.DEBUG });
On iOS, disabling OS_ACTIVITY_MODE in your Xcode scheme will block debug logs from printing in the console. If you have debug logs enabled, but don't see any output, go to Product -> Scheme -> Edit Scheme... in Xcode and uncheck the OS_ACTIVITY_MODE environment variable.
Debug UI
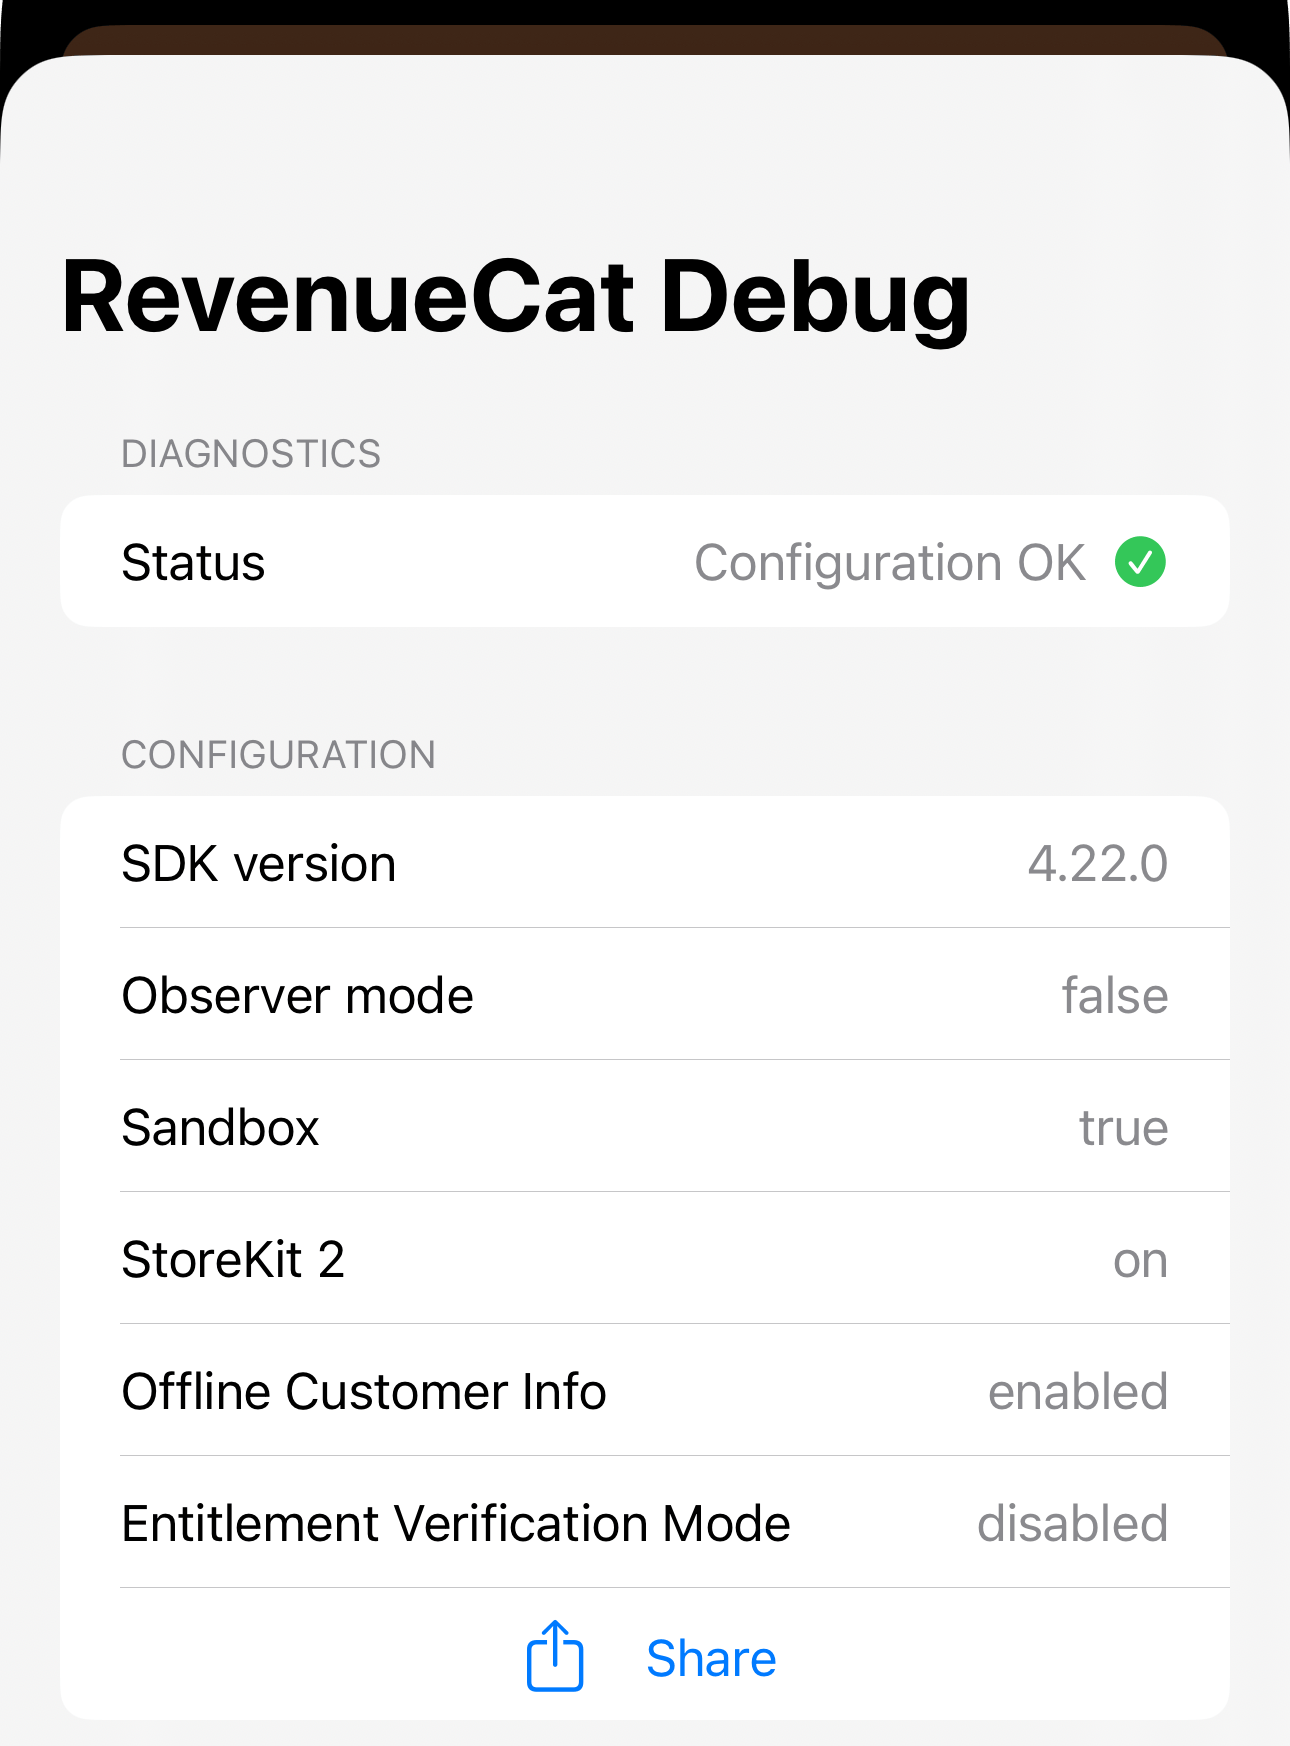
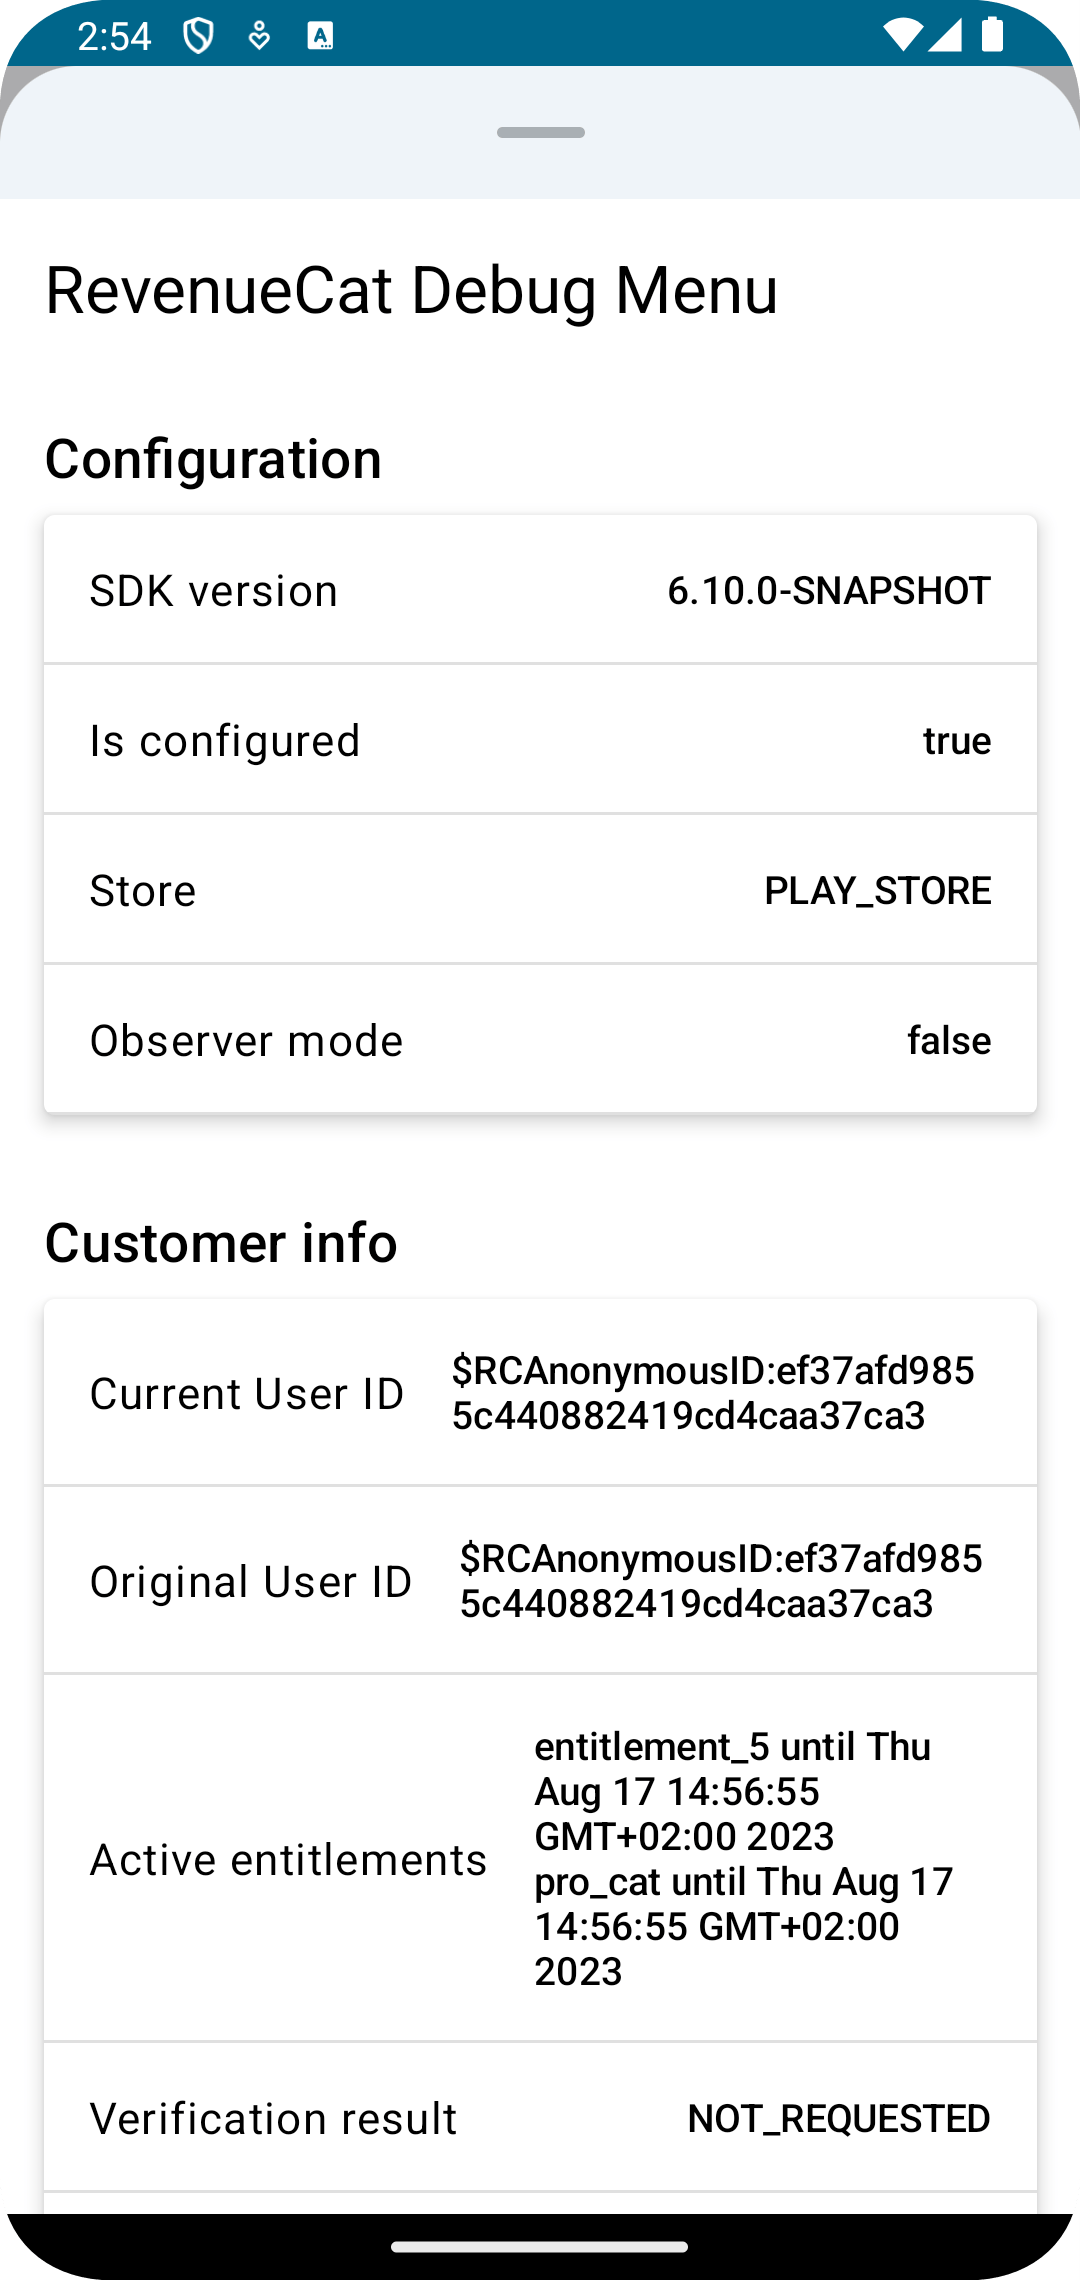
RevenueCat's iOS 4.22.0+ and Android 6.9.2+ SDKs provide an overlay for your app that displays relevant details of the SDK configuration. The debug overlay includes each of your configured Offerings, with the option to purchase any of the products and validate access to entitlements.
iOS / macOS / visionOS
- SwiftUI
- UIKit
// To display the overlay in SwiftUI, add the `.debugRevenueCatOverlay()` to your view.

// This will display it automatically on app-launch:
ContentView()
    .debugRevenueCatOverlay()

// Alternatively, you can control when to present it:
@State private var debugOverlayVisible: Bool = false

var body: some View {
    Button {
        self.debugOverlayVisible = true
    } label: {
        Text("Display debug screen")
    }
    .debugRevenueCatOverlay(isPresented: self.$debugOverlayVisible)
}
// To display the overlay in UIKit, use the `presentDebugRevenueCatOverlay` method on any UIViewController:
self.presentDebugRevenueCatOverlay()

// or, initialize the DebugViewController and present it manually:
let debugOverlay = RevenueCat.DebugViewController()
self.present(debugOverlay, animated: true)
You can export your configuration details in JSON format to share with RevenueCat support if you need to open a support ticket.
Note: The debug UI won't compile for release builds, so you'll need to disable the behavior before archiving for release.
Android
In order to use the overlay, you need to include the debug view library which is available on Maven and can be included via Gradle. Currently, this is only available as a Jetpack Compose Composable.

- Code
debugImplementation "com.revenuecat.purchases:purchases-debug-view:9.1.0"
releaseImplementation "com.revenuecat.purchases:purchases-debug-view-noop:9.1.0"
Then, you can use it from your own @Composable's like this:
- Code
var displayRCDebugMenu by remember { mutableStateOf(false) }

DebugRevenueCatBottomSheet(
    onPurchaseCompleted = { /* Handle purchase completion */ },
    onPurchaseErrored = { error ->
        if (error.userCancelled) { /* Handle purchase cancelled */ }
        else { /* Handle purchase error */ }
    },
    isVisible = displayRCDebugMenu,
    onDismissCallback = { displayRCDebugMenu = false }
)
Reference
| Debug Section | Details |
|---|---|
| Diagnostics | The status of your configuration based on access to the RevenueCat API with your API key |
| Configuration | SDK configuration based on your configure parameters |
| Customer Info | The configured users’ IDs as well as entitlement details |
| Offerings | Each of your configured Offerings, packages, and products. Only includes Offerings with products accessible via StoreKit. See our guide on Empty Offerings if your Offerings aren’t populating |
Debug Logs
All logs from the SDK are prepended with "[Purchases]", you can use this string as a filter in your log output to clearly see the logs that are from Purchases.
Reference
Emojis currently available on the following platforms:
- Android version >= 4.0.2
- iOS version >= 3.10.1
| Icon(s) | Log Level | Description | Required Actions |
|---|---|---|---|
| 🍎 ‼️ | Error | Error/warning messages generated from Apple | View error handling doc if on Error level |
| 🤖 ‼️ | Error | Error/warning messages generated from Google | View error handling doc if on Error level |
| 📦 ‼️ | Error | Error/warning messages generated from Amazon | View error handling doc if on Error level |
| 😿 ‼️ | Error | Error messages generated from RevenueCat | View error handling doc |
| 😻 | Debug | Success messages generated from RevenueCat | No action required, for informational purposes |
| 😻💰 | Info | RevenueCat received purchase information | No action required, for informational purposes |
| 💰 | Debug | Messages related to your products | No action required, for informational purposes |
| ℹ️ | Debug | Messages detailing events that occur in your app | No action required, for informational purposes |
| 👤 | Debug | Messages related to a user's App User ID | No action required, for informational purposes |
| ⚠️ | Warn | Warning messages about implementation | View log message for additional information |
Messages that have the double red exclamation marks prefix (‼️) attached provides important information regarding your implementation and may require your attention. Paying attention to the source of the message will assist you during the development process. Be sure to address these logs before shipping your app.
Sample Output
Below are sample logs generated when setting debugLogsEnabled = true. Keep an eye out for any ERROR level logs, status codes other than 200, or any Invalid Product Identifiers.
- Code
- Code
[Purchases] - DEBUG: Debug logging enabled.
[Purchases] - DEBUG: SDK Version - 2.0.0
[Purchases] - DEBUG: Initial App User ID - <APP_USER_ID>
[Purchases] - DEBUG: Changing App User ID: (null) -> <APP_USER_ID>
[Purchases] - DEBUG: GET /v1/subscribers/<APP_USER_ID>
[Purchases] - DEBUG: GET /v1/subscribers/<APP_USER_ID>/products
[Purchases] - DEBUG: Delegate set
[Purchases] - DEBUG: Sending latest purchaser info to delegate
[Purchases] - DEBUG: Vending purchaserInfo from cache
[Purchases] - DEBUG: Vending purchaserInfo from cache
[Purchases] - DEBUG: applicationDidBecomeActive
[Purchases] - DEBUG: No cached entitlements, fetching
[Purchases] - DEBUG: GET /v1/subscribers/<APP_USER_ID> 200
[Purchases] - DEBUG: Purchaser info updated, sending to delegate
[Purchases] - DEBUG: GET /v1/subscribers/<APP_USER_ID>/products 200
[Purchases] - DEBUG: Requesting products with identifiers: {(
    onetime,
    annual,
    onemonth
)}
[Purchases] - DEBUG: Products request finished
[Purchases] - DEBUG: Valid Products:
[Purchases] - DEBUG: annual - <SKProduct: 0x600000308980>
[Purchases] - DEBUG: onemonth - <SKProduct: 0x6000003131b0>
[Purchases] - DEBUG: onetime - <SKProduct: 0x600000313180>
[Purchases] - DEBUG: Invalid Product Identifiers - (
)
[Purchases] - DEBUG: 2 completion handlers waiting on products
[Purchases] - DEBUG: makePurchase - onemonth
[Purchases] - DEBUG: PaymentQueue updatedTransaction: onemonth (null) ((null)) - 0
[Purchases] - DEBUG: PaymentQueue updatedTransaction: onemonth <TRANSACTION_ID> ((null)) - 2
[Purchases] - DEBUG: Finishing onemonth <TRANSACTION_ID> ((null))
[Purchases] - DEBUG: PaymentQueue removedTransaction: onemonth <TRANSACTION_ID> ((null)) - 2
[Purchases] - DEBUG: ℹ️ Debug logging enabled
[Purchases] - DEBUG: ℹ️ SDK Version - 3.10.1
[Purchases] - DEBUG: 👤 Initial App User ID - <APP_USER_ID>
[Purchases] - DEBUG: ℹ️ PurchaserInfo cache is stale, updating caches
[Purchases] - DEBUG: ℹ️ Offerings cache is stale, updating caches
[Purchases] - DEBUG: ℹ️ Vending PurchaserInfo from cache.
[Purchases] - DEBUG: ℹ️ There are no requests currently running, starting request GET /subscribers/<APP_USER_ID>
[Purchases] - DEBUG: ℹ️ API request started: GET /v1/subscribers/<APP_USER_ID>
[Purchases] - DEBUG: ℹ️ API request started: GET /v1/subscribers/<APP_USER_ID>/offerings
[Purchases] - DEBUG: ℹ️ No cached Offerings, fetching from network
[Purchases] - DEBUG: ℹ️ API request completed with status: GET /v1/subscribers/<APP_USER_ID>/offerings 200
[Purchases] - DEBUG: ℹ️ Requesting products from the store with identifiers: {(
    onetime,
    annual,
    onemonth
)}
[Purchases] - DEBUG: ℹ️ Products request finished.
[Purchases] - DEBUG: 💰 Retrieved SKProducts:
[Purchases] - DEBUG: 💰 onetime - <SKProduct: 0x600000308980>
[Purchases] - DEBUG: 💰 annual - <SKProduct: 0x600000308980>
[Purchases] - DEBUG: 💰 onemonth - <SKProduct: 0x600000308980>
[Purchases] - WARN: 🍎‼️ Invalid Product Identifiers - (
)
[Purchases] - DEBUG: ℹ️ 3 completion handlers waiting on products
[Purchases] - DEBUG: ℹ️ makePurchase
[Purchases] - DEBUG: 💰 Purchasing product from package  - annual in Offering main
[Purchases] - DEBUG: ℹ️ PaymentQueue updatedTransaction: annual <TRANSACTION_ID> ((null)) (null) - 0

[Purchases] - DEBUG: 💰 Finishing transaction annual <TRANSACTION_ID> ((null))
[Purchases] - DEBUG: ℹ️ PaymentQueue removedTransaction: annual <TRANSACTION_ID> (null (null)) (null) - 1
Custom Log Handling
You can set a custom log handler for redirecting debug logs to your own logging system. By default, this sends info, warning, and error messages. You can enable this by setting the logHandler property. You should set this immediately in your app while testing, before you configure Purchases.
- Swift
- Obj-C
- Kotlin
- Java
- React Native
- Flutter
- Code
- Cordova
- Capacitor
/* Custom Log handling object that will handle all of our types: debug, info, warn, and error.

You can edit the message to display whatever you would like for each case. */
let handler: (LogLevel, String) -> Void  = { level, message in
    switch level {
    case .verbose:
        print("[VERBOSE] \(message)")
    case .debug:
        print("[DEBUG] \(message)")
    case .info:
        print("[INFO] \(message)")
    case .warn:
        print("[WARN] \(message)")
    case .error:
        print("[ERROR] \(message)")
    }
}

// After configuring a custom log handler, set the `logHandler` property on Purchases
Purchases.logHandler = handler
Purchases.configure(withAPIKey: <public_sdk_key>, appUserID: <my_app_user_id>)
// After configuring a custom log handler, set the `logHandler` property on Purchases
RCPurchases.logHandler = RCLogHandler;
[RCPurchases configureWithAPIKey:@<public_sdk_key> appUserID:@<my_app_user_id>];
// After configuring a custom log handler, set the `logHandler` property on Purchases
Purchases.logHandler = logHandler;
Purchases.configure(PurchasesConfiguration.Builder(context, apiKey = "")
            .appUserID(<my_app_user_id>)
            .build()
// After configuring a custom log handler, set the `logHandler` property on Purchases
Purchases.setLogHandler = logHandler
Purchases.configure(new PurchasesConfiguration.Builder(context, <api_key>).appUserID(<my_app_user_id>).build());
// After configuring a custom log handler, set the `logHandler` property on Purchases
Purchases.setLogHandler = logHandler;
Purchases.configure({
    apiKey: "<public_sdk_key>",
    appUserID: "<my_app_user_id>",
});
// After configuring a custom log handler, set the `logHandler` property on Purchases
await Purchases.setLogHandler(logHandler);
PurchasesConfiguration pc = PurchasesConfiguration(<public_sdk_key>);
await Purchases.configure(pc);
// After configuring a custom log handler, set the `logHandler` property on Purchases
Purchases.SetLogHandler(logHandler);
// After configuring a custom log handler, set the `logHandler` property on Purchases
Purchases.setLogHandler(logHandler);
// After configuring a custom log handler, set the `logHandler` property on Purchases
Purchases.setLogHandler(logHandler);
Debugging with Hybrids
Xcode and Android Studio are our recommended IDEs for debugging. If you are a developer who works primarily with one of our hybrid SDKs and have not encountered either before, you can follow these instructions to open your app and find the debug logs to share with RevenueCat Support or your internal team.
Xcode
Install Xcode from the App Store.. Within the main folder of your app, you should have a folder titled ios that contains an Xcode project file, ending in .xcodeproj. Open this with Xcode from your file finder or from Xcode itself. You should be able to build and run your app in Xcode without additional editing but if you are getting an error, check that all General and Build Settings are filled out. Your debugger output will open automatically upon building within the Xcode window, and from here you can follow the instructions above.
Android Studio
Install Android Studio from the Google Developers website. You can open the main folder of your app in Android Studio either from the main menu or from your file finder. There shouldn't be any additional editing needed to build and run your app, although you most likely need to set up a virtual Android device when running your app for the first time. The debugging output will open automatically upon building within the Android Studio window, and from here you can follow the instructions above.
Expo
Expo can be a useful framework when developing Android and iOS apps with React Native, however it can be difficult to view debug logs during development. Expo apps for iOS can use Console.app on Mac to view debug logs, while Android projects are still recommended to use Android Studio. Here is the Expo documentation for full native debugging with Xcode and Android Studio. For specific help on debugging your React Native Expo project, feel free to reach out to RevenueCat support.
No and Low Code App Builders
When debugging with No and Low Code App Builders, it's important to remember that you'll still need to utilize the specific IDE associated with the device you're targeting. For instance, if you're trying to access debug logs for an app you created using FlutterFlow and you're running it on an iOS device, you'll need to build and run the app through XCode. If you're trying to run it on an Android device, you would need to run it through Android Studio. The process for retrieving debug logs remains the same as explained above.
Considerations
- You can open your Xcode project directly from Google - to do so, right click on the
iosfolder, hover over Flutter, and click "OpenIOS module in Xcode". - You can also run and debug your iOS project inside Android Studio itself by adding an iOS simulator and choosing it as the device before building. To do this however, you will still need Xcode installed.
- Flutter projects using Swift may fail to show debug logs in the console if you are using Android Studio. We recommend running your Flutter iOS project using Xcode to view debug logs from the Purchases SDK.
- If using Flutterflow or another low to no code app builder, it may not be possible for you to see debug logs. We recommend reaching out to the app builder's support team directly to help troubleshoot.
Next Steps
- If you spotted any errors while debugging, make sure you're handling errors correctly
- You've verified that Purchases is running correctly, time to start making purchases in sandbox