Configure Customer Center
To configure Customer Center, locate the Monetization Tools section of your Project Settings and click on Customer Center.
The default configuration includes a set of paths, feedback surveys, and promotional offers that can be used immediately once your promotional offers are configured; or you can customize the configuration to your specific needs.
Default configuration
There are four main management options available in Customer Center. These options are configured by default:
- Cancellation
- Missing Purchases
- Refund Request (iOS only)
- Plan Changes (iOS only)
When a customer initially opens the Customer Center, these are the main options they'll see to select from.
| iOS | Android |
|---|---|
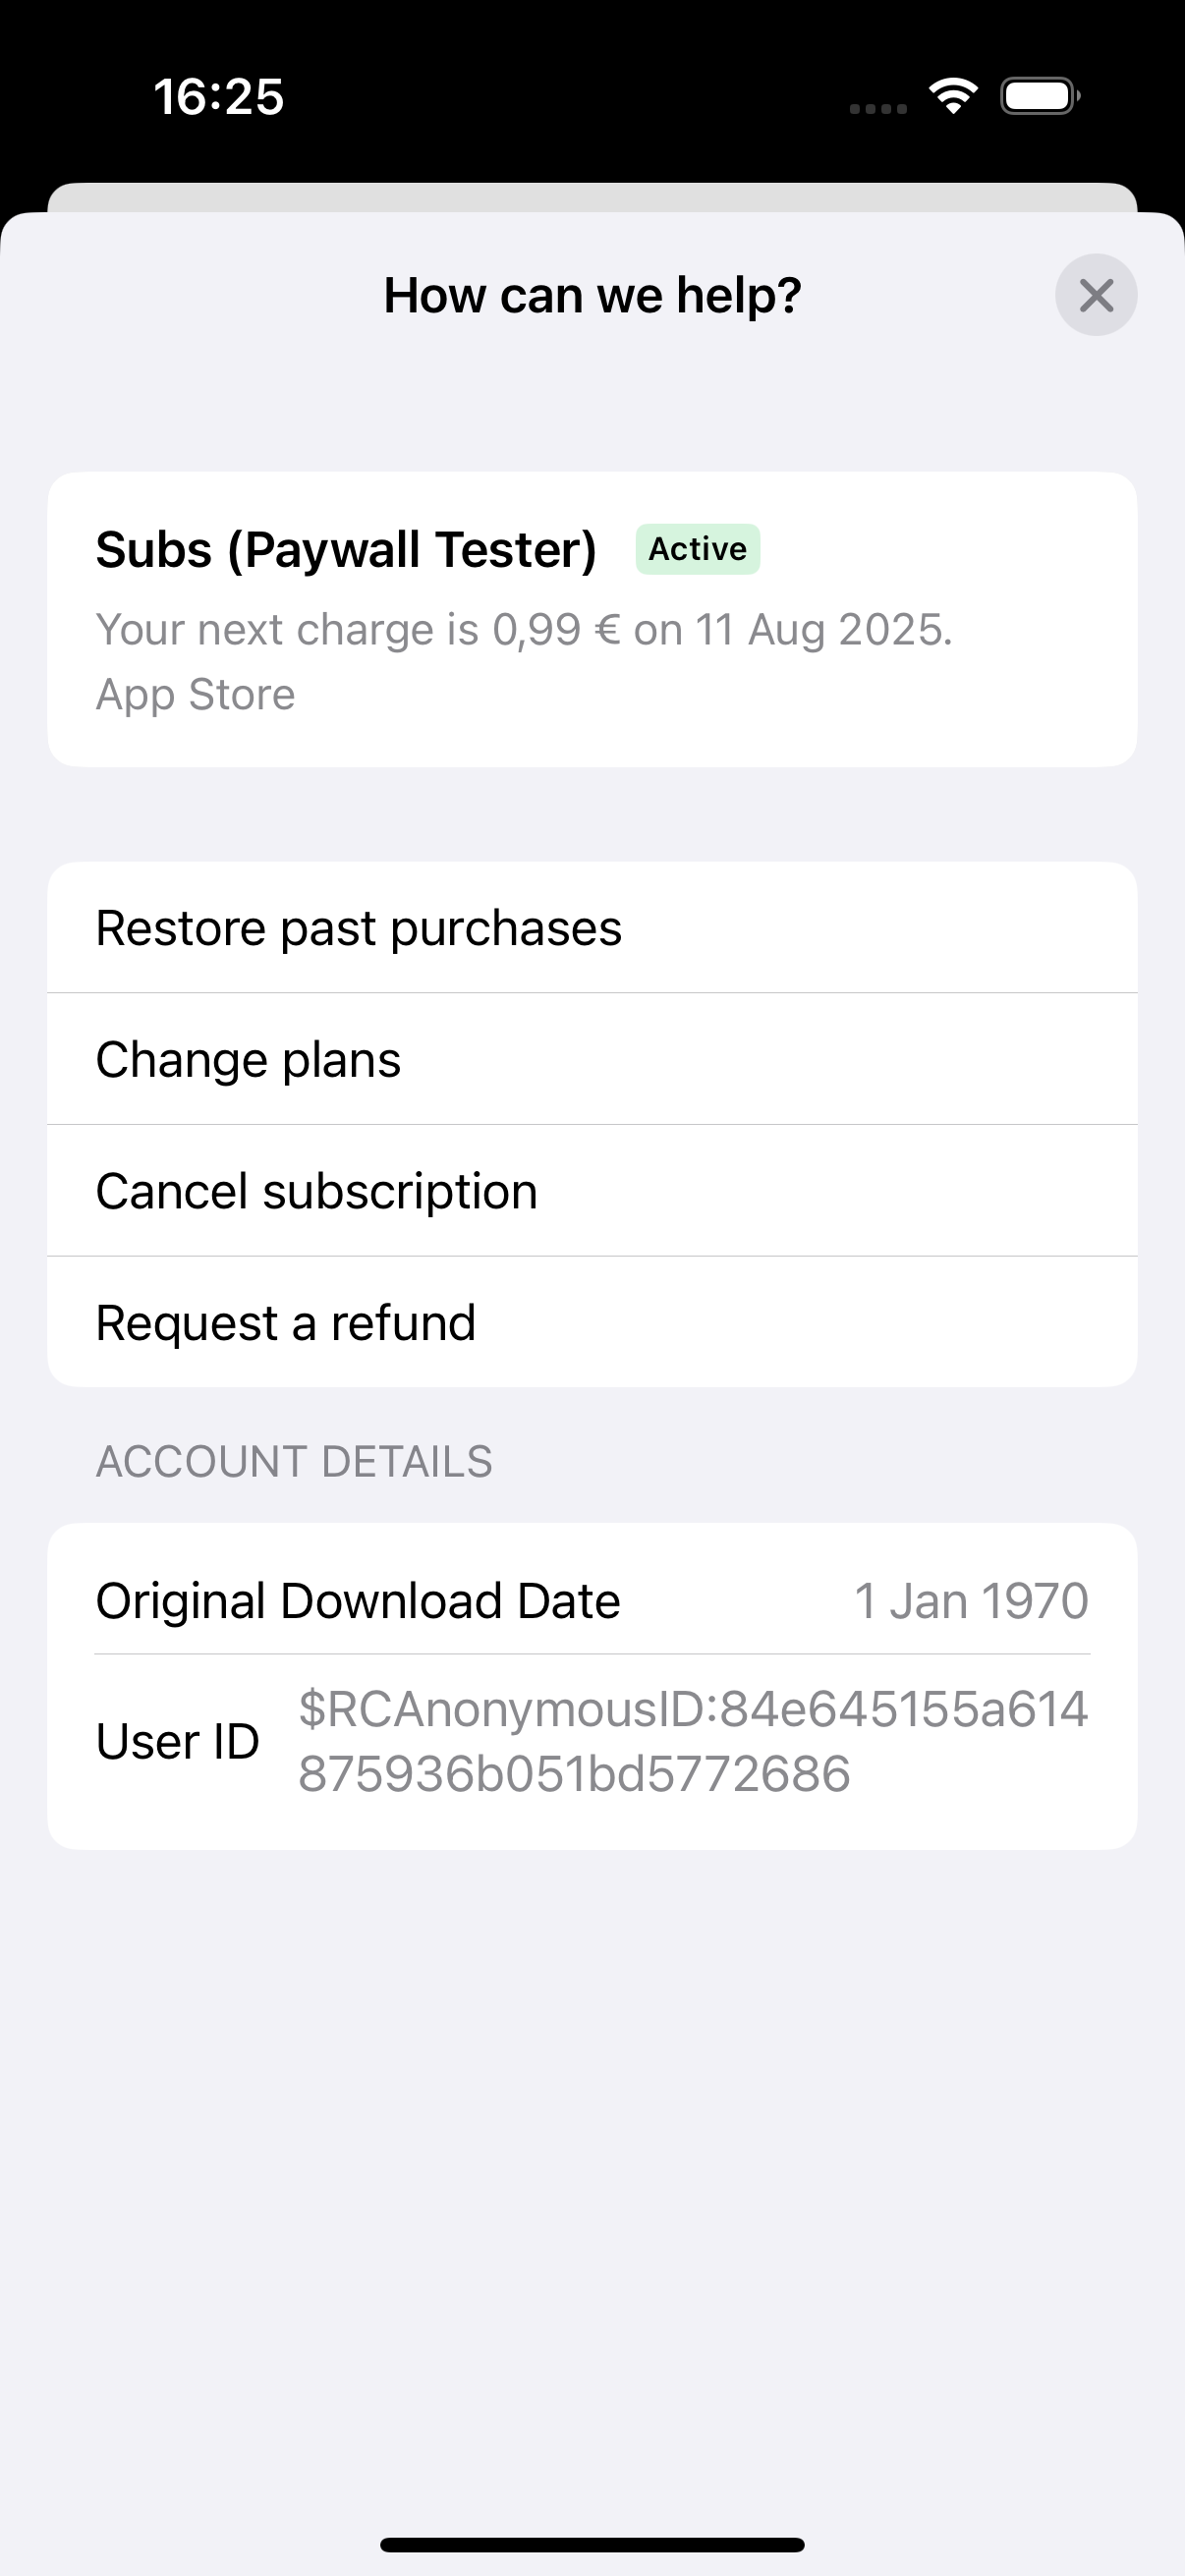 | 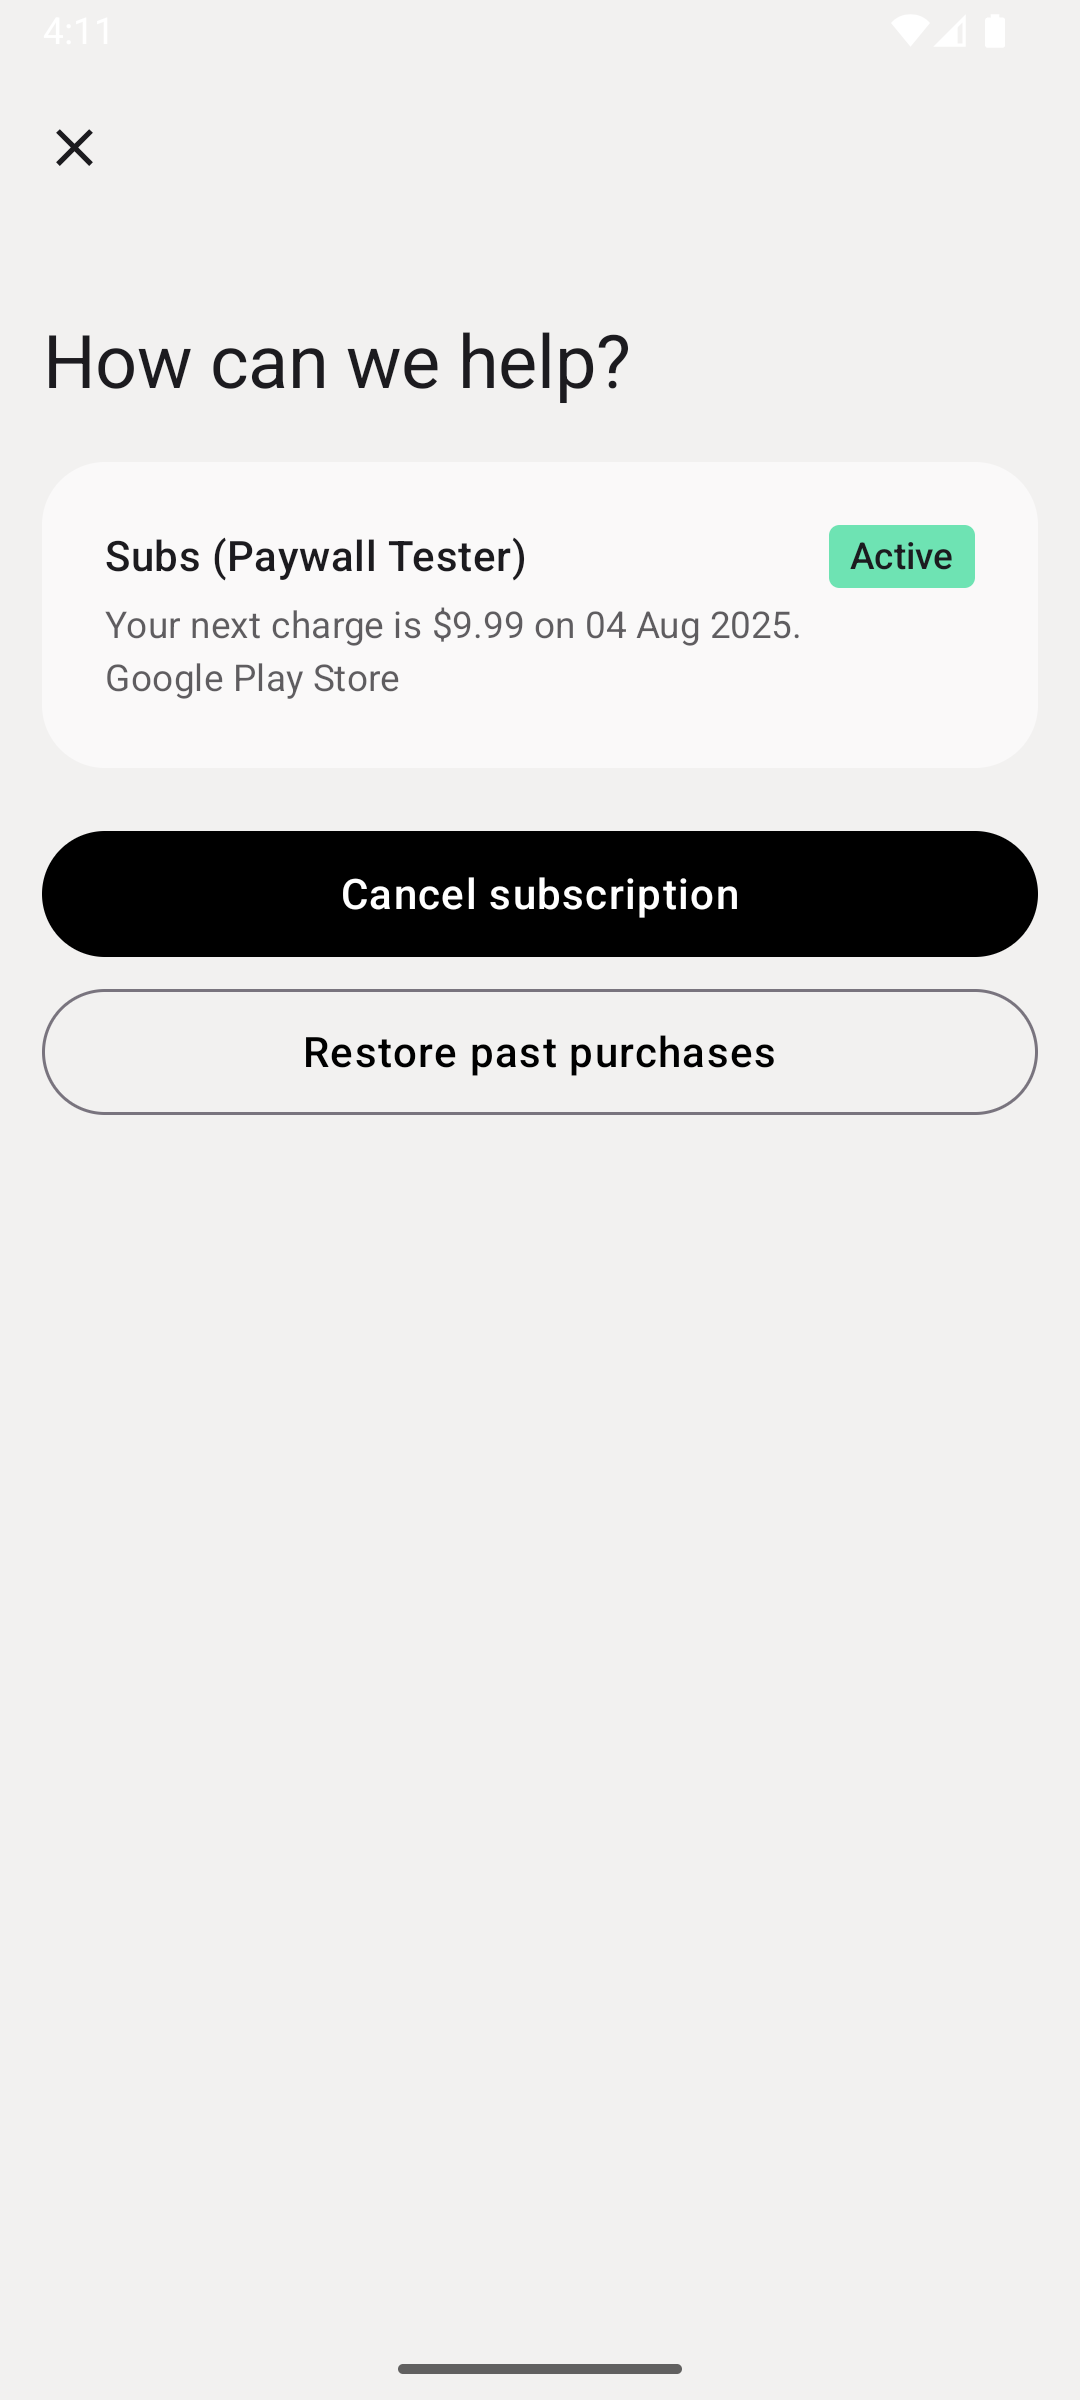 |
Feedback prompts
Any management option can have a custom feedback survey attached to it with a question & answers that you define. You might use a survey simply to understand why a customer selected a given path (e.g. why they're looking to cancel), or you may use a survey to motivate them to change their mind with a compelling promotional offer. Learn more about configuring promotional offers.
The cancellation option is configured with a feedback survey with the following response options:
- "Too expensive"
- "Don't use the app"
- "Bought by mistake"
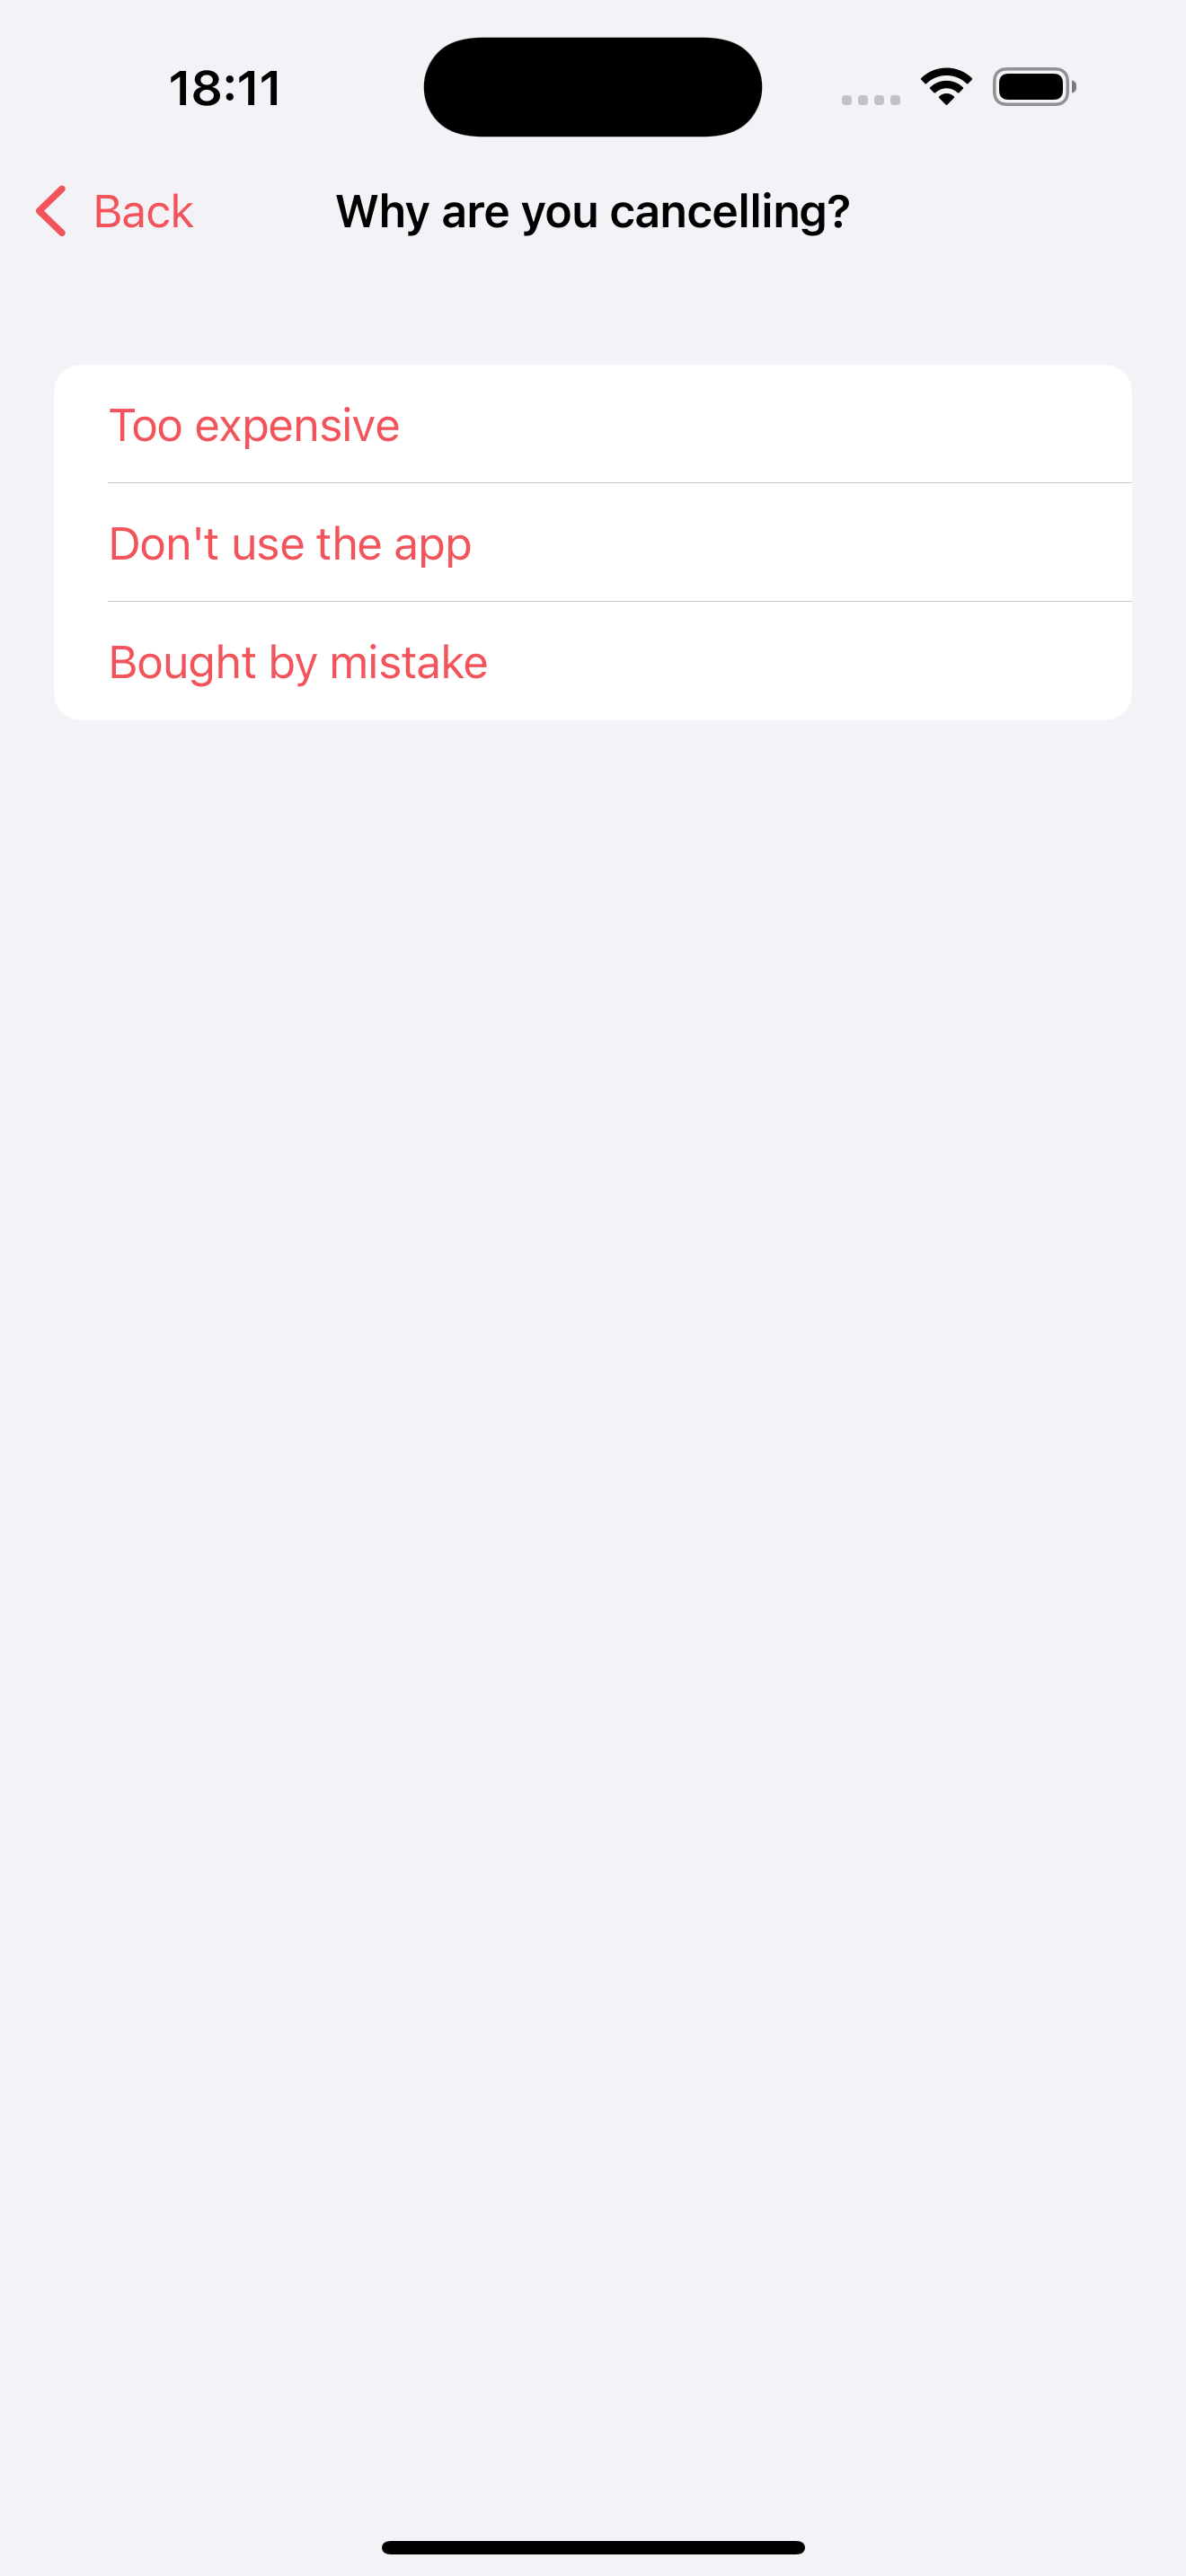
You can check the responses of feedback surveys in the Customer Center Survey Responses chart.
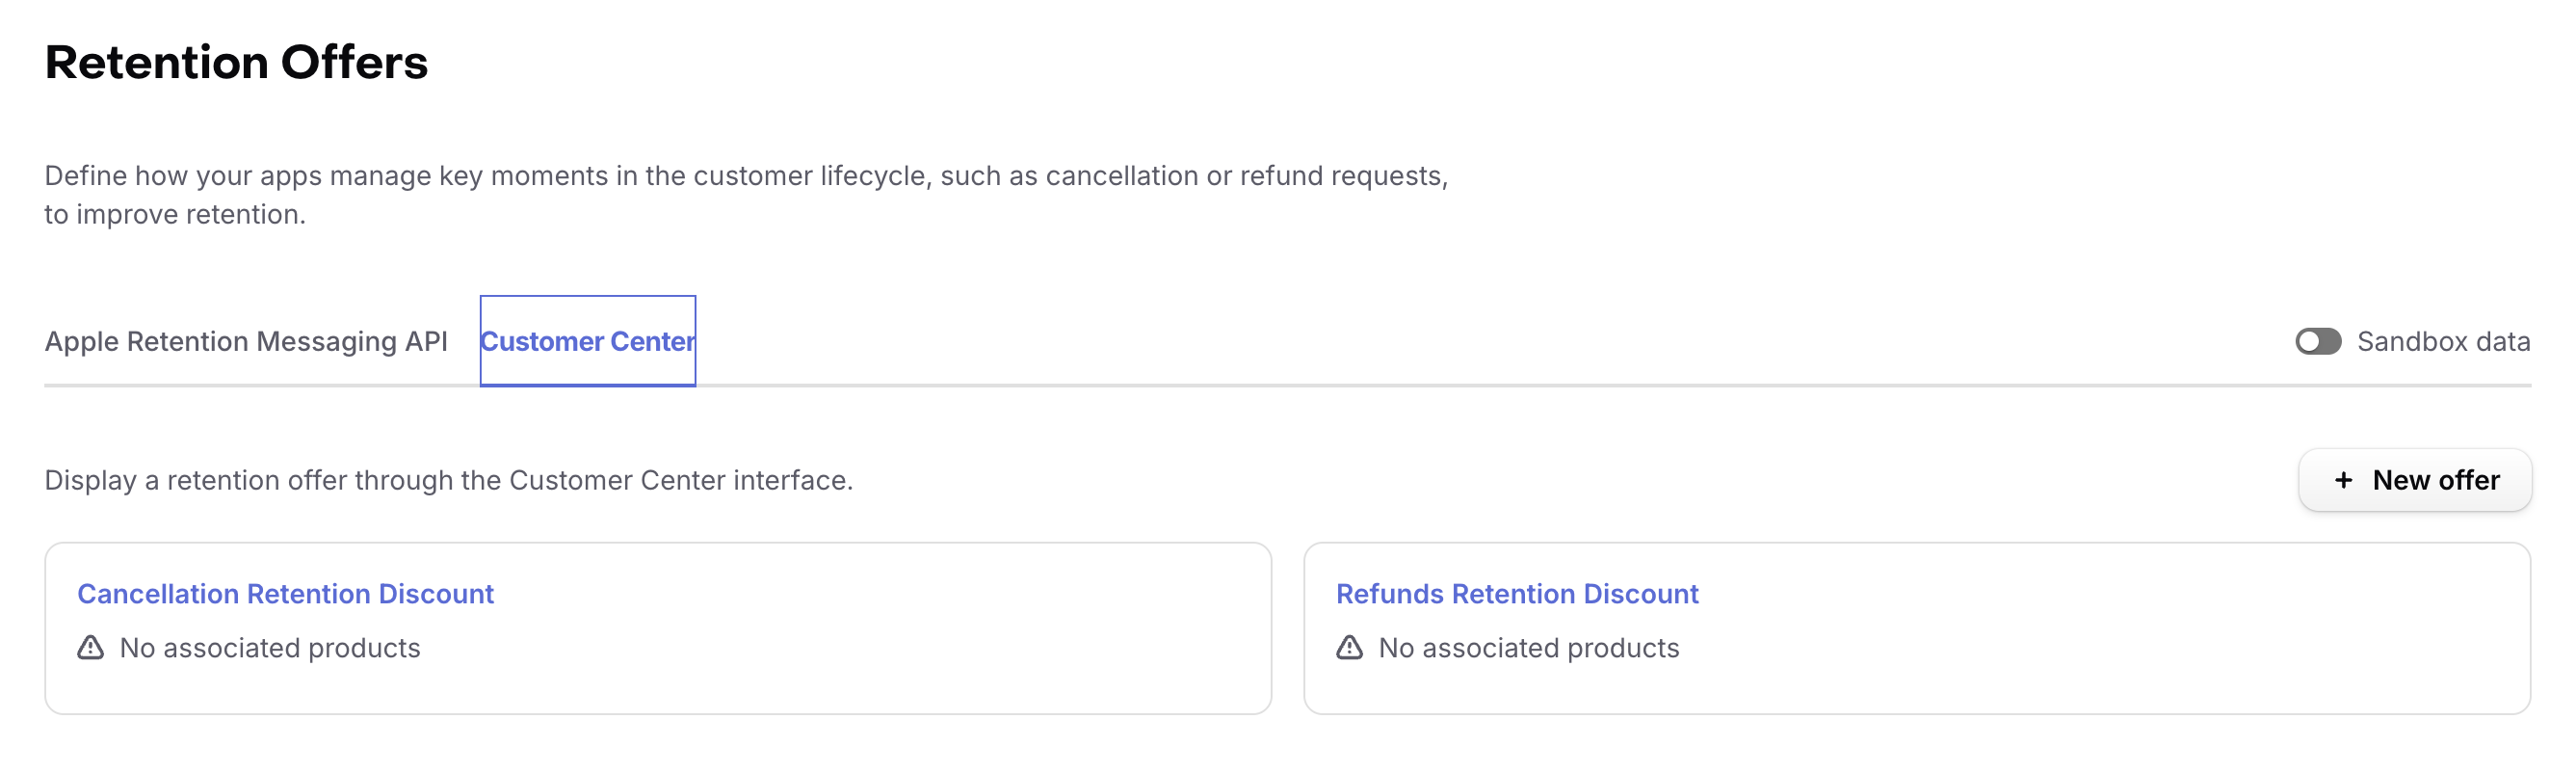
Promotional offers
Promotional offers are attachable to particular feedback survey options and to paths. We think you might be able to reduce churn if you capture customers who are looking for a way to make changes to their subscription if you offer them a discount at that exact time.
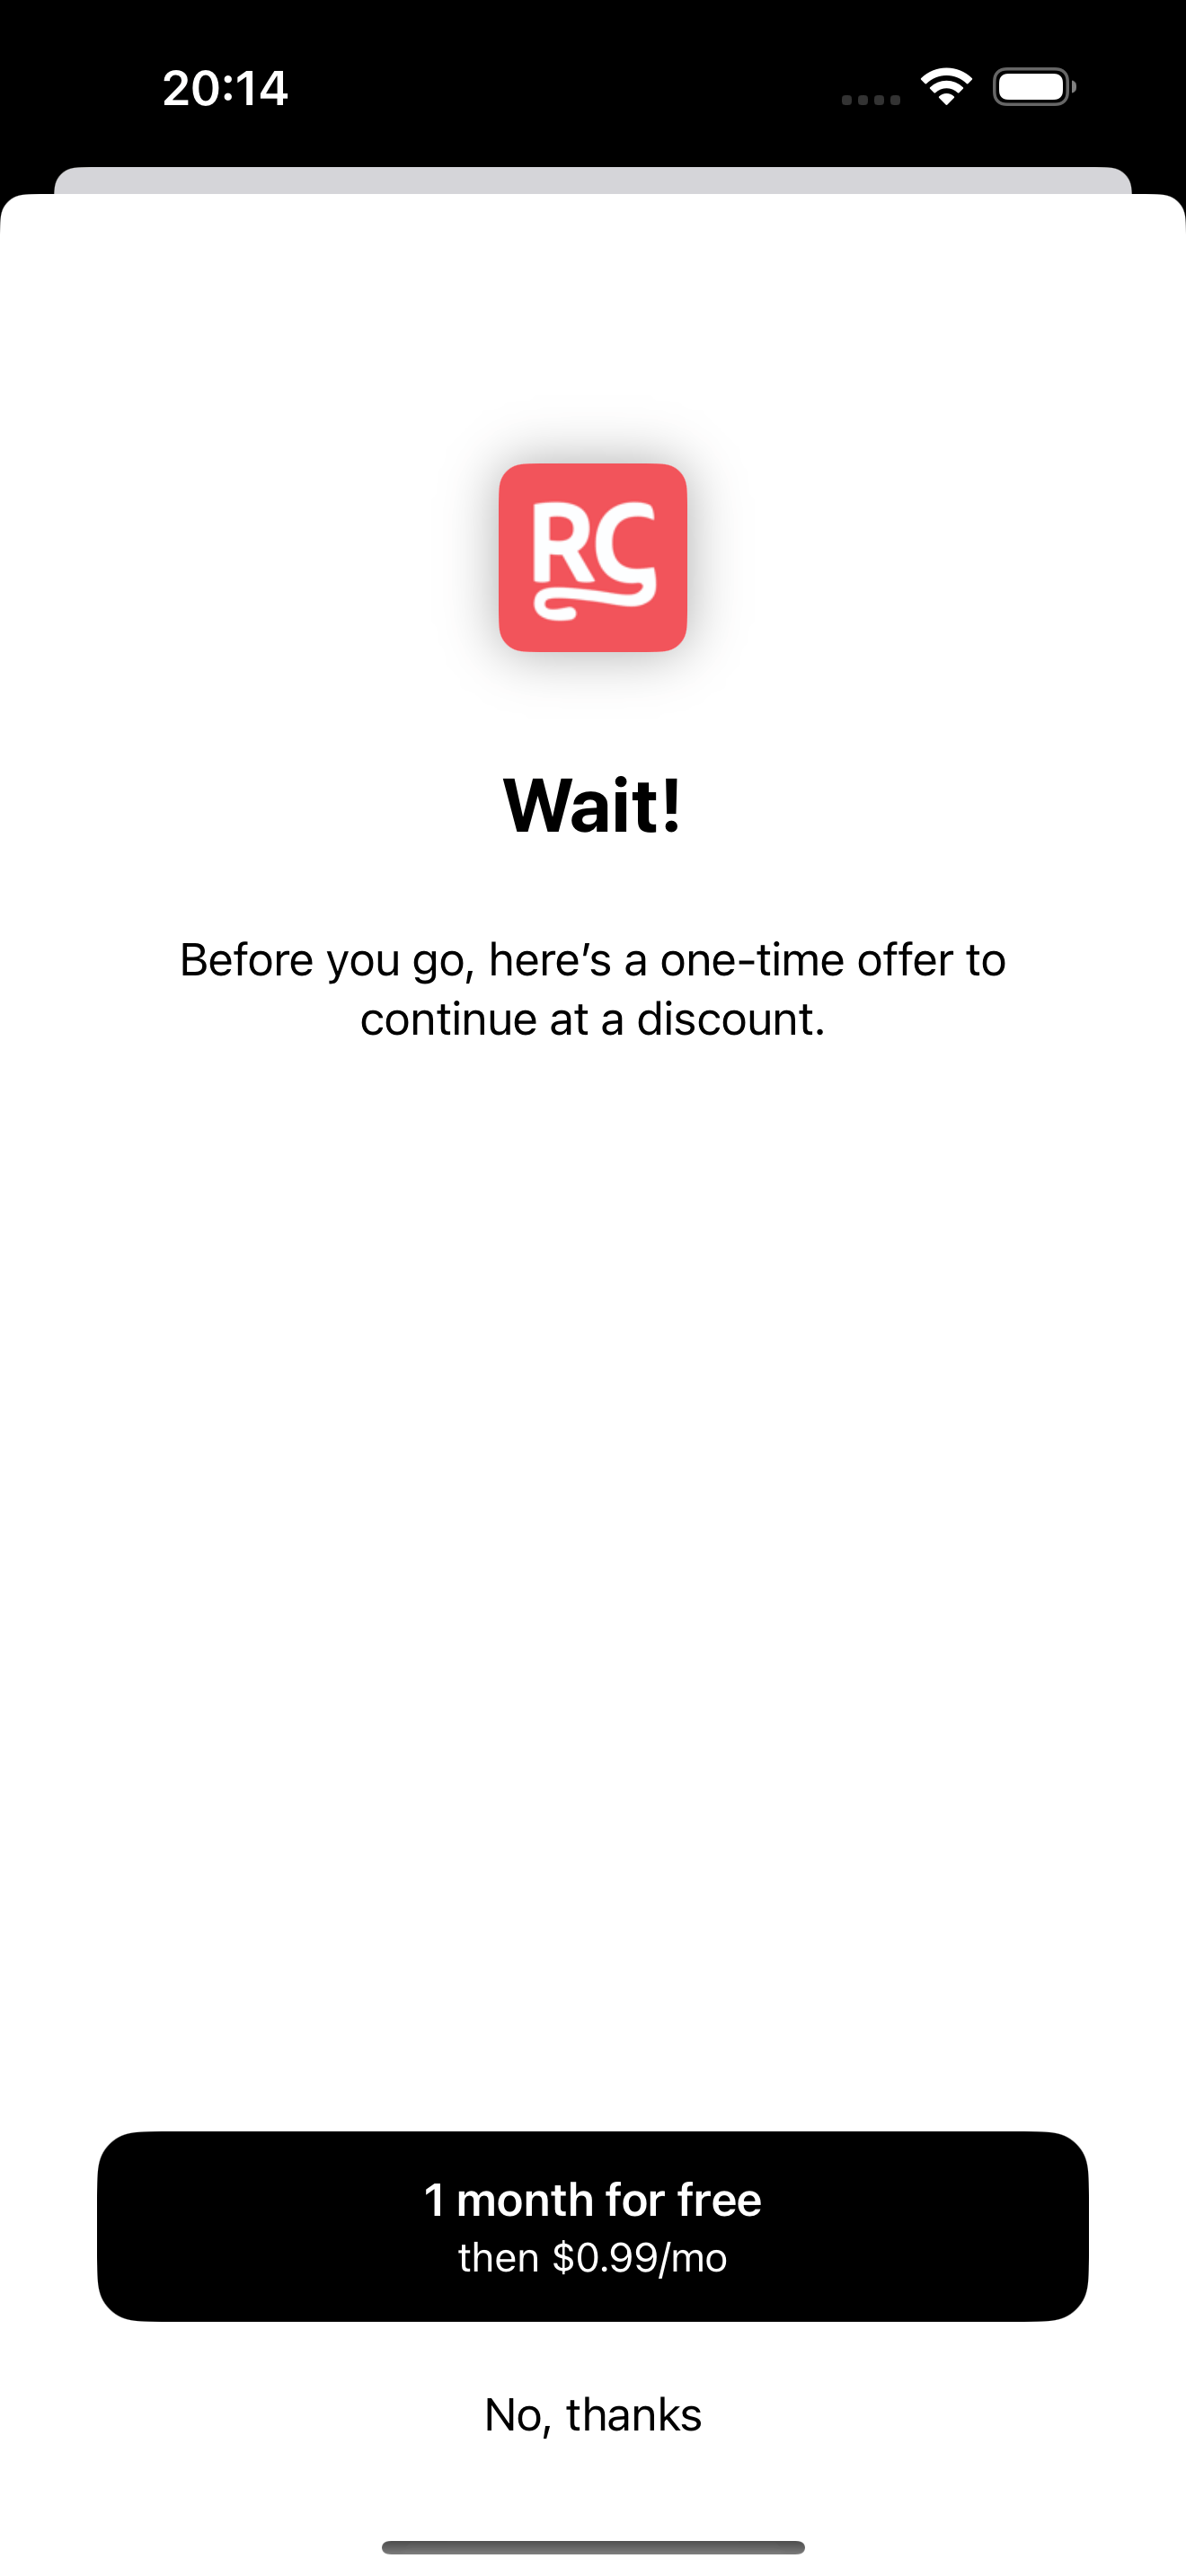
By default, if your customer selects "Too expensive" or "Don't use the app", they'll receive the promotional offer Cancellation Retention Discount. And of course, you can customize these responses and what (if anything) is offered to your liking.
If your customer selects Refund Request, they'll be given the Refunds Retention Discount by default. In order for these promotional offers to be given to your customers, they must be first be created in App Store Connect and Google Play Console.
Required promotional offers
You need to add the store specific promotional offer ids you want to use for each of your products under Lifecycle → Retention, in the Customer Center tab. Otherwise, the promotional offer will not be shown to customers.
The Customer Center will automatically show offers based on specific user actions. By default we have defined it for refunds and cancellations but it can be modified to any of the defined paths. Here’s how it works:
-
Cancellation Retention Discount: By default, for responses in the cancellation survey, RevenueCat will use a promotional offer that you can customize under Lifecycle → Retention, in the Customer Center tab.
-
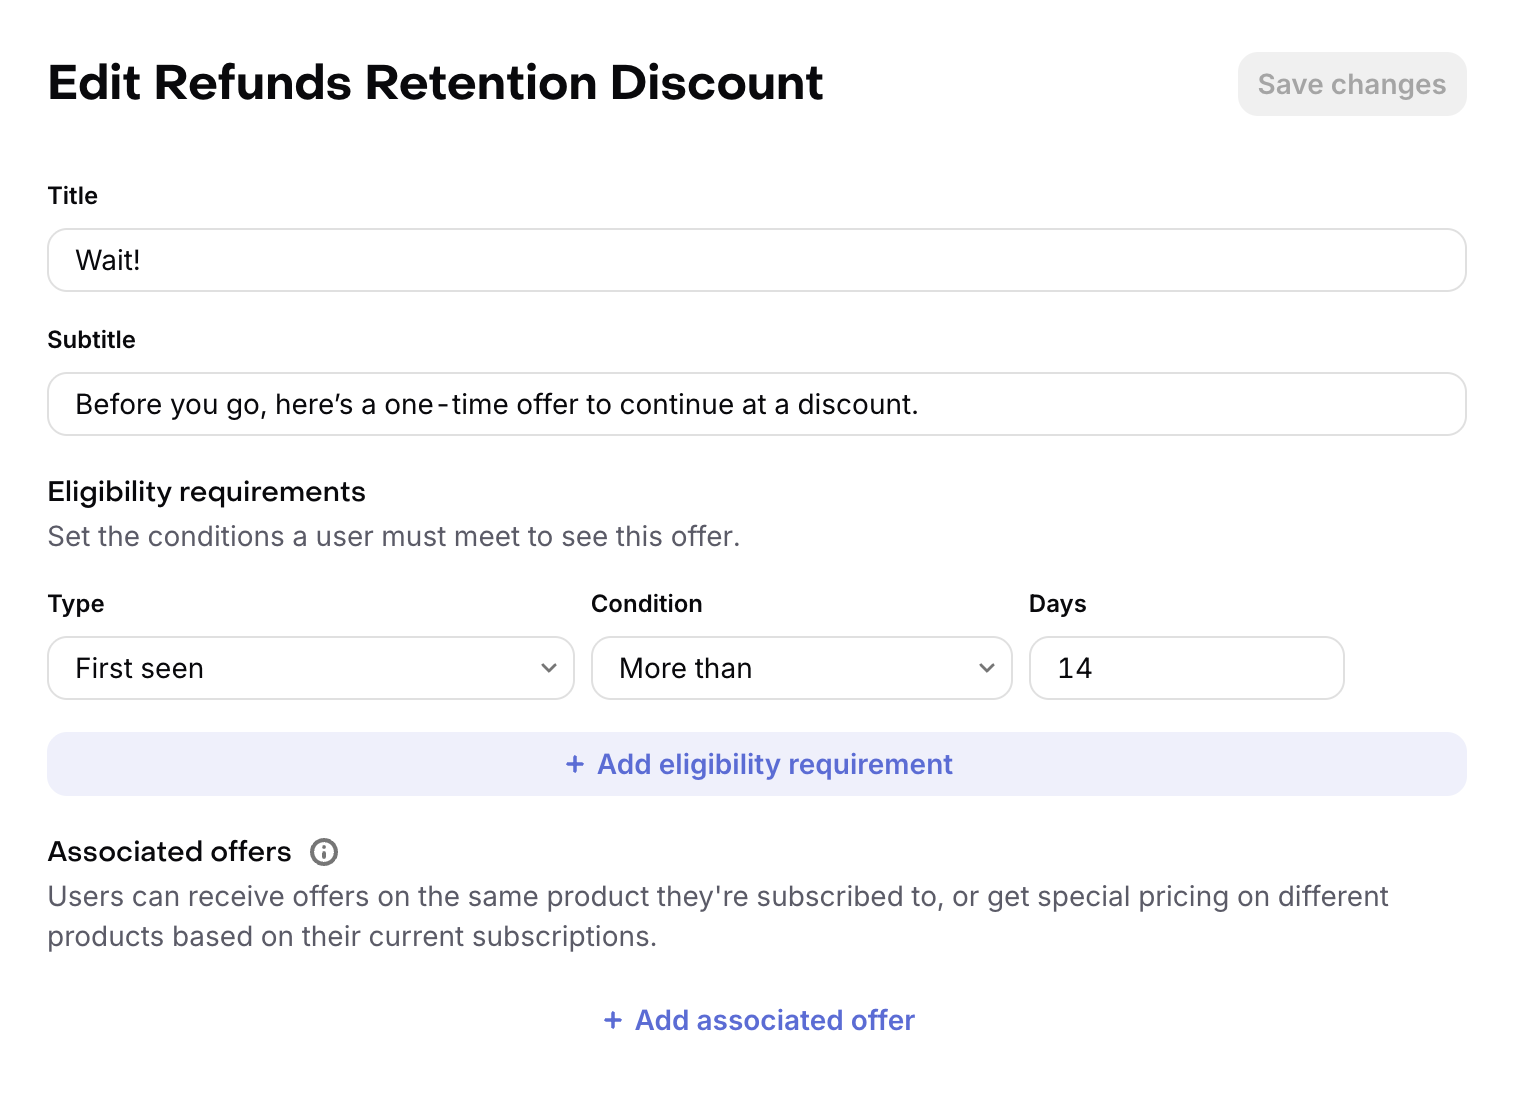
Refund Retention Discount: By default, when a user requests a refund in iOS, RevenueCat will use a promotional offer that you can customize under Lifecycle → Retention, in the Customer Center tab.
This setup enables RevenueCat to automatically match the right offer based on a user’s actions, providing a seamless experience for both cancellation and refund requests.
The SDK will automatically match the right offer based on a user’s actions and its active subscription. If the SDK cannot locate a matching promotional offer id for the currently active user's subscription, it will bypass the survey and proceed with the user’s requested action—either canceling or refunding the subscription.
These promotional offers must be created in App Store Connect and Google Play Store in order to be shown to customers:
- Setting up promotional offers in App Store Connect
- Setting up promotional offers in Google Play Console
After creating the promotional offers for the cancellation and refund offers in App Store Connect and Google Play Store, they need to be assigned to the particular offer under Lifecycle → Retention, in the Customer Center tab.
For example, if you just created an offer with id monthly_subscription_refund_offer in App Store Connect for your monthly subscription product, edit the Refund Retention Discount offer under Lifecycle → Retention → Customer Center tab, and assign the id of the promotional offer id to that monthly subscription product.
You may also customize your configuration to provide other offers, or provide them when the user performs other actions. Learn more about advanced configuration of the Customer Center.
Advanced configuration
The Customer Center is composed of different screens that customers can navigate through. The main screens are defined in the Configuration tab of the Customer Center settings.
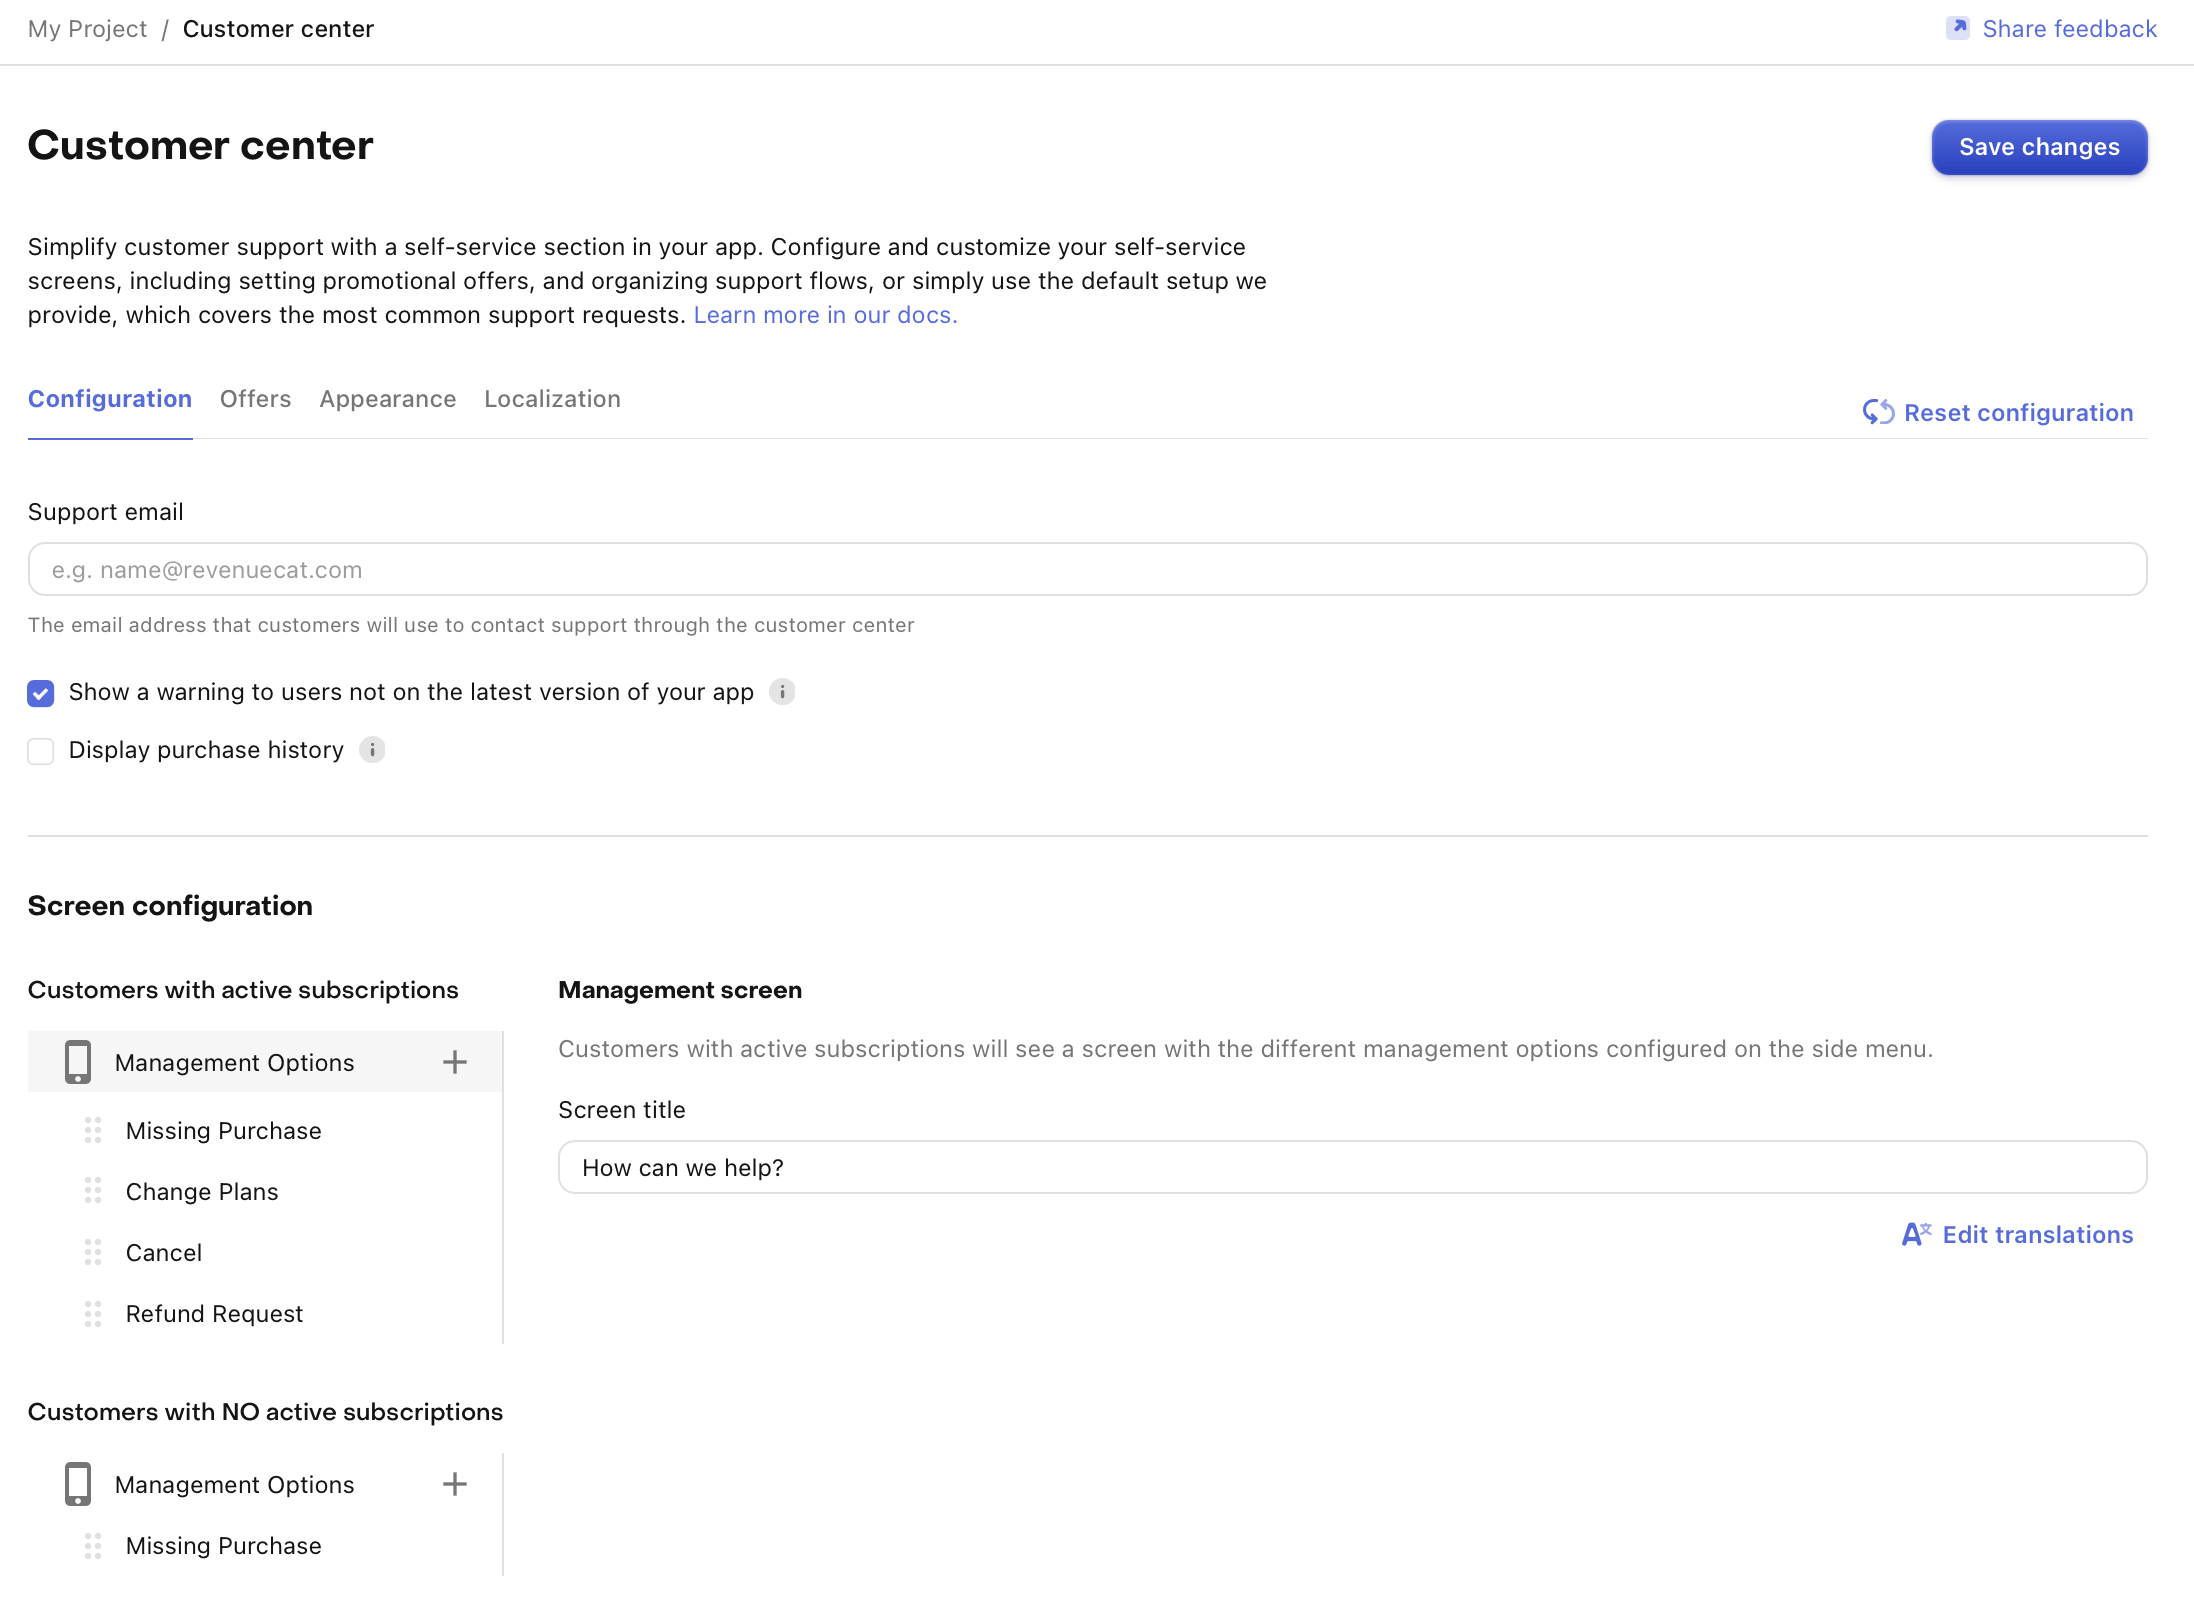
This configuration defines two main screens:
-
Management screen for users with an active subscription: This is the main screen customers see when they have an active subscription. It contains several paths (or actions) that customers can take:
- Missing Purchase
- Cancel Subscription
- Refund Request (iOS only)
- Change Plans (iOS only)
-
Management screen for users without an active subscription: This screen is shown when the customers don't have an active subscription. It typically only offers the option to restore purchases.
You can customize these screens by:
- Adding or removing management options
- Changing the order of the management options
- Modifying the title and subtitle keys to reference different localized strings
Management options
Management options define the different actions customers can take within the Customer Center. Each management option has a unique configuration that determines its behavior.
Let's break down the configuration for each management option:
-
Missing Purchase: Used for restoring previous purchases.
-
Refund Request (iOS only): Allows customers to request refunds.
-
Change Plans (iOS only): Enables customers to switch between different subscription plans.
-
Cancel: Provides an option for customers to cancel their subscription.
-
Custom URL: Allows you to specify a custom URL that customers will be redirected to when they select this management option. This can also be used to link to other sections of your app using deeplinks.
-
Custom Action: Allows to attach a custom identifier to a button, and execute your own code whenever the button is tapped.
Key points about management options:
- Management options can include a promotional offer to present discounts to customers.
- Management options can include a feedback survey to gather information from customers.
- Feedback survey options can have their own promotional offer to provide targeted retention efforts.
You can customize these management options by:
- Adding or removing management options to change available actions.
- Modifying the title to change the displayed text (ensure the key exists in your localization configuration).
- Adding or adjusting promotional offer keys to change or introduce discount offers.
- Adding or adjusting feedback survey keys to change or introduce feedback surveys.
Feedback prompts
Any management option can have a feedback survey attached to it with a question & answers that you configure. You might set one up to:
- Understand why customers are looking to cancel their subscription
- Uncover unmet expectations that led to a refund request, or
- Attempt to persuade customers to change their mind by delivering a promotional offer based on their specific feedback
You can check the responses of feedback surveys in the Customer Center Survey Responses chart.
Promotional offers
Promotional offers can be attached to any feedback survey option or management option to provide an extended trial, discounted price, or another offer of your choosing.
Setting up promotional offers
Unique promotional offers can be assigned to different paths and survey responses in the Customer Center, but first they must be setup in App Store Connect and Google Play Store.
Promotional offers allow you to provide a custom price or trial for a product to existing or previously subscribed customers. These offers are used in the Customer Center to incentivize customers to stay subscribed who otherwise intend to cancel their subscription or request a refund.
- Setting up promotional offers in App Store Connect
- Setting up promotional offers in Google Play Store
Adding promotional offers
In order for these promotional offers to be given to your customers, they must be first be created in App Store Connect and Google Play Store
Promotional offers are defined under Lifecycle → Retention, in the Customer Center tab. Each offer can be referenced from management options or feedback survey options.
Key points about promotional offers:
- Each offer has a unique reference which is internal and used to reference the offer from management options or feedback survey options (e.g.,
Cancelation Retention Discount,Refund Retention Discount). - The eligibility criteria defines conditions for when the offer can be presented.
- The title and subtitle reference localized strings for the offer's display text.
- The product mapping is a map of store product identifiers to promotional offer identifiers. The promotional offer has to be created in App Store Connect before it can be used. Learn more.
To use these offers, you link them from management options or feedback survey options in the configuration tab.
By configuring promotional offers this way, you can create targeted discount strategies for different user actions or feedback responses.
Eligibility conditions for promotional offers
You can customize a promotional offer's eligibility by setting conditions in the eligibility criteria. This allows you to control when and to whom the offer is presented. There are two types of conditions you can use:
- First Seen: This condition is based on when the user was first seen by RevenueCat.
- Time Since First Purchase: This condition is based on the time elapsed since the user's first purchase.
For both condition types, you can set the comparison to be either "More than" or "Less than", allowing you to target customers based on how long they've been using the app or how long they've been customers.
By using these eligibility conditions, you can create targeted offers for different segments of your user base, potentially increasing the effectiveness of your retention strategies.
Support email
The support email is optional and it is the email address that will be used to send emails to your customer in the following cases:
- If your customer chooses the "Missing Purchase" option, where they can contact you if they have trouble restoring their purchase.
- It is also used if the user is trying to manage a subscription that was purchased on a different store than the one they are currently on, for example a Play Store subscription on an iOS device.
The user will only be prompted to contact you if you have configured a support email.
Update warning
Displaying a warning to users not on the latest version of your app is not supported on Android and it requires version 5.14.0 or later of the RevenueCatUI iOS SDK.
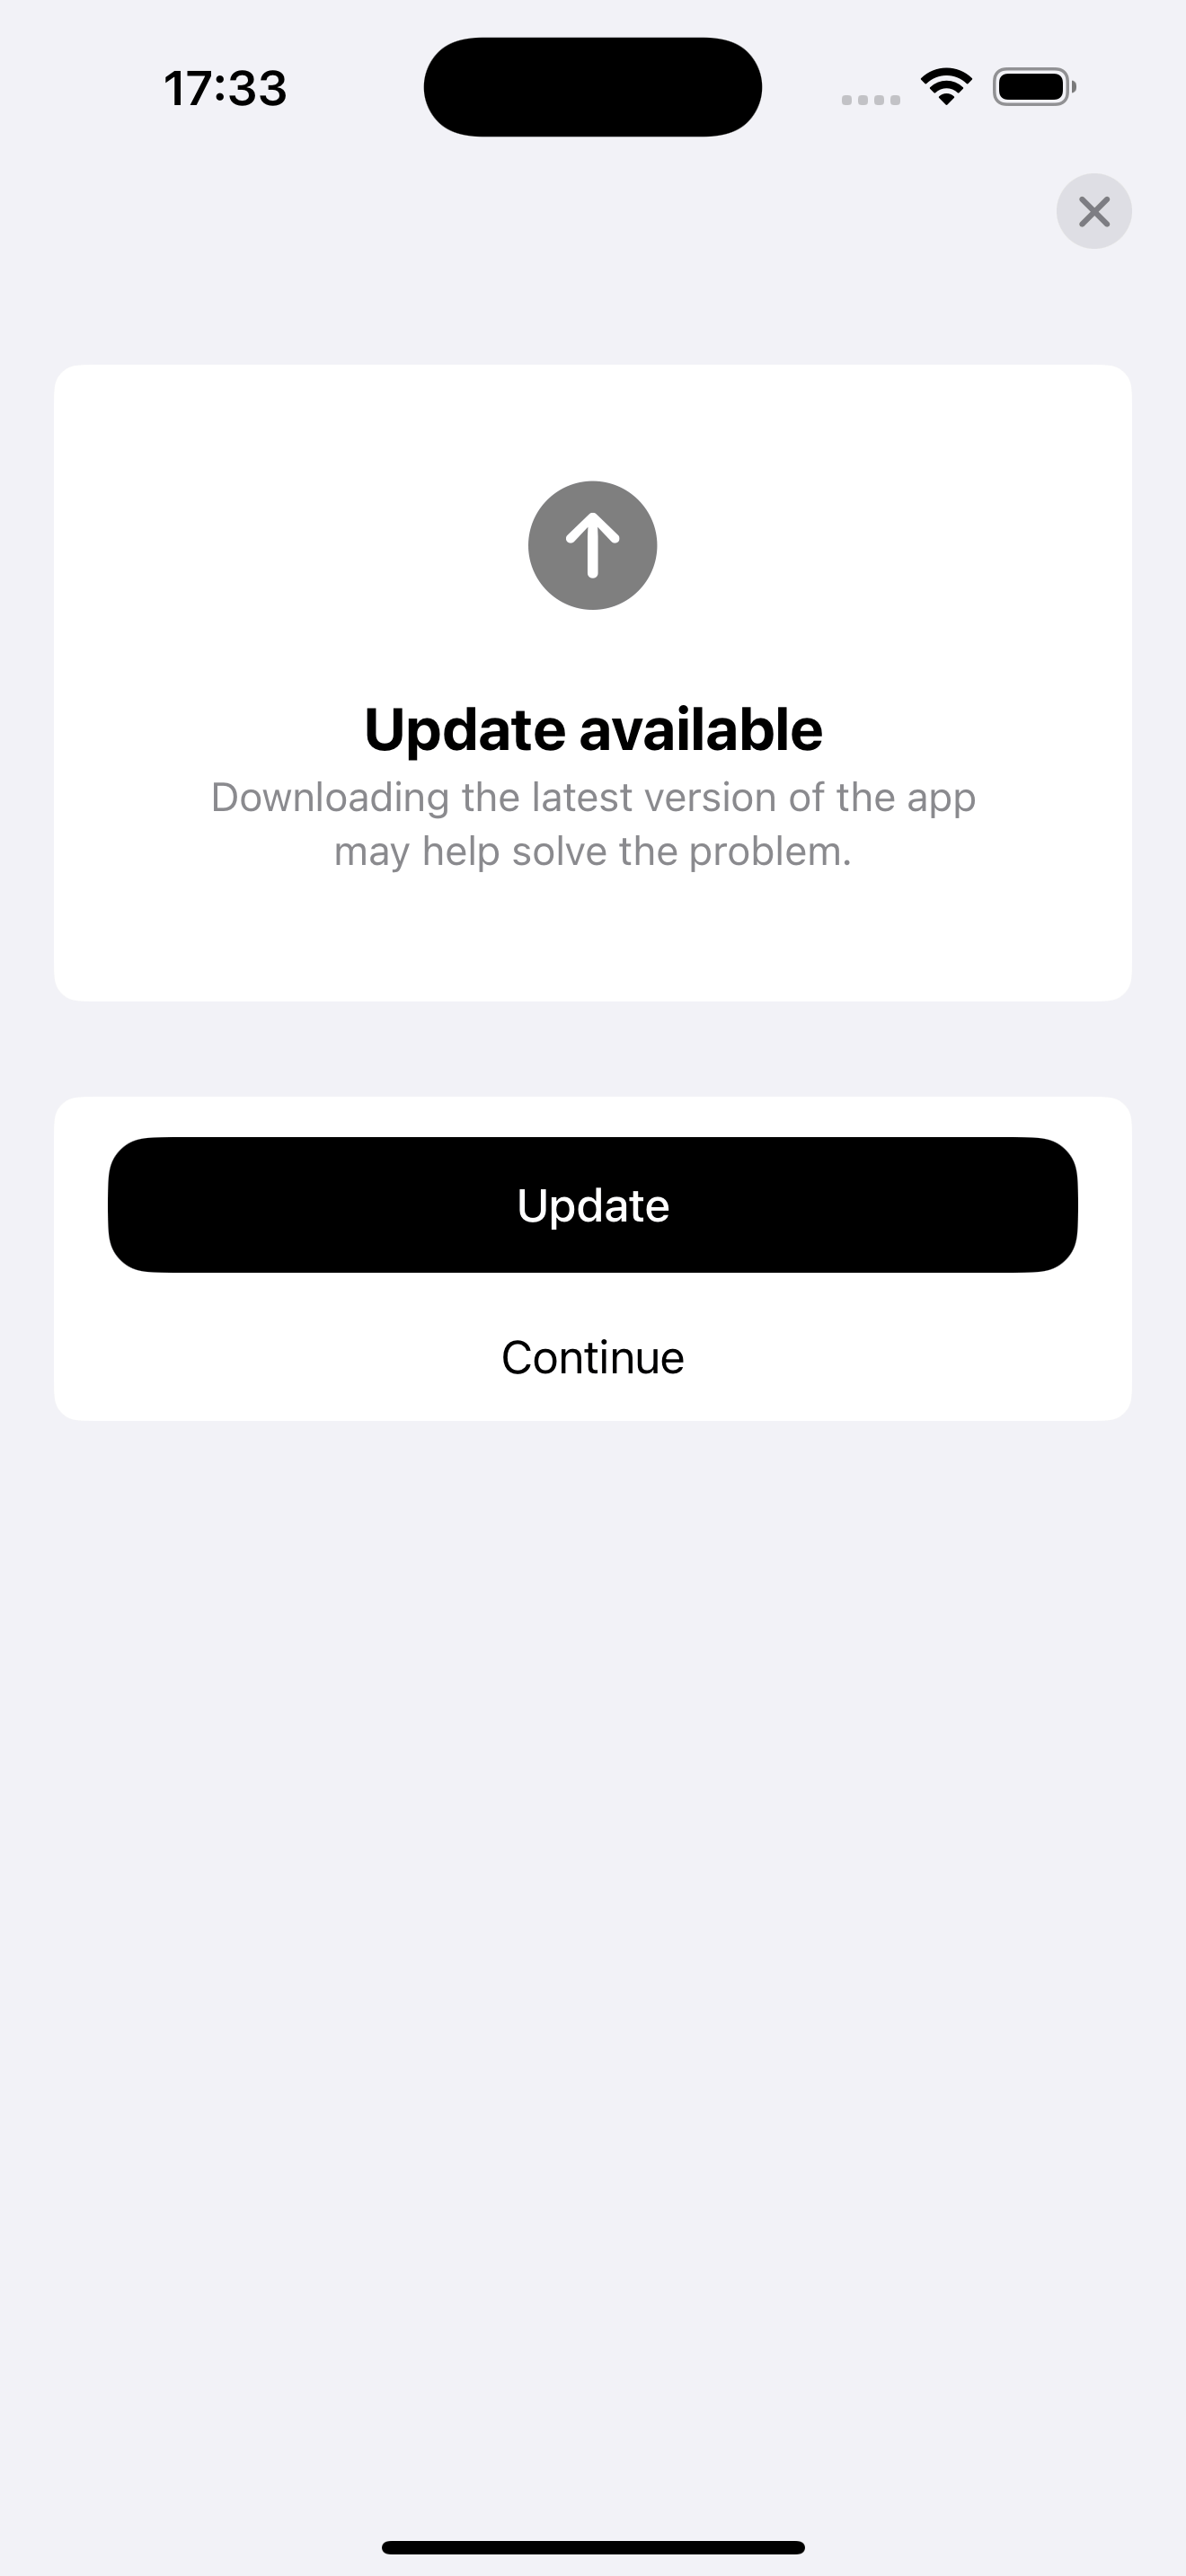
It is possible to show a warning to users not on the latest version of your app. This can be useful to ensure users are using the latest version of your app to manage their subscriptions.
To enable this, you can enable the "Show a warning to users not on the latest version of your app" option in the Customer Center settings.
Purchase history
Displaying a link to display purchase history is not supported on Android and it requires version 5.15.1 or later of the RevenueCatUI iOS SDK.
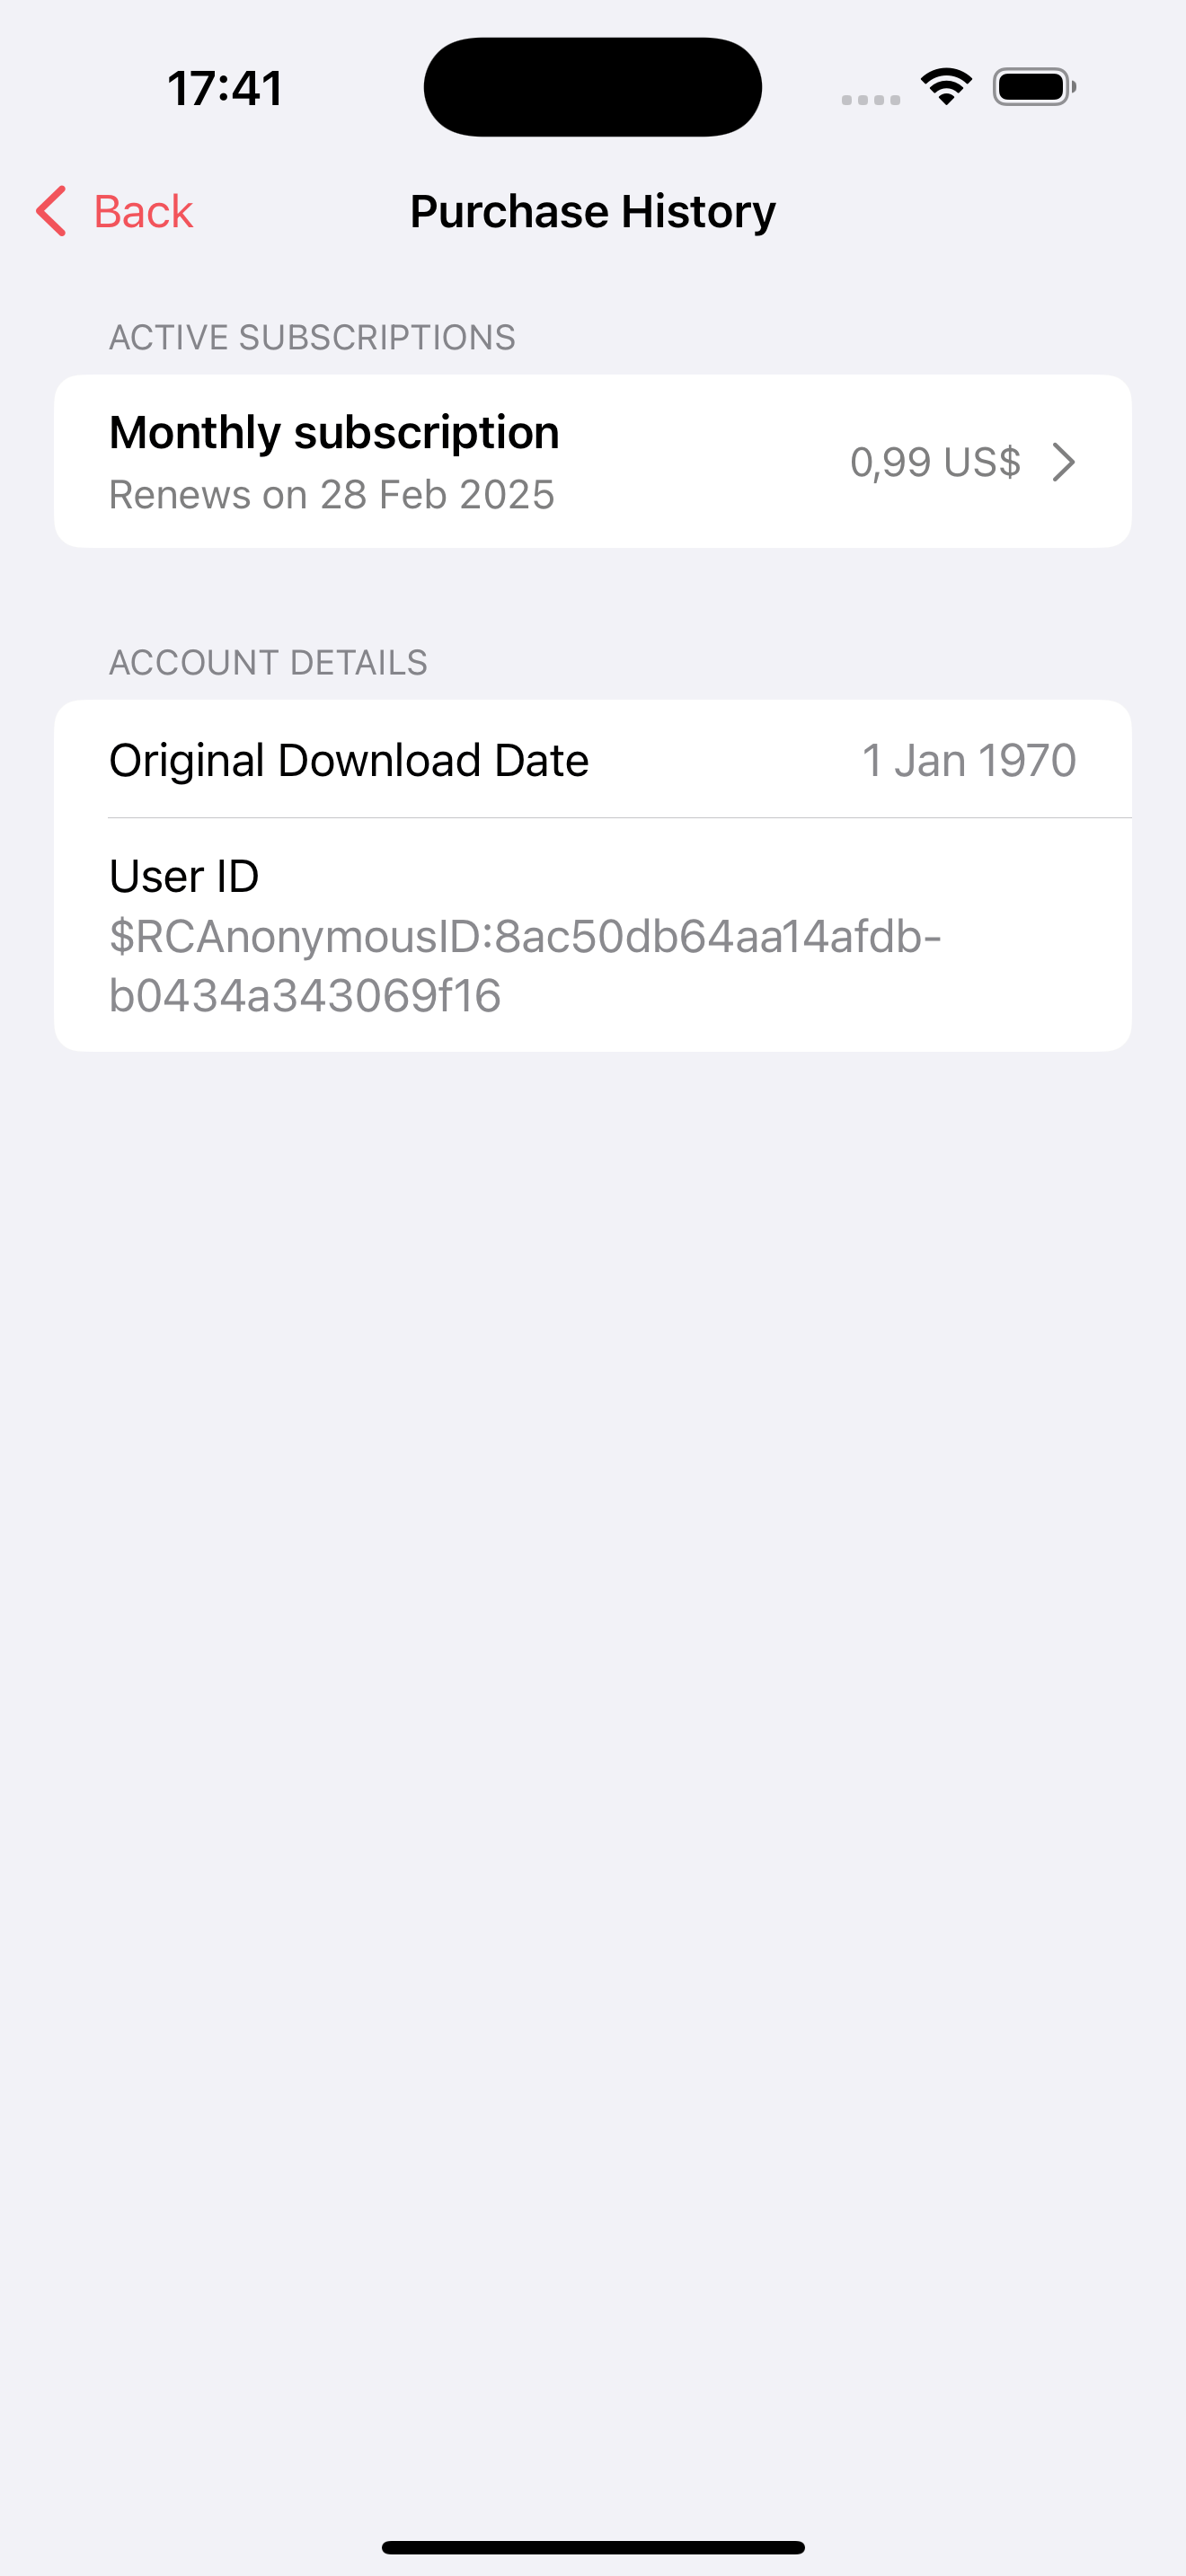
The customer center tries to primarily show the details that are most meaningful to the user. But it is possible to show more details on the purchase history to users.
To enable this, you can enable the "Display a link to purchase history in the main screen of the Customer Center" option in the Customer Center settings. This will display a link to the purchase history in the main screen of the Customer Center.
This view also contains information that is only displayed on debug builds of your app which can be useful to diagnose issues with the purchases history.
Virtual currencies
Displaying virtual currencies requires version 5.32.0 or later of the RevenueCatUI iOS SDK or version 9.7.0 of the RevenueCatUI Android SDK.
The Customer Center can allow users to view their virtual currency balances.
To enable displaying virtual currencies, you can turn on the "Display virtual currencies" option in the Customer Center settings. When enabled, the Customer Center will display a customer's virtual currency balances on the main screen. If your app has more than four currencies, it shows the four highest balances and provides a button to view all balances on a separate screen.
| Main Customer Center Screen | Virtual Currencies Screen |
|---|---|
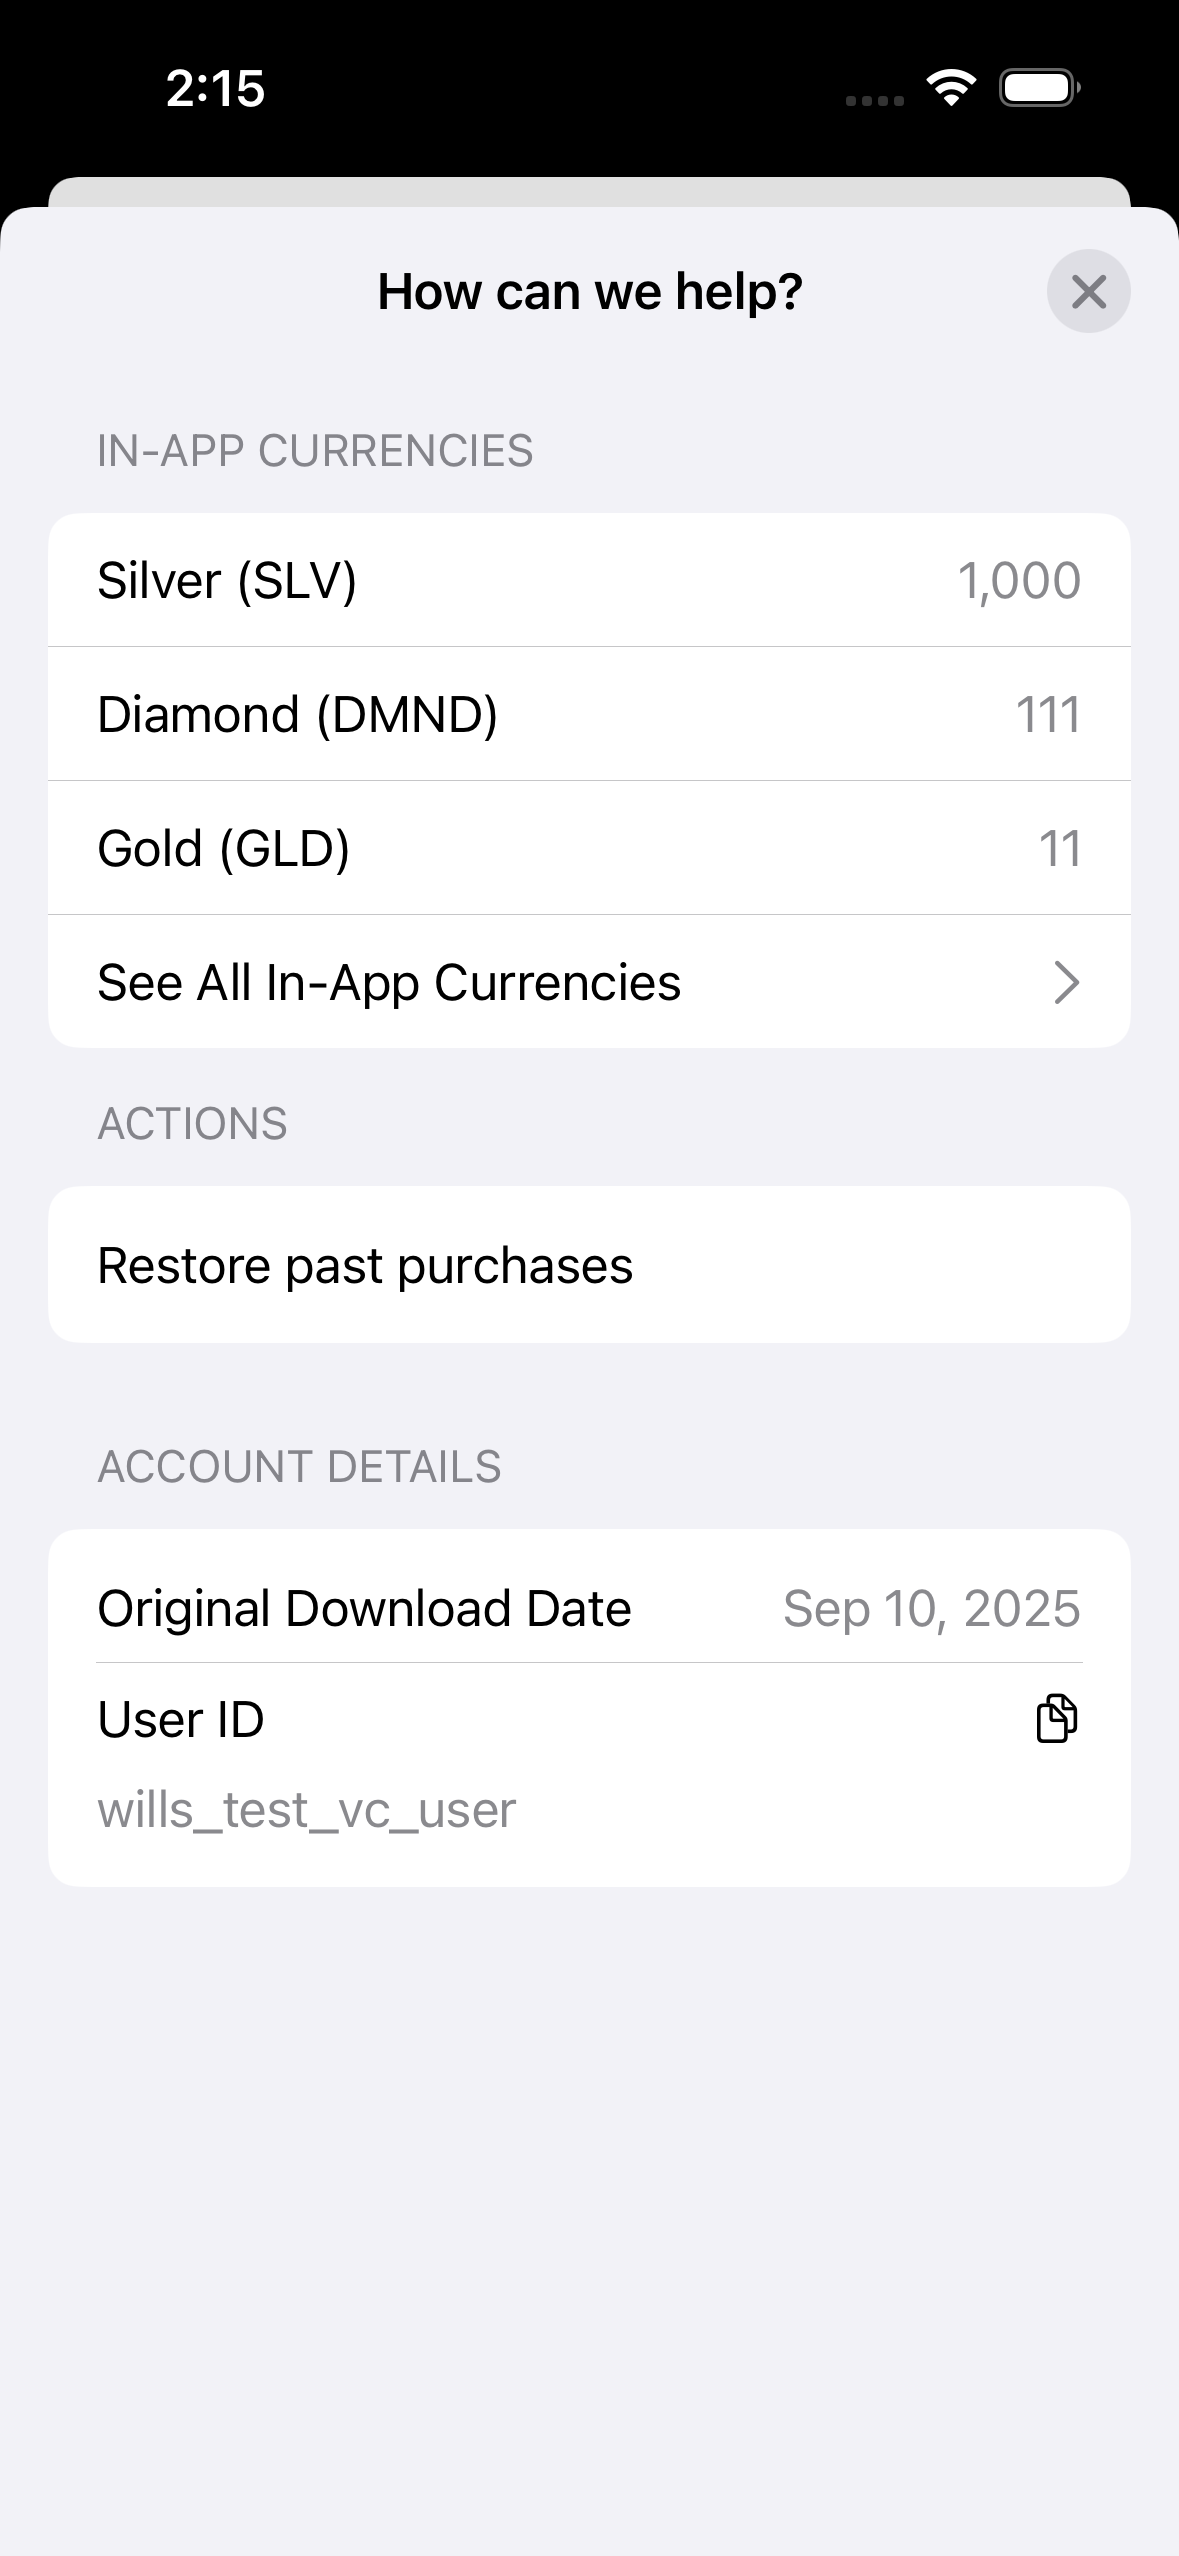 | 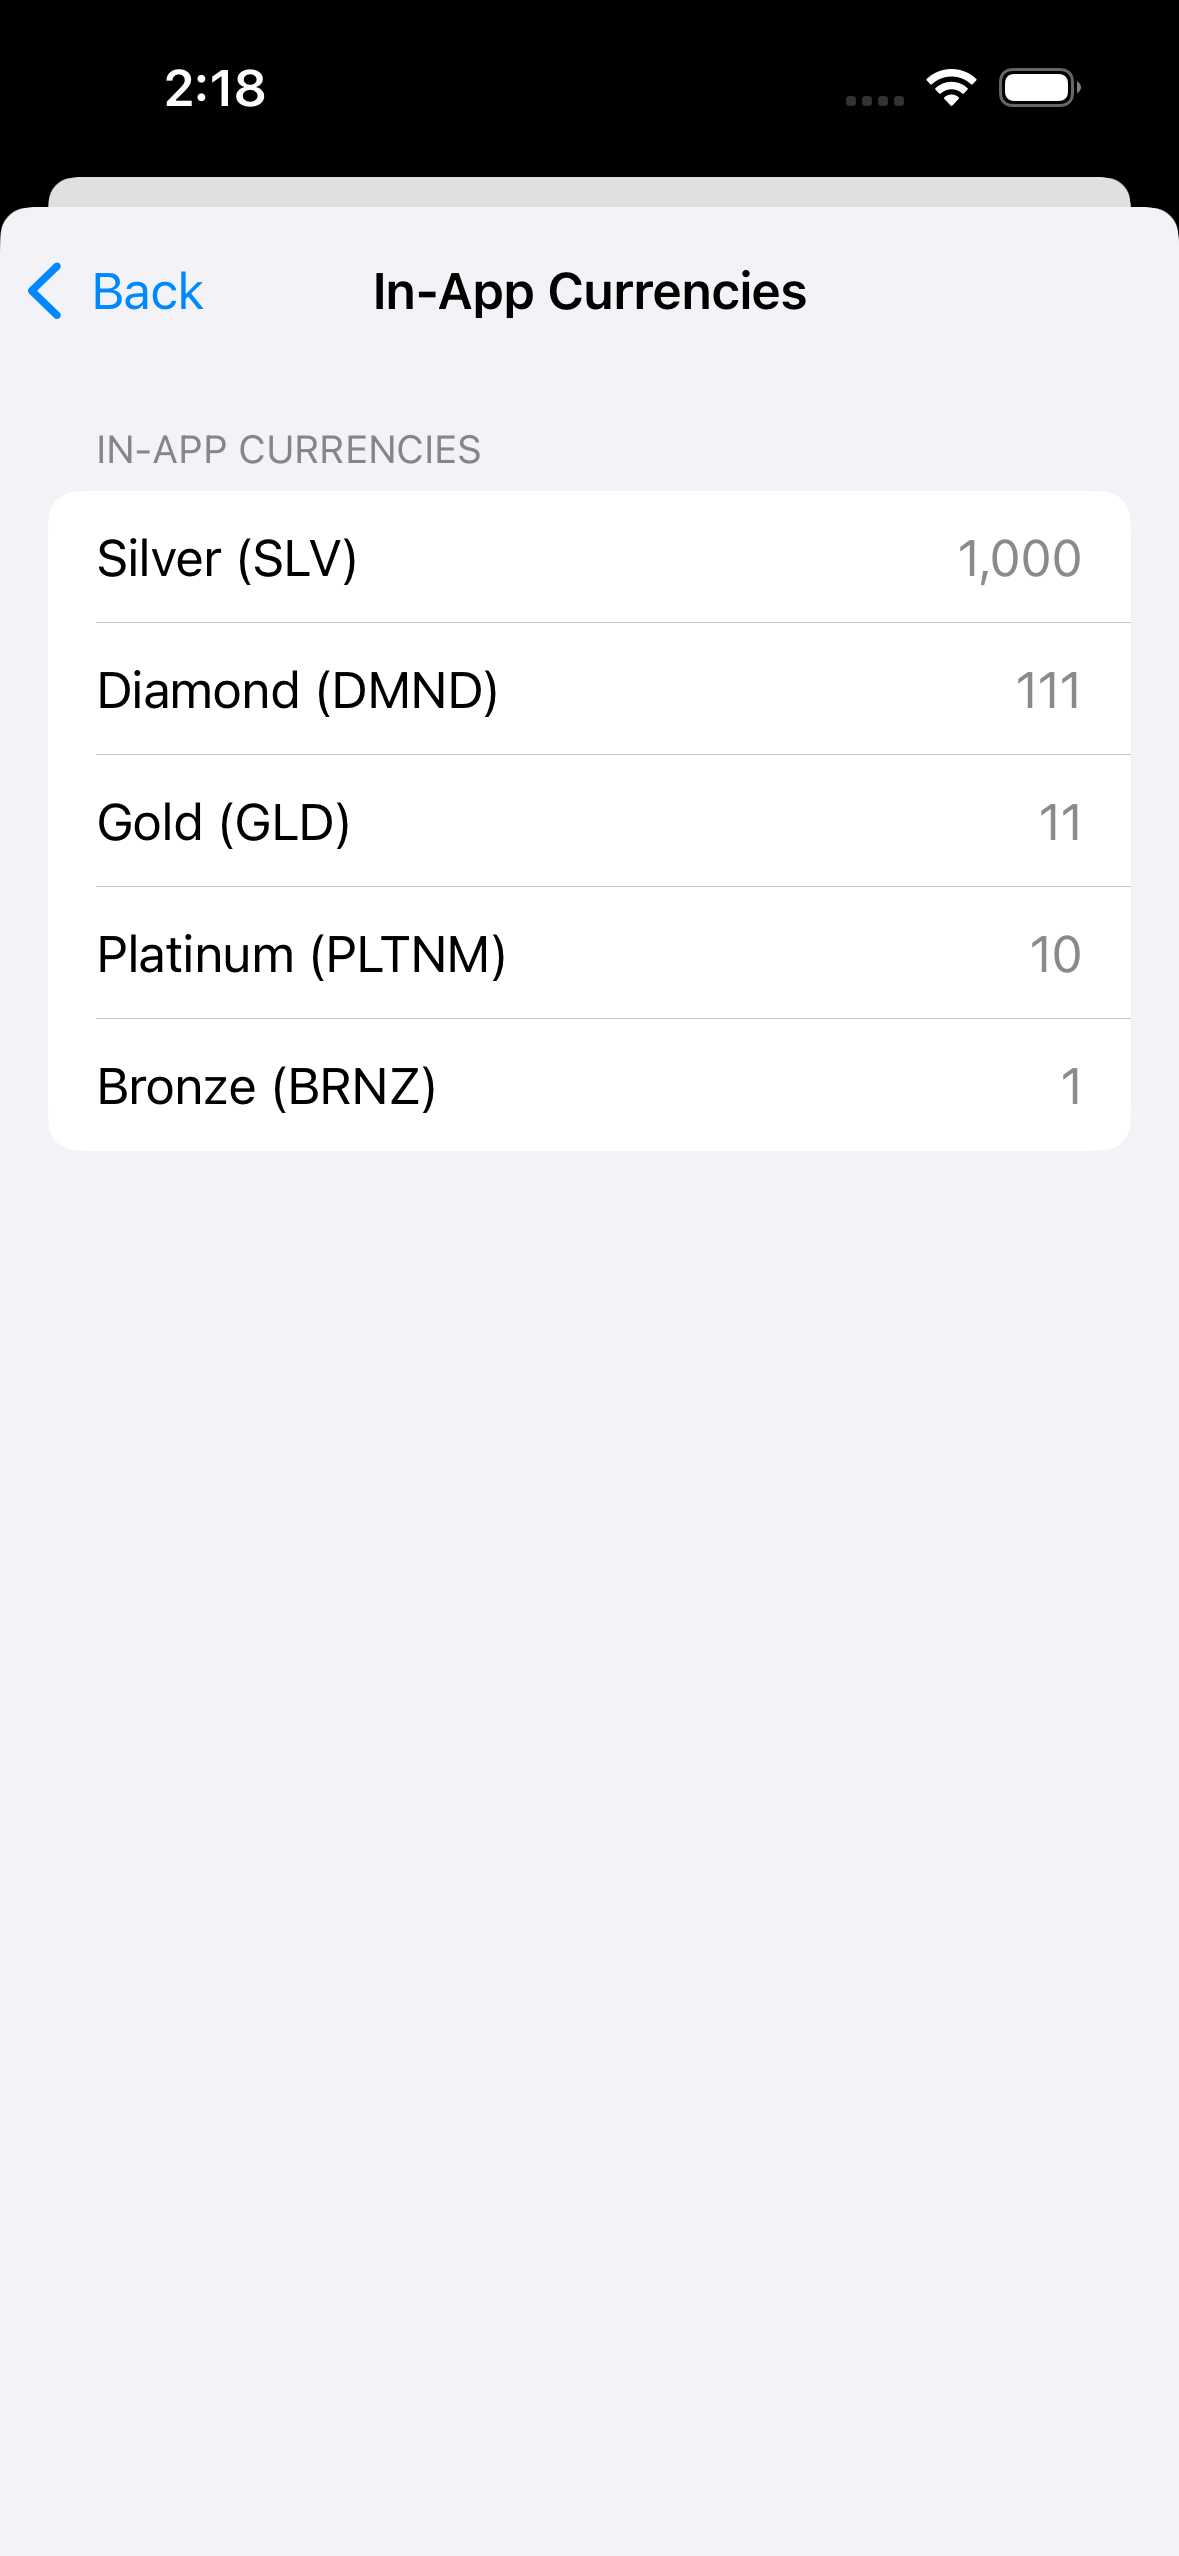 |
For more information on setting up virtual currencies in your app, check out our Virtual Currency docs.
Color customization
By default, the Customer Center will use your app's default color scheme throughout, ensuring a native look and feel.
However, you can also customize the colors of the Customer Center through the UI.
Here's how the color settings work:
-
Accent Color: This color is used throughout the entire Customer Center for various UI elements like buttons. If not set, the app's default accent color will be used.
-
Background Color: This color only applies to the promotional offers views. If not set, the app's default background color will be used.
-
Text Color: This color only applies to the text in the promotional offers views. If not set, the app's default text color will be used.
-
Button Text Color: This color only applies to the text in the promotional offers button. If not set, the app's default text color will be used.
-
Button Background Color: This color only applies to the background of the promotional offers button. If not set, the app's default background color will be used.
In addition, there are light and dark theme variants available, which you can set in the configuration UI.
Remember, except for the accent color, these color settings only affect the promotional offers views. The rest of the Customer Center will use your app's default colors to maintain consistency with your app's overall design.
Localization
The default configuration has been localized for 32 languages. If you want to customize the strings for a specific language, you can do so by editing them in the Localization tab.