Submitting an iOS Subscription App
Let's get your iOS app with subscriptions shipped!



You’ve created your first iOS app, set up your subscriptions, tested everything, and you’re ready to ship to the App Store… but now what?
Before your app can be released, it needs to be reviewed by Apple by submitting it through App Store Connect. Submitting a new app with subscriptions can appear fiddly, and it’s an area where many developers run into issues for the first time, as both your new app and your subscriptions need to be reviewed together. This guide will walk you through everything you need to take your app from an Xcode project to a successful approval from Apple.
Getting everything set up correctly in App Store Connect is important. If something is missing or misconfigured, Apple may reject your app during review. In most cases, this isn’t as scary as it sounds, and you’ll usually be able to resubmit after addressing minor issues. However, rejections can cause delays, so it’s best to get things right the first time.
By following a clear set of steps, you can move confidently from an app in Xcode to submitting it to Apple in the correct way.
Scope of this guide
This guide focuses specifically on preparing and submitting an iOS app with subscriptions for App Review. It does not cover general App Store metadata such as keywords, App Store descriptions, screenshots, or App Store Optimization.
The goal of this guide is to help you upload your build to App Store Connect, configure your subscriptions correctly, and submit both together for review.
Guide structure
This guide is broken down into three subscription-focused steps:
- Taking your app from Xcode and uploading it to App Store Connect, ready for submission
- Making sure all of your subscriptions are set up correctly
- Submitting your new app and your subscriptions together in the correct way
Uploading Your Build to App Store Connect
Note: This section uses Xcode to upload your app’s build to App Store Connect. If you use another method to upload your app, the remaining sections of this guide are still fully relevant.
To get started, we need to upload a build of your app to App Store Connect. This does not submit your app to Apple for review yet, but it does make the build available in App Store Connect so it can be selected for submission later.
There are three main steps involved:
- Archiving your app
- Uploading the archive to App Store Connect
- Selecting the uploaded build in App Store Connect
Archiving your app
Open your project in Xcode and make sure:
- Your Bundle Identifier matches the app created in App Store Connect
- Your signing and provisioning profiles are correctly configured
Make sure the build target is set to Any iOS Device:
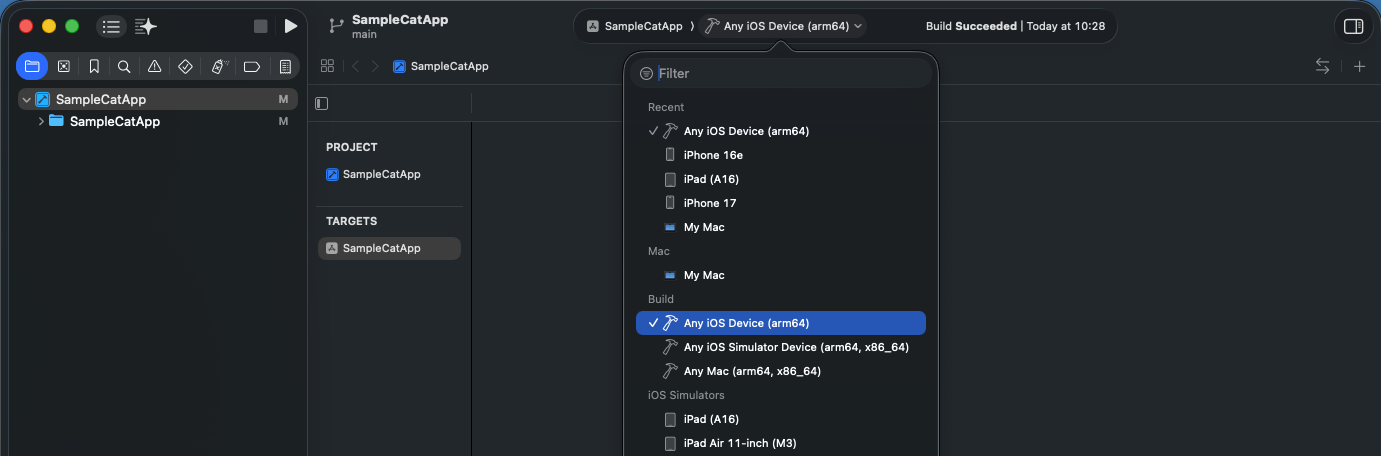
Then select Product → Archive:
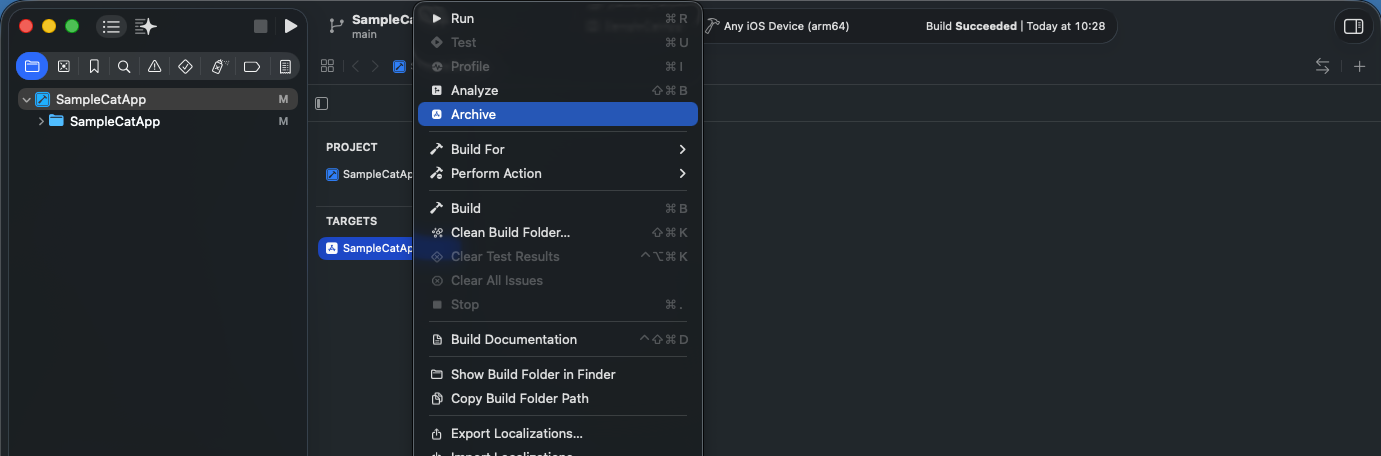
Once the archive process completes, the list of archives should appear automatically. If it doesn’t, or if you want to access your archives later, you can find them by selecting Window → Organizer in Xcode.
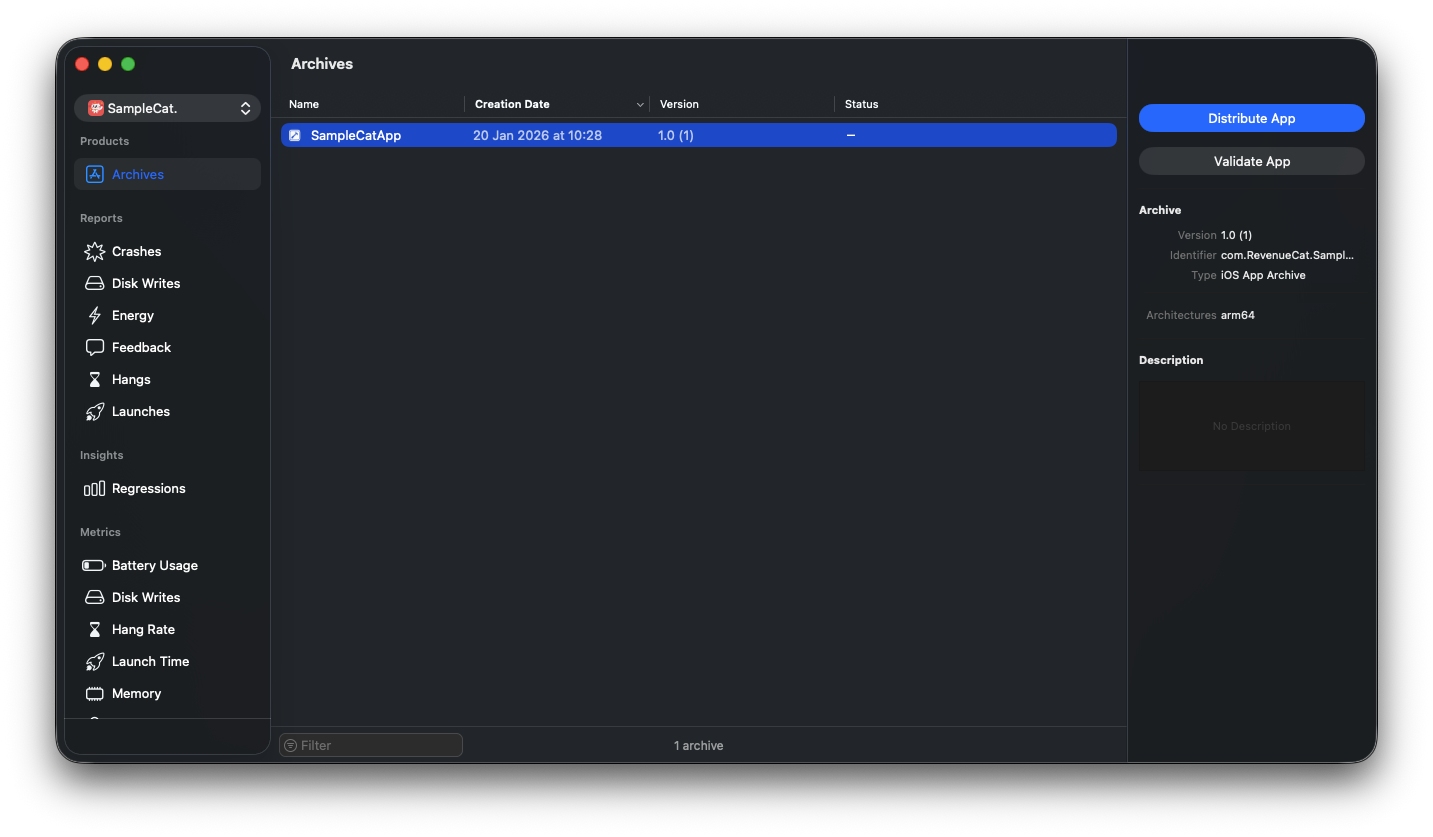
Uploading the build
From the Organizer, select Distribute App.
Choose App Store Connect, and continue through the steps. Once everything is prepared, the upload will begin.
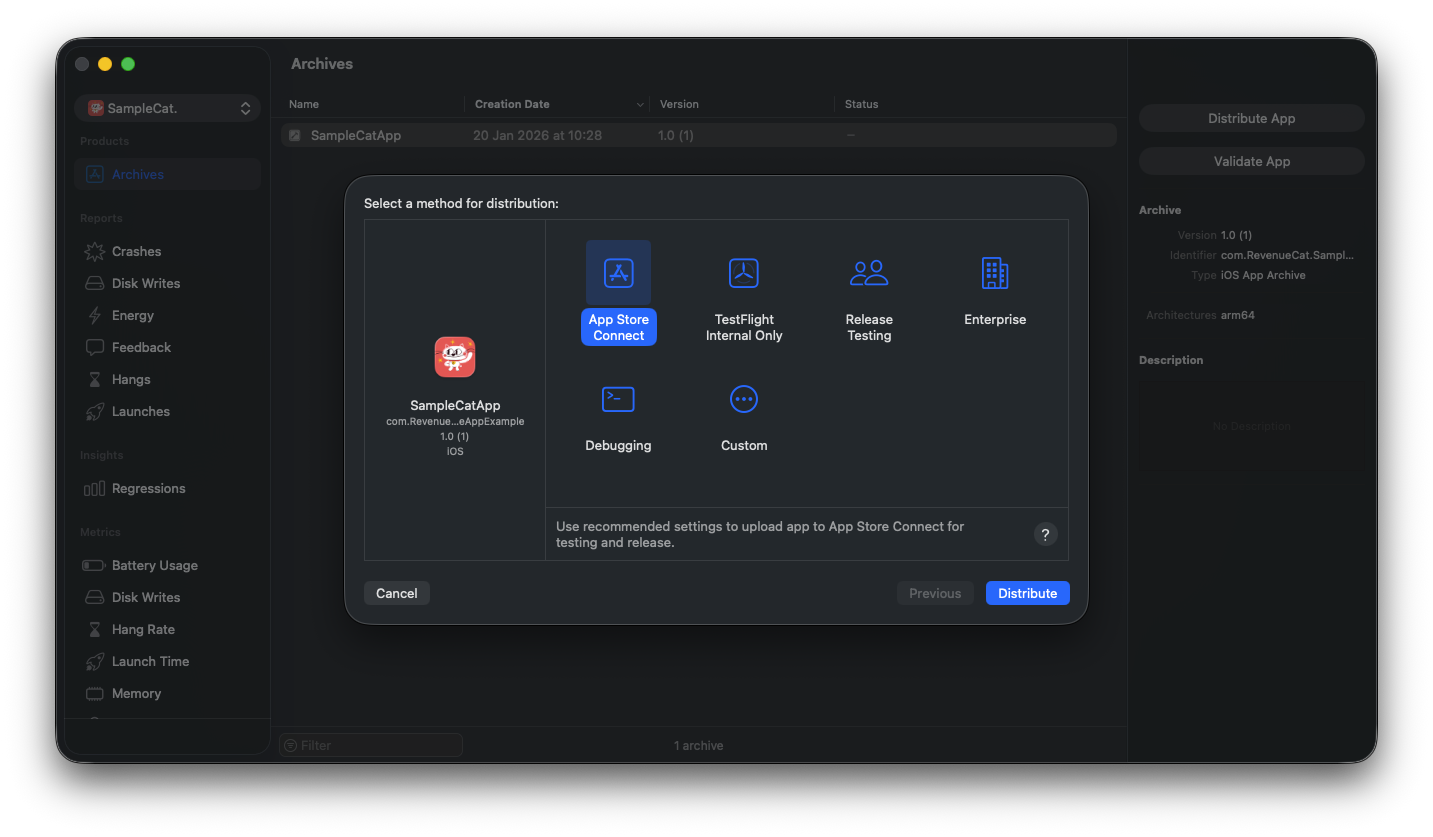
The upload may fail if required assets are missing, such as an app icon or required metadata.
When the upload completes successfully, the build will be available in App Store Connect. As a reminder, uploading a build does not automatically submit your app to Apple for review.
Selecting the build in App Store Connect
Open App Store Connect and navigate to your app. In the Distribution Information, scroll to the Build section:
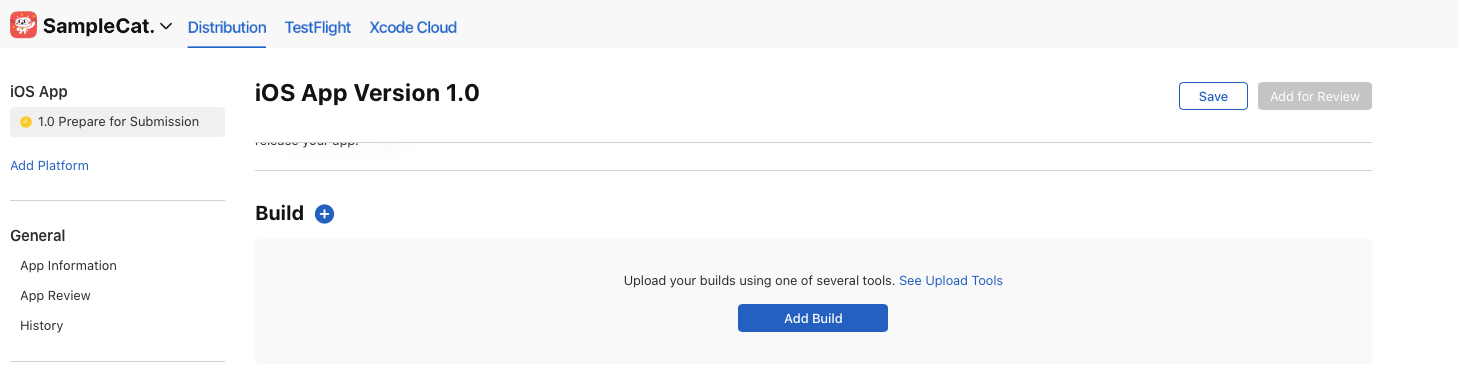
Select your new build. It can take some time for a new build to finish processing and appear here, so don’t worry if it isn’t visible immediately. You may be required to add some additional compliance information for the build here.
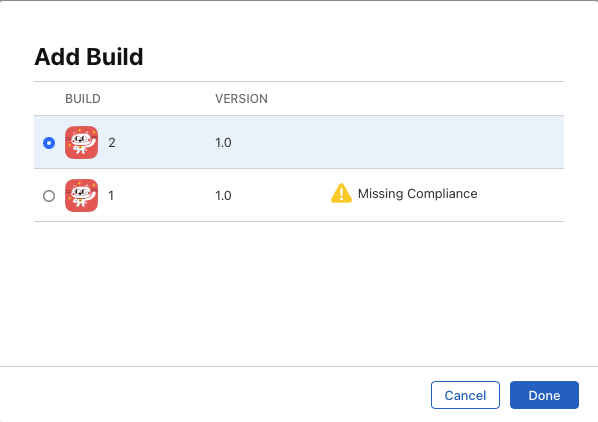
With your build uploaded and selected, you’re now in a good position to move on to setting up your subscriptions, ready for submission.
Confirming Subscriptions Configurations
Before submitting your new app and subscriptions to Apple, it’s important to double-check that all subscriptions are set up correctly. This helps avoid App Review rejections caused by missing information and ensures your subscriptions are configured exactly as you intend.
At this stage, your subscriptions should be in the Prepare for Submission state in App Store Connect. That status is used before a subscription is added to a submission, whether or not the metadata is complete — so walk through the checks below carefully. Incomplete metadata here is a common reason products fail to load in sandbox or can’t be submitted for review.
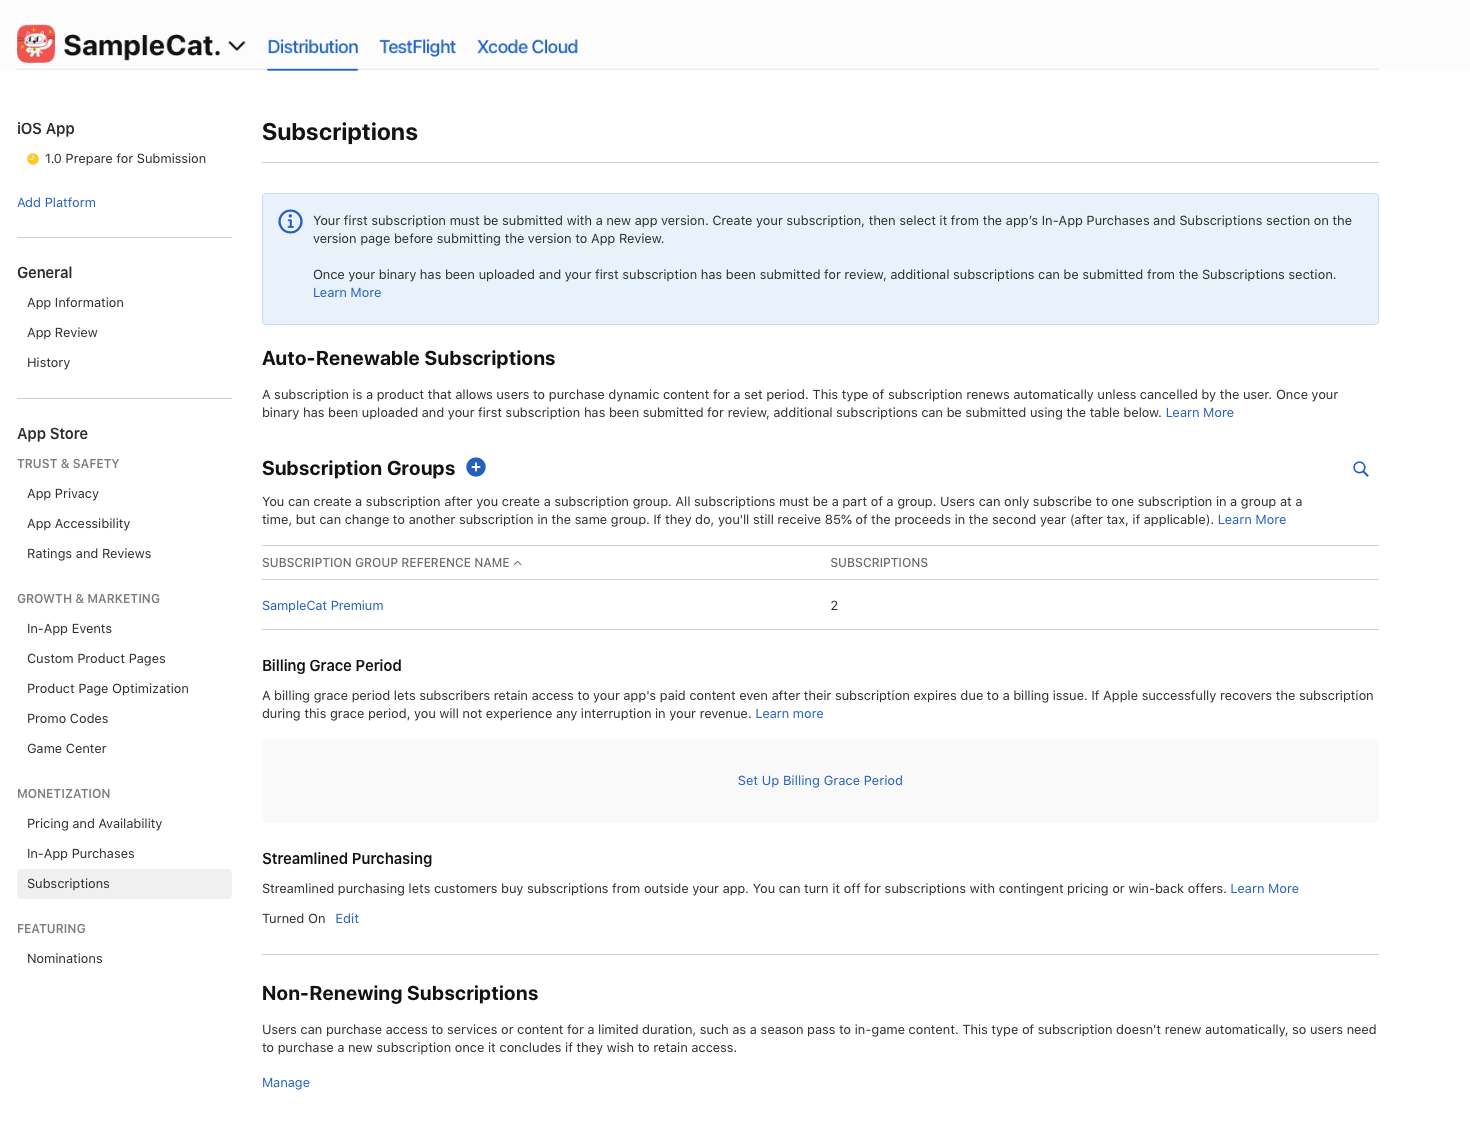
Understanding subscription groups
A subscription group is a collection of related subscriptions where a user can only be actively subscribed to one subscription in that group at a time. Because of this, it's really important you have your subscription groups set up in the correct way. A common use case for subscription groups is offering different durations for the same subscription, such as weekly and yearly options. This prevents users from being subscribed to multiple durations at the same time, while still allowing them to move between subscriptions within the group.
If you want users to hold multiple subscriptions for different content, those subscriptions must be placed in different subscription groups.
Selecting a subscription group allows you to view the subscriptions within the group and review group-level settings, such as localization.
Reviewing individual subscriptions
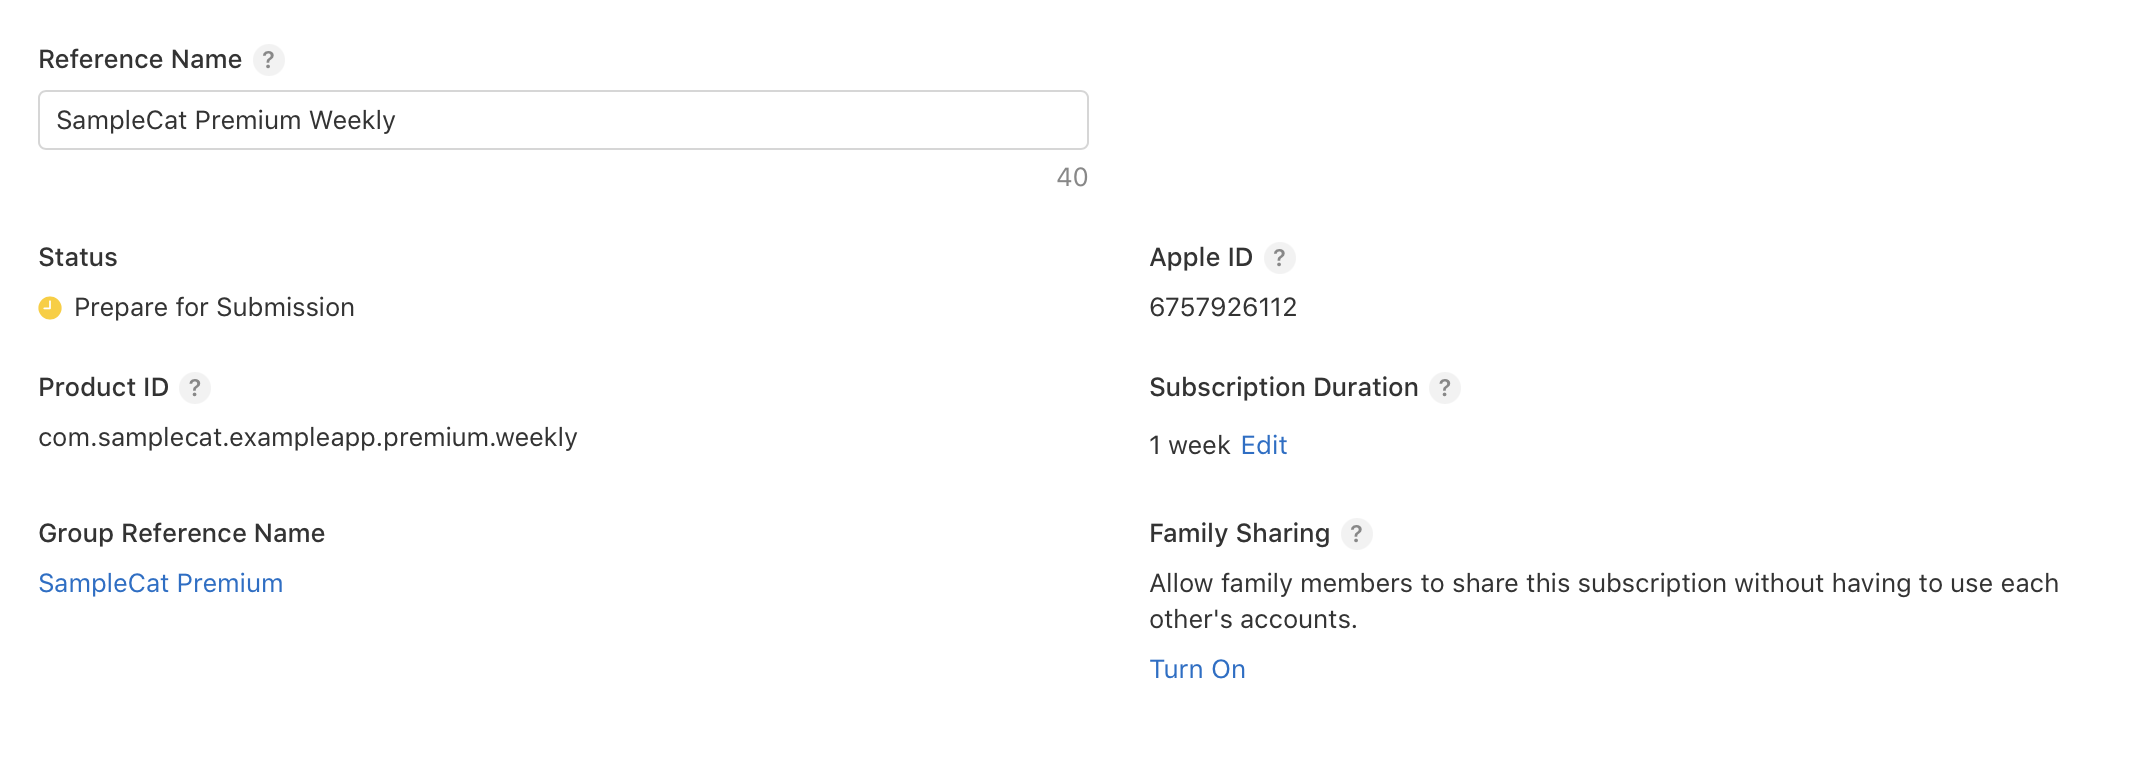
Select one of the subscriptions within the group to review its configuration.
Here, you’ll see the Reference Name for the subscription. This is used internally in App Store Connect for reporting and analytics and is not shown anywhere in your app.
In this top section, make sure the following settings are correct:
- Subscription duration, which defines how long each billing cycle lasts
- Family Sharing, if you want families to be able to share the subscription
Availability
Confirm the subscription is available in all intended regions and countries.

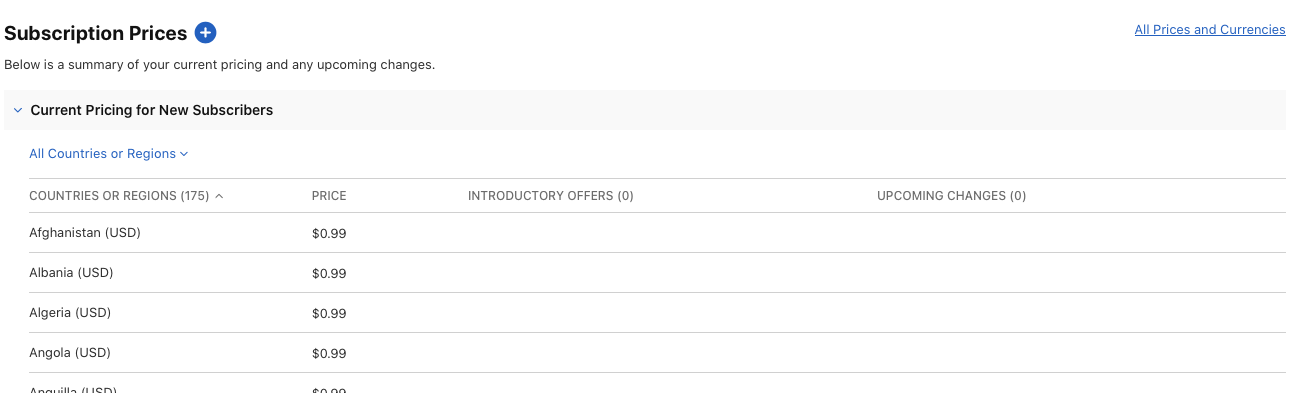
Pricing
Confirm the pricing for your subscription per region
Localization
Localization allows you to configure display names and descriptions for your subscription in different languages. These values are shown to users when they subscribe.
At least one localization is required.

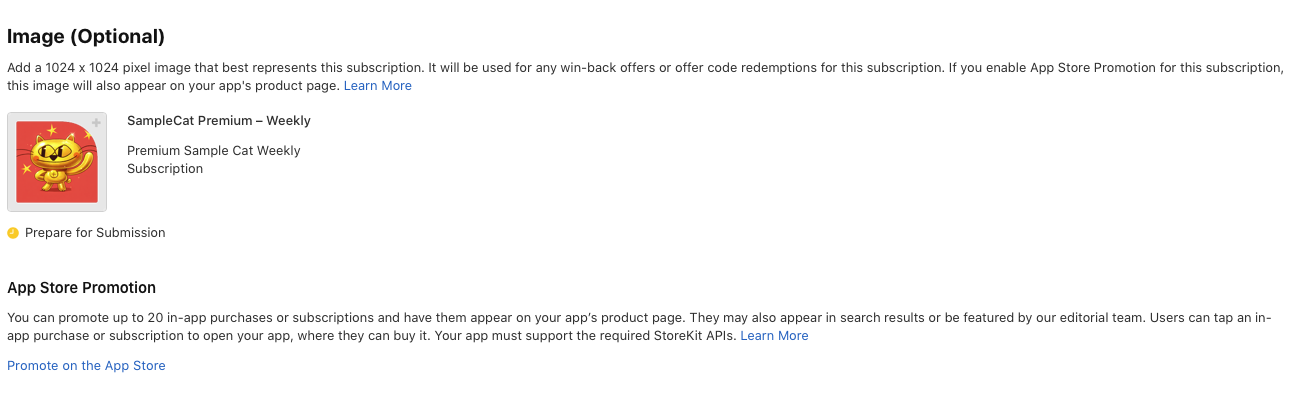
Optional Image
You can also upload images that are used in other areas, such as win-back offers. Images like this can be very effective in those flows.
Tax
Make sure the tax category for your subscription is correct. This can be different from your app’s main tax category if required.

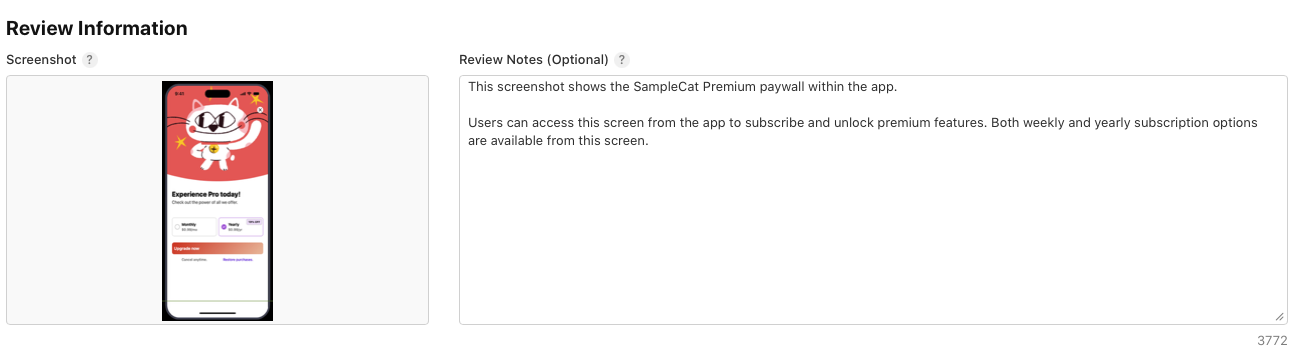
Review information
Finally, upload the review information needed for Apple to review your subscription. This includes:
- A screenshot showing where the subscription appears in your app or what content it unlocks
- A short description to help the review team understand the subscription
This information is only visible to Apple’s review team.
Group Localization
Also make sure the subscription group localization is set. From the subscription groups list, you can configure:
- The display name for the group
- An optional custom displayable app name

Once everything is set up and you’re happy with your subscriptions, you’re ready to move on to submitting your app and subscriptions to Apple.
Submitting Your App and Subscriptions Together
With your build selected and your subscriptions configured, the final step is to submit everything to Apple for review.
For a new app, your first subscriptions must be submitted together with the app. In App Store Connect, this is done by creating a draft submission that includes:
- Your subscriptions
- Your subscription group
- Your app version (with the build you selected earlier)
Add a subscription for review
Open one of your subscriptions in App Store Connect and select Add for Review.
You’ll be asked to either:
- Add it to an existing draft submission
- Start a new draft submission
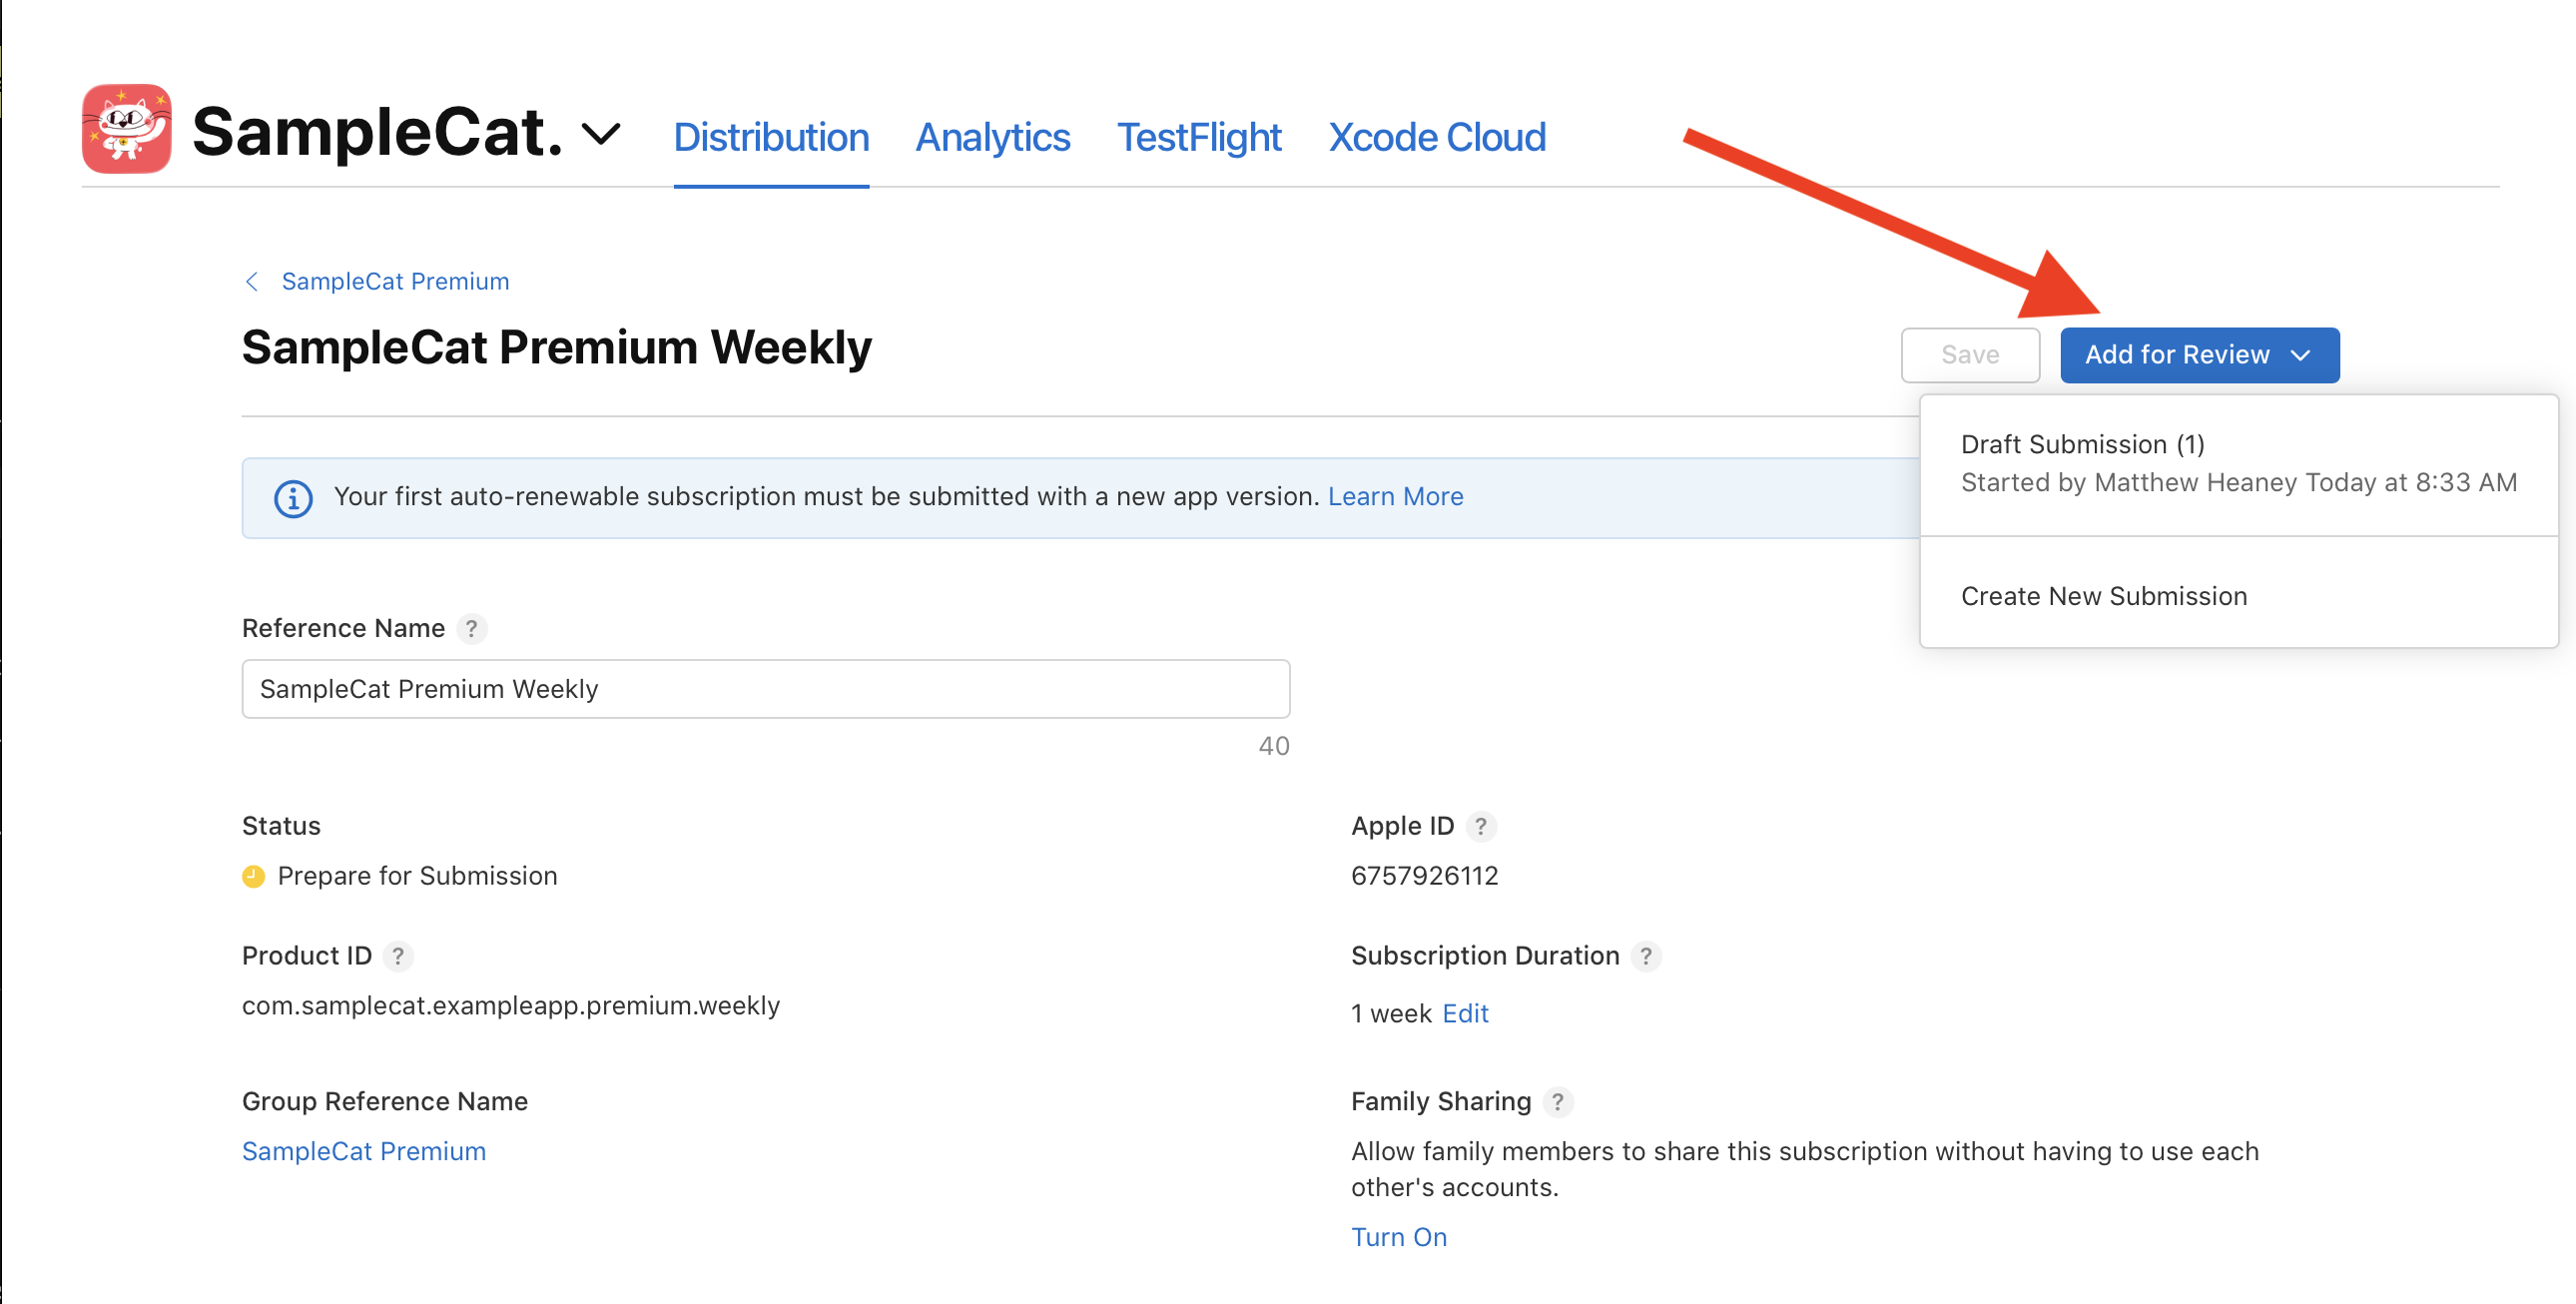
Choose the option that matches where you are in the process. For the first submission, this will usually mean creating a new draft.
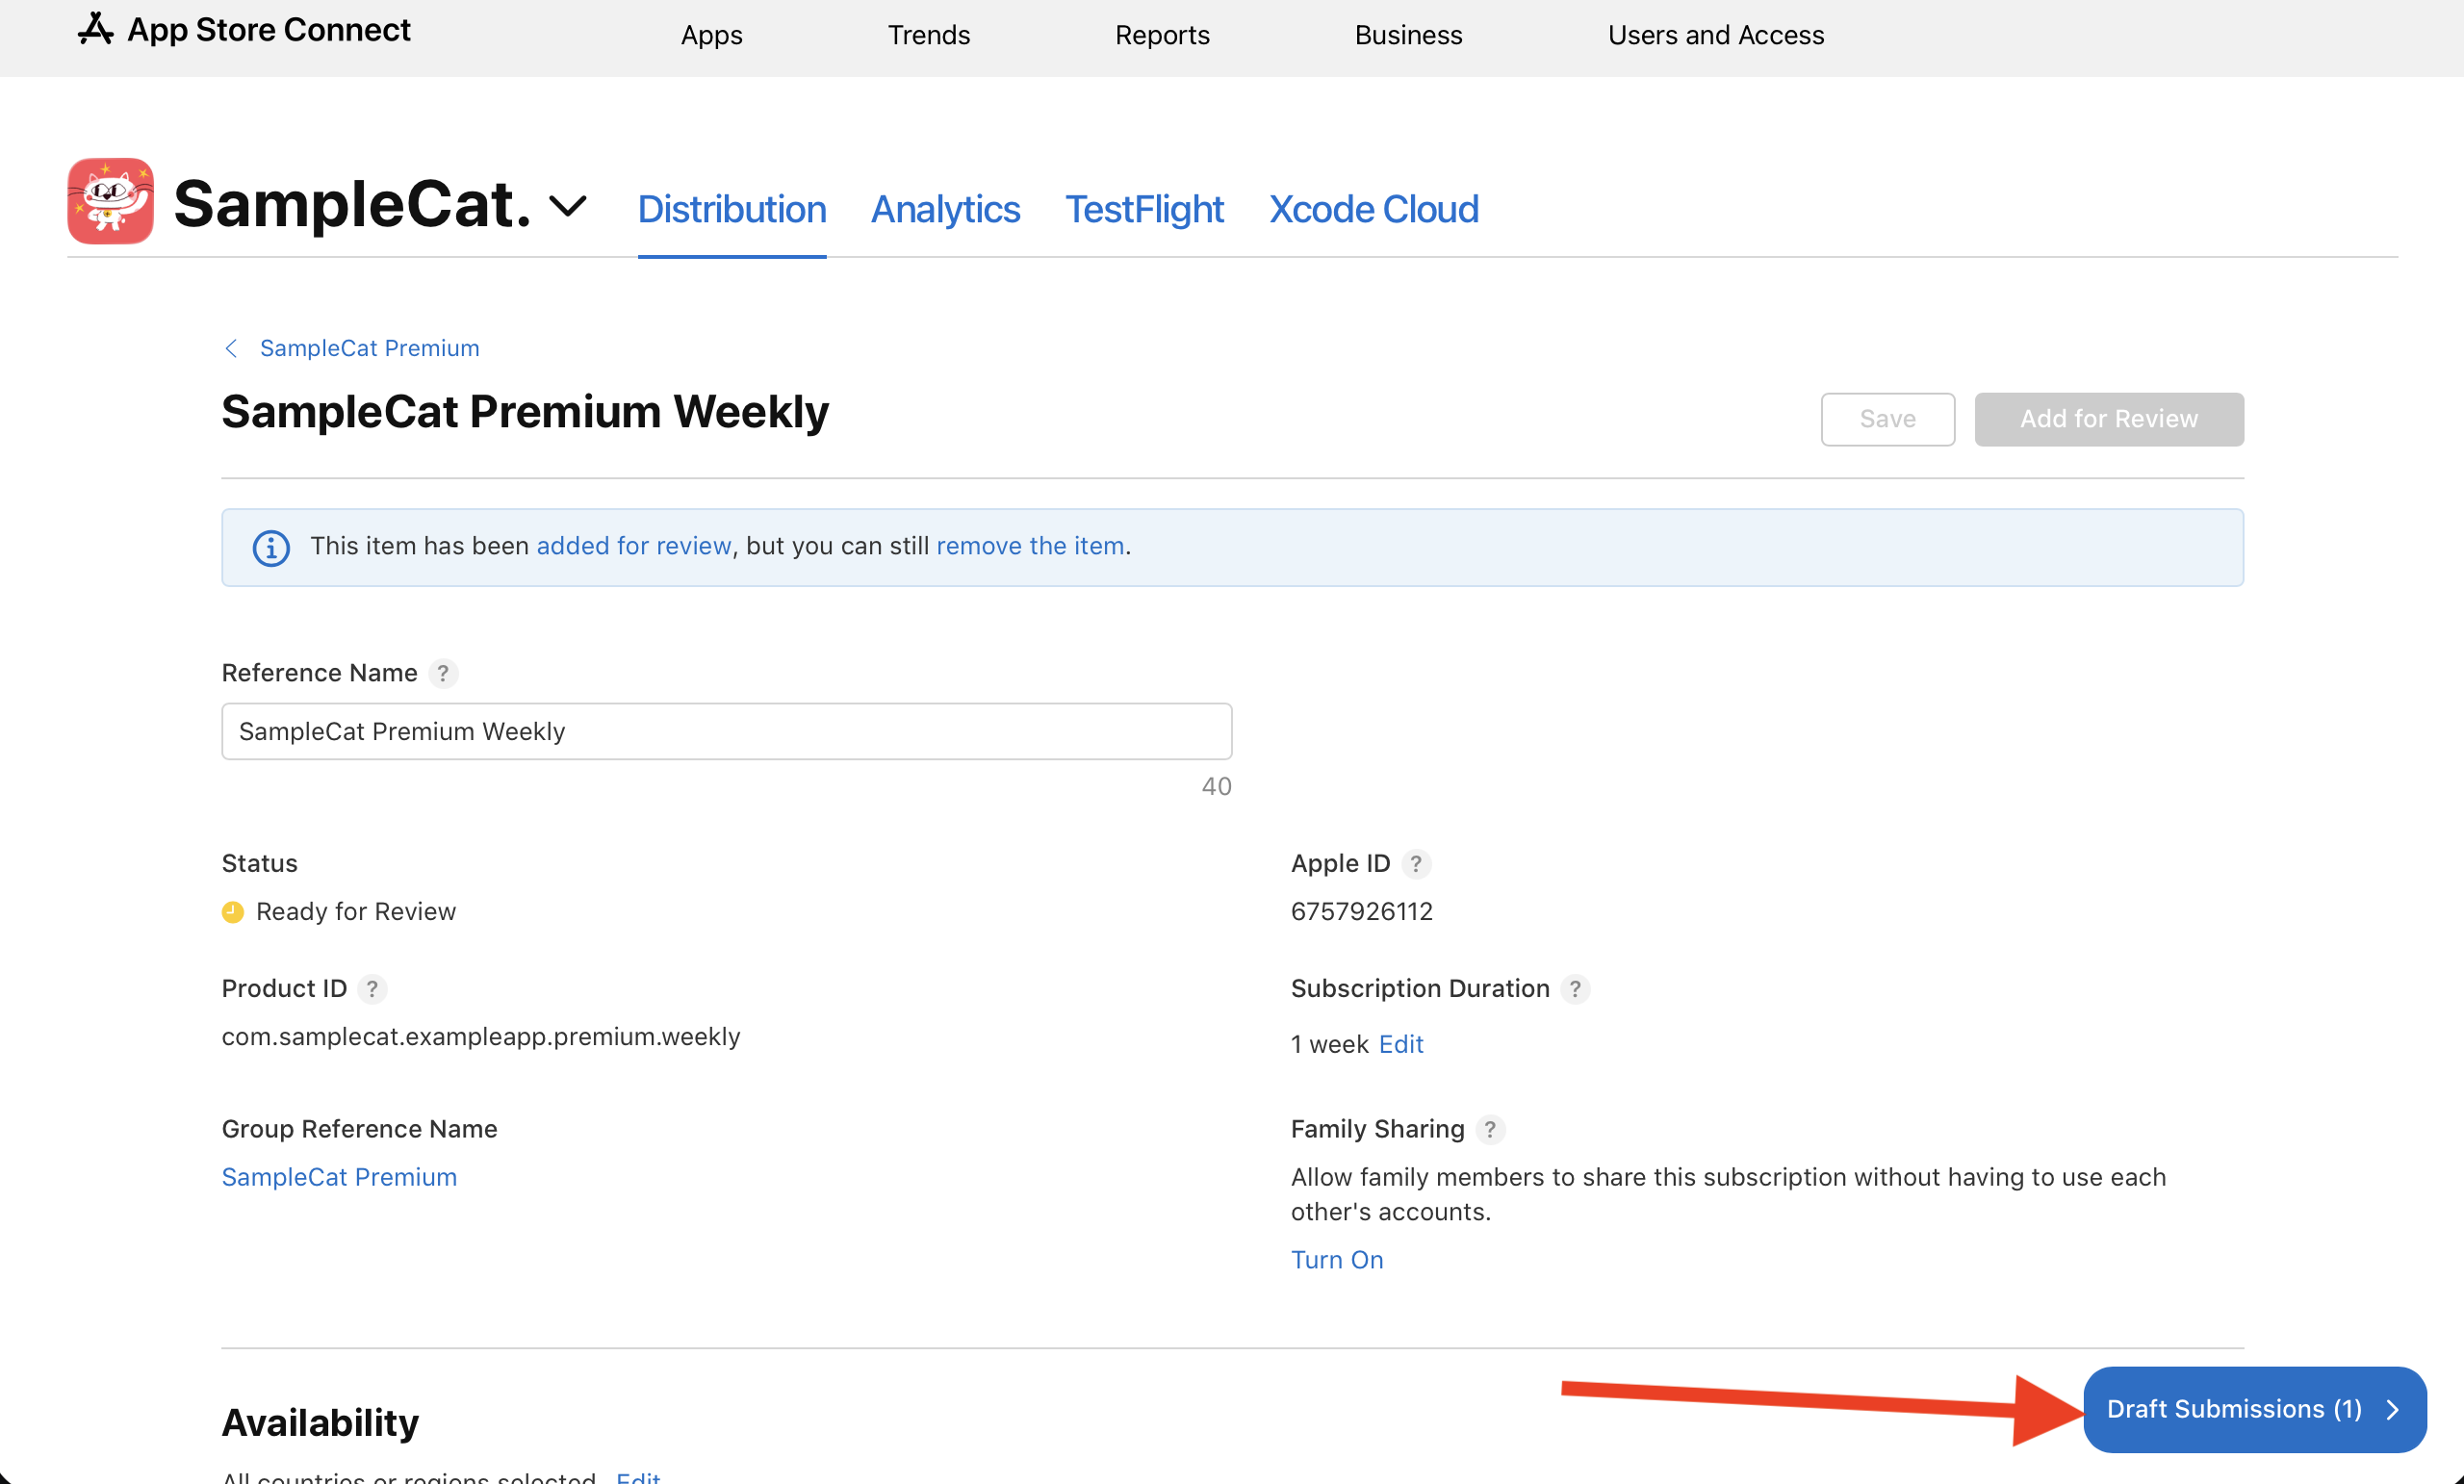
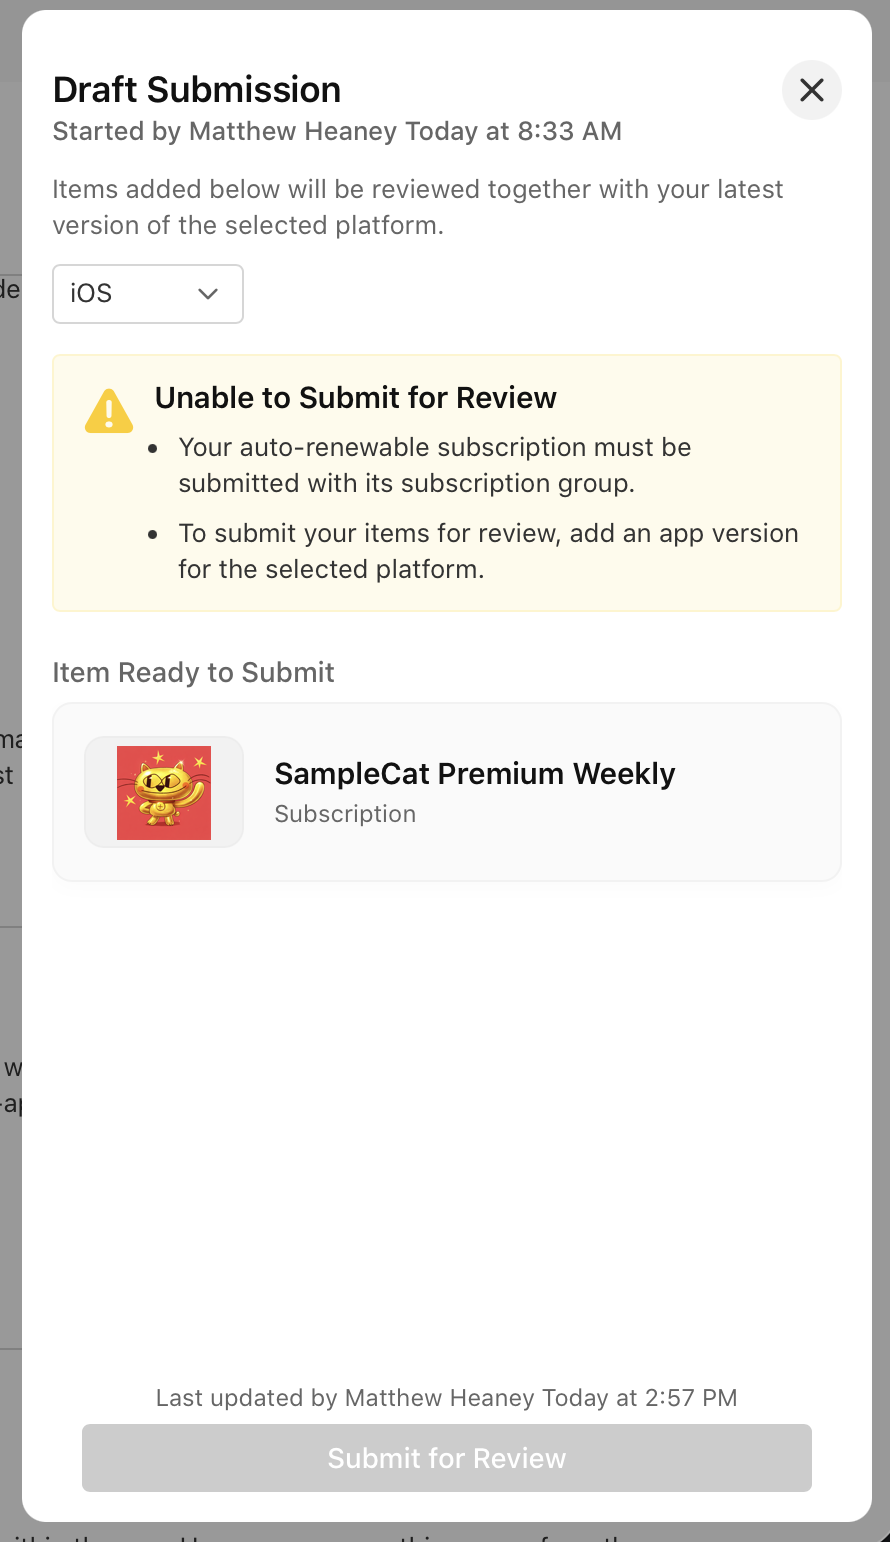
Repeat this for each subscription you want included in the first release.
Add the subscription group for review
New subscriptions also need their subscription group included in the same submission.
Open the subscription group and select Add for Review, then add it to the same draft submission you used for the subscriptions.
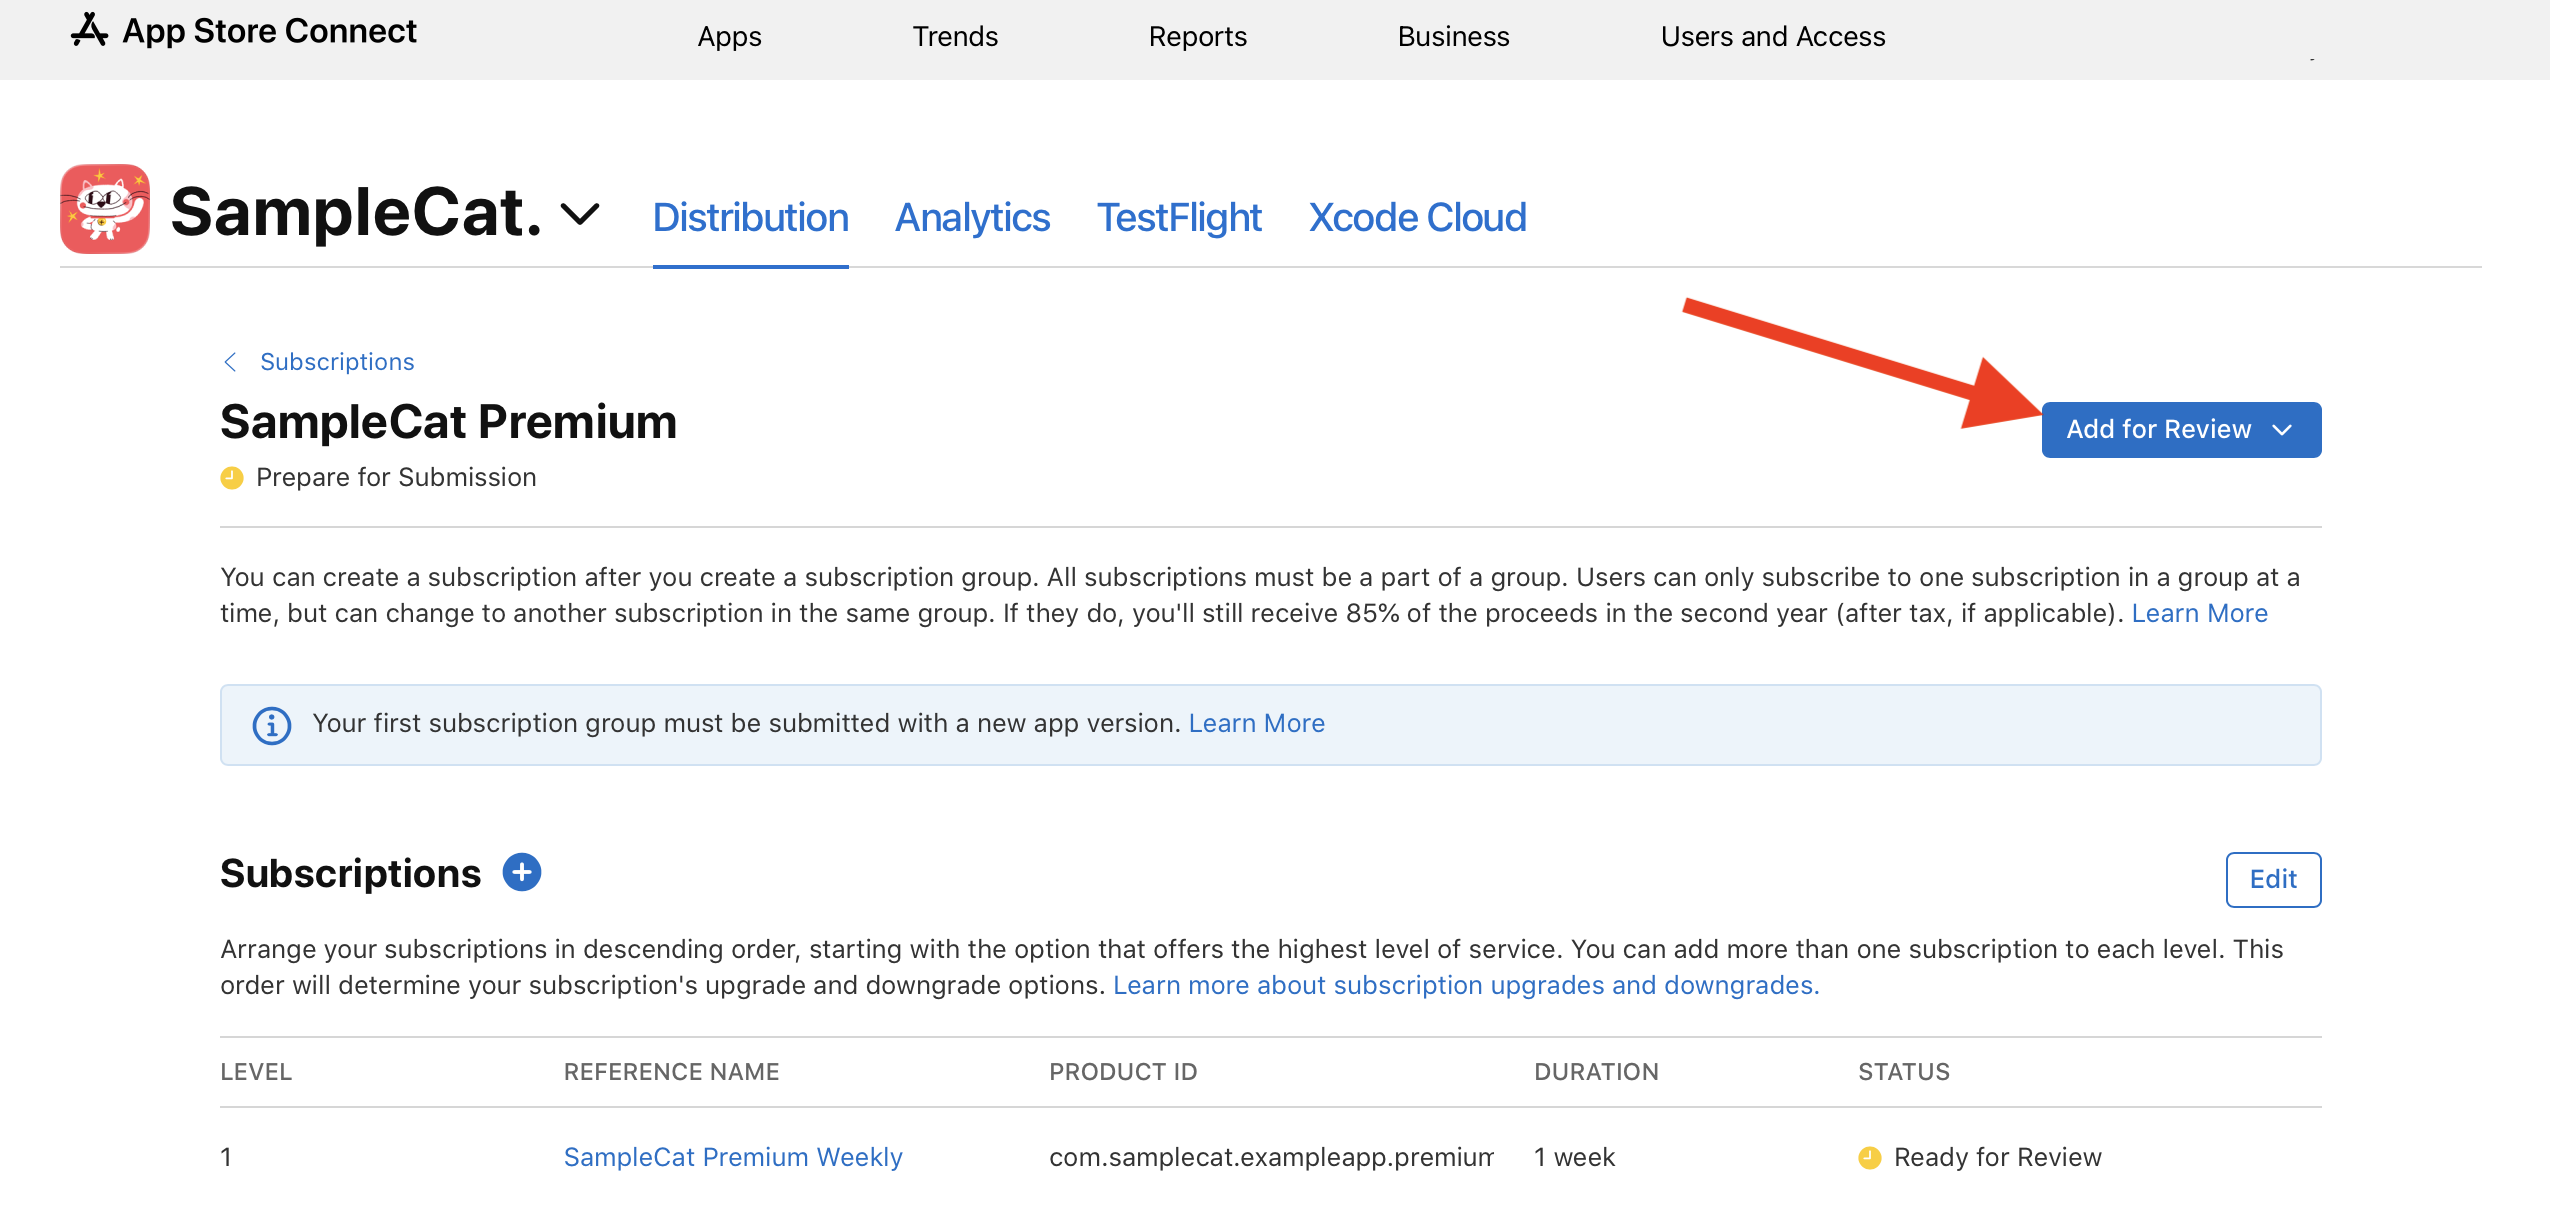
Add the app to the submission
Subscriptions need to be submitted alongside the app build. From the iOS app version page, select Add for Review and add the app to the same draft submission.
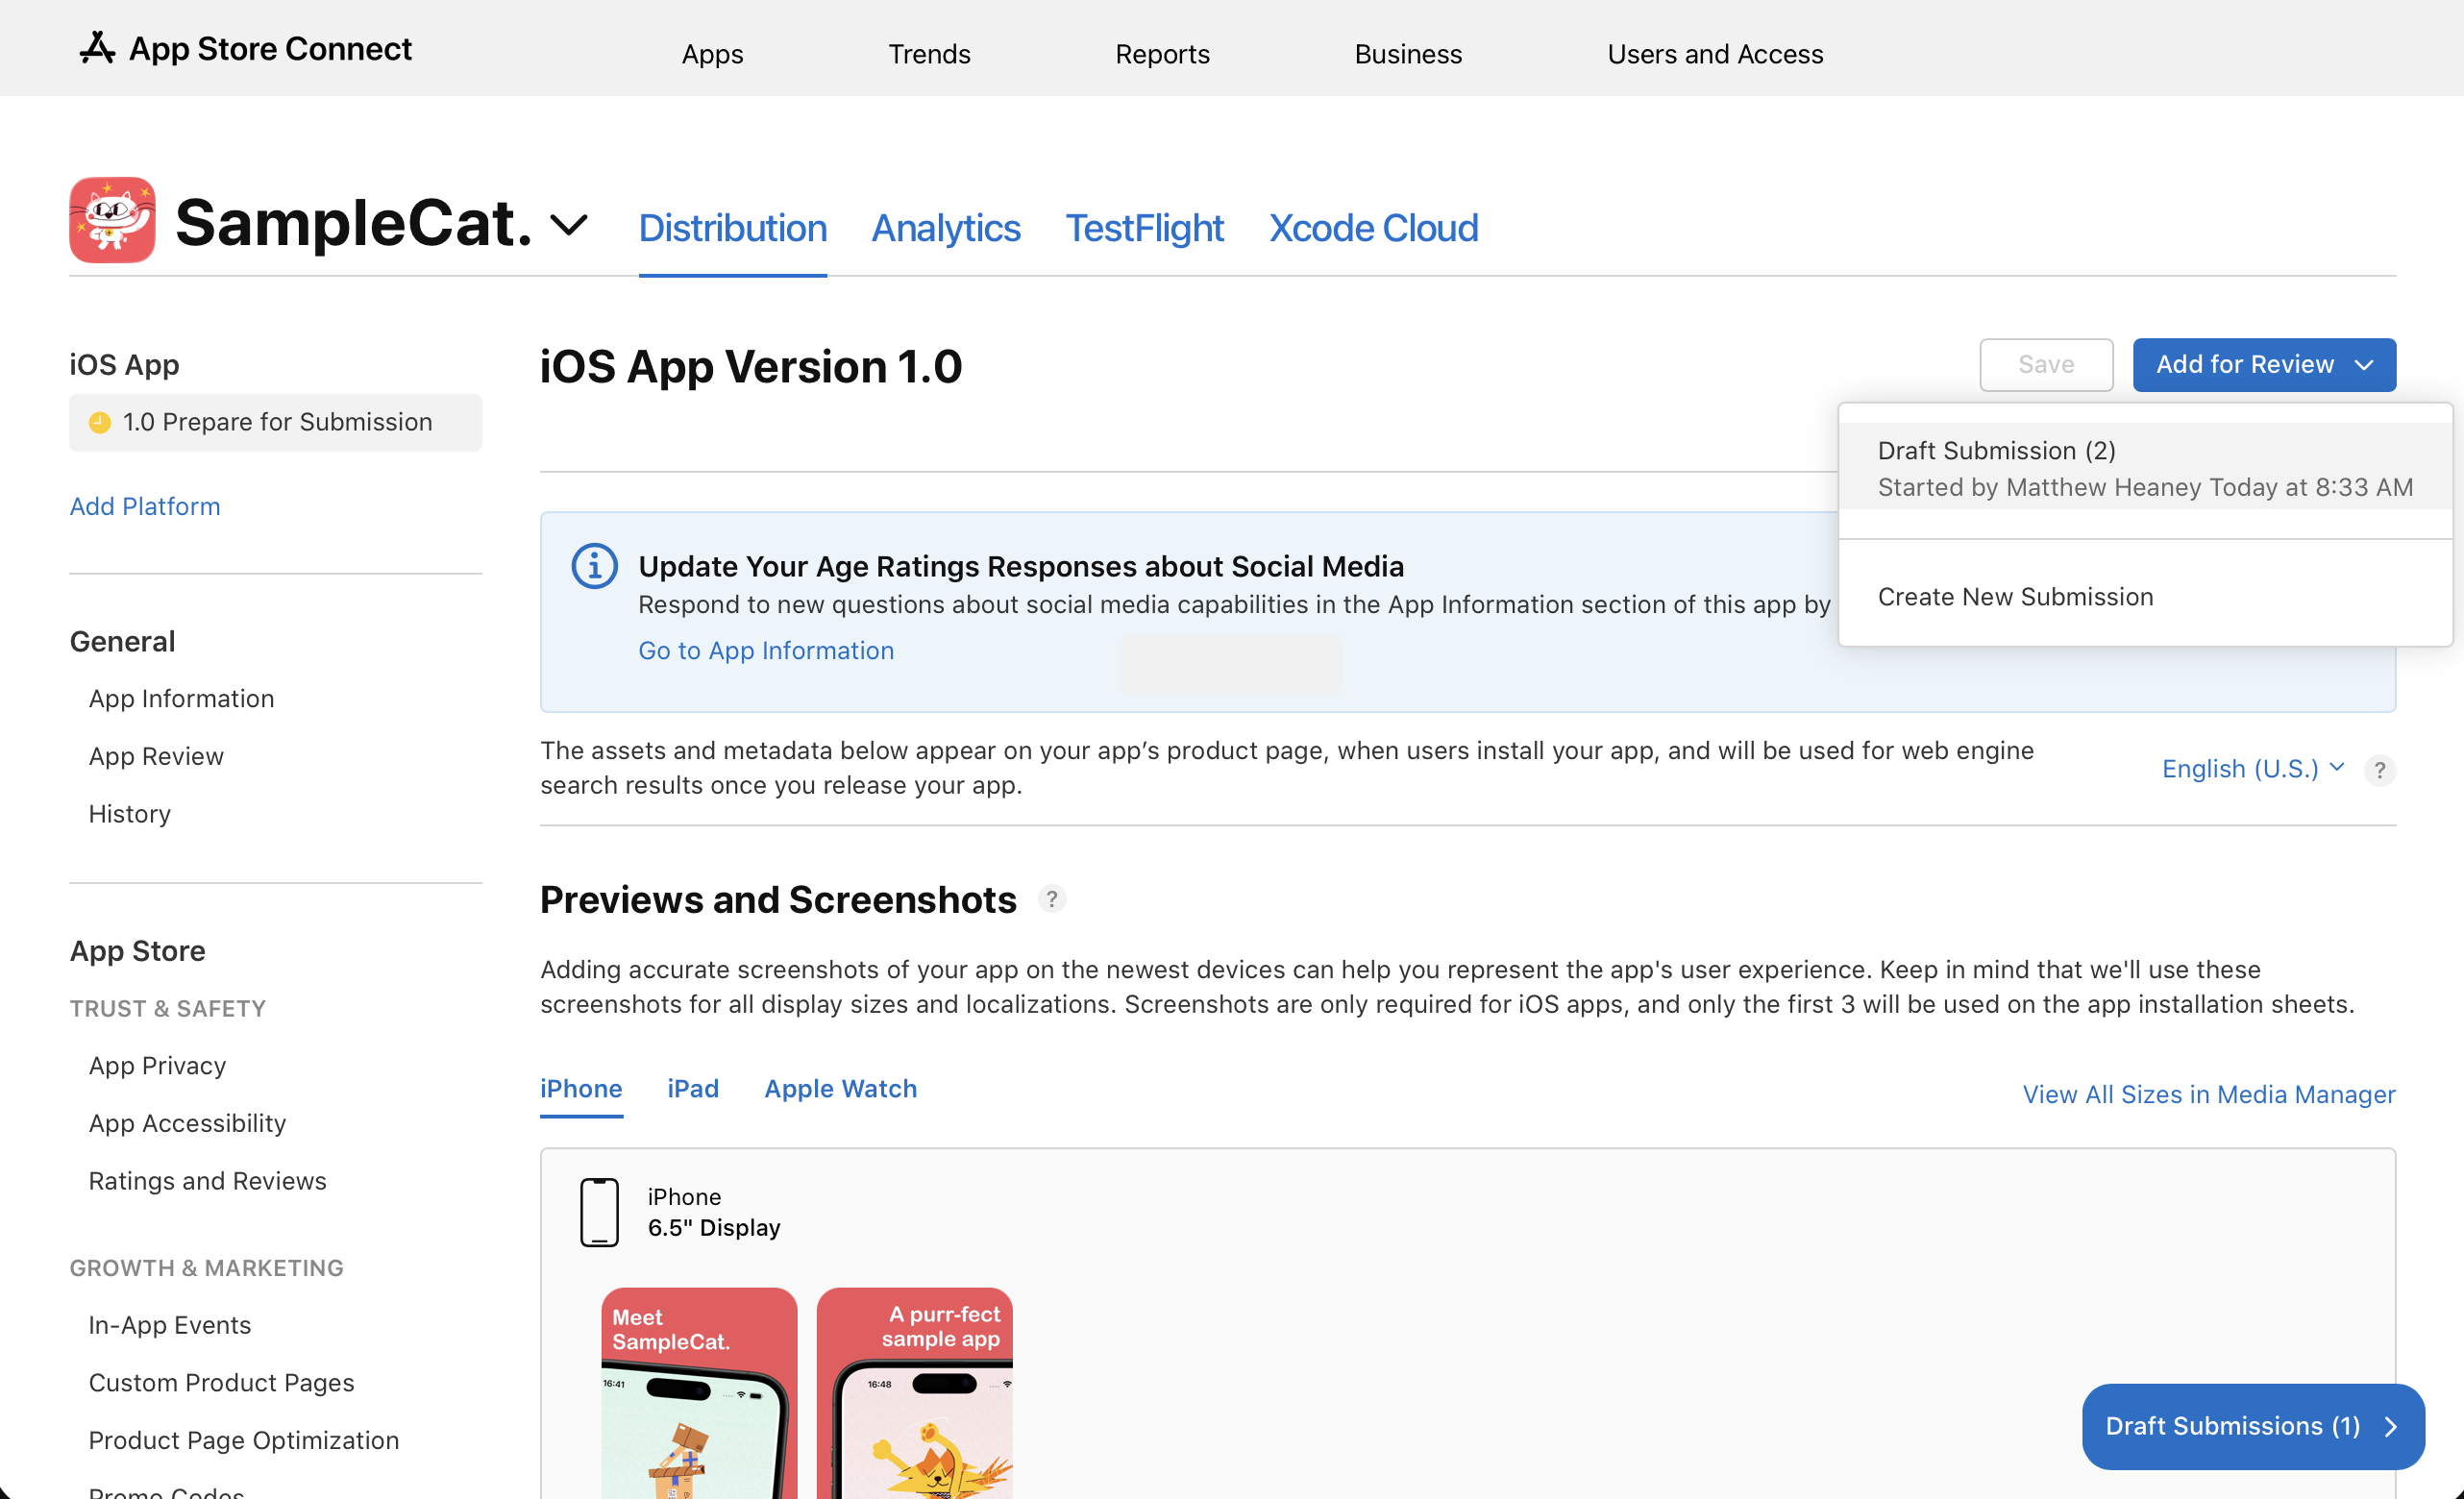
At this point, the draft should include:
- The subscription(s)
- The subscription group
- The app version (with your selected build)
Submit to Apple
Once the subscription, subscription group, and app are all attached to the draft, submit the submission to Apple.
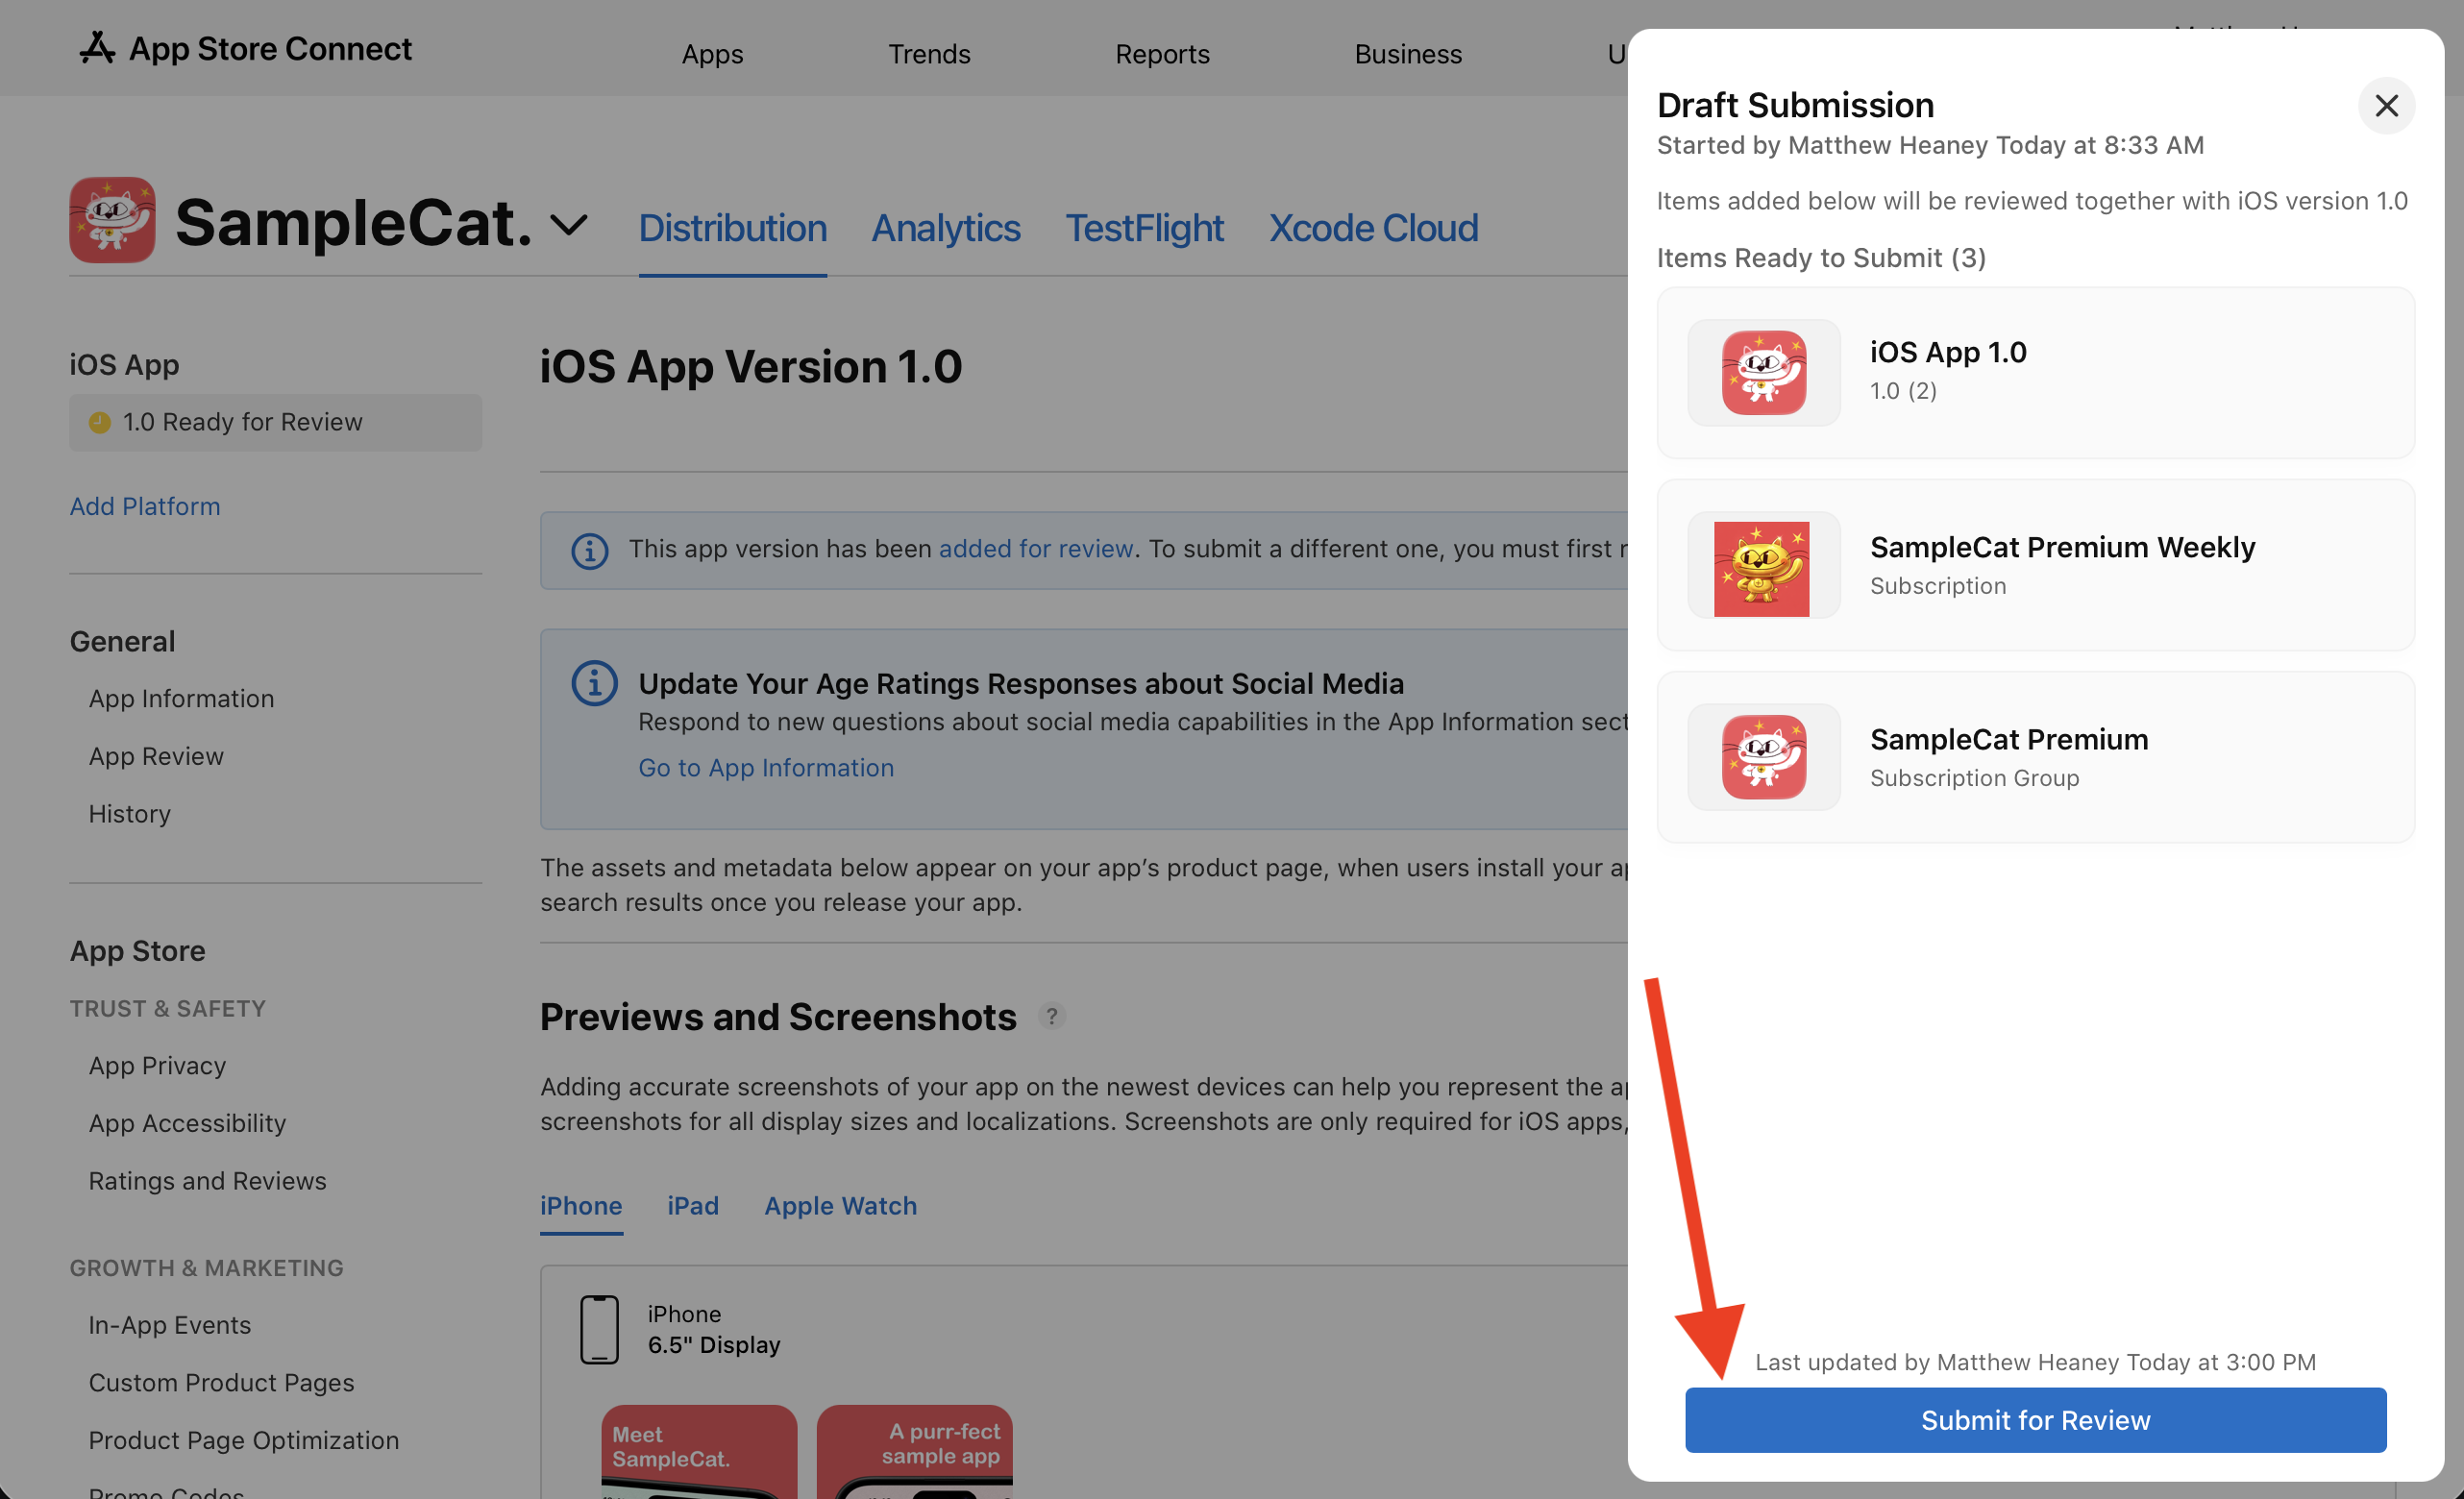
After you add items to the draft, they move to Ready for Review. Once you submit to Apple, they move to Waiting for Review / In Review as Apple reviews them.
When everything is approved, your app and subscriptions are ready for release on the App Store.
Good luck with the submission, and I look forward to seeing your app on the App Store.