Paddle Billing
Allow your users to subscribe to your app via Paddle
| RevenueCat Feature | Compatibility |
|---|---|
| Importing external purchases | ✅ Supported |
| Web SDK | ✅ Supported |
| Web Purchase Links | ✅ Supported |
| Web Paywalls | ✅ Supported |
| Funnels | ✅ Supported |
| Redemption Links | ✅ Supported |
A recent U.S. District Court ruling found Apple in violation of a 2021 injunction meant to allow developers to direct users to external payment options, like Paddle. As a result, iOS developers are now permitted to guide users to web-based payment flows without additional Apple fees or restrictive design requirements. You can find more details on the RevenueCat blog.
For apps available outside the U.S. App Store, Apple still requires that digital goods and subscriptions be purchased through in-app purchases. Promoting or linking to alternative payment methods within the app for non-U.S. users may lead to app review rejection or removal. Always ensure external payment links are shown only to eligible U.S. users.
RevenueCat currently supports web payments through Paddle in a number of different configurations.
Supported features:
- Import and sync external Paddle purchases: Let subscribers purchase on your own website using Paddle, and use them to unlock mobile entitlements for your users.
- Embedded Paddle checkout (Web SDK): Use RevenueCat's purchases-js SDK to initialize a purchase in your web app that uses a Paddle checkout, and creates subscriptions in Paddle Billing.
- Hosted Paddle checkout (Web Purchase Links): Create a revenuecat-hosted purchase flow which uses a Paddle checkout, and creates subscriptions in Paddle Billing.
- Redemption Links: Allow users to purchase anonymously without logging in, and handle purchase redemption in your mobile app.
- Web Paywalls: Present a RevenueCat paywall on the web, attached to a Paddle checkout.
- Web Purchase Button: Present a RevenueCat paywall on mobile, which links out to a Paddle web checkout.
For all of the above features, Paddle acts as the billing engine and merchant of record. This means that Paddle operates the subscription, sends receipts and emails to subscribers, and handles any subscription management. RevenueCat's RevenueCat Billing features such as Customer Portal, product configuration, and tax handling are not used when integrating with Paddle.
Current limitations
We support purchases that contain only one product. Multiple products on a single purchase are not supported, including one-time setup fees that are included with a subscription purchase.
Use cases
Choose the relevant use case below, then follow each section to implement it.
Use case 1: Using Paddle to import purchases and grant entitlements
If you want to use a non-RevenueCat purchase flow and simply import purchases in order to grant entitlements to users, follow these steps. This use case doesn't enable any purchases that happen within a RevenueCat purchase flow, but simply import purchases that happen in your Paddle account through external flows (e.g. you integrated Paddle's checkout into your website).
- Configure your Paddle account
- Create a Paddle config and configure purchase tracking
- Create products and prices in Paddle (skip if already created)
- Import Paddle products to RevenueCat
- Create entitlements in RevenueCat
Use case 2: Using a Paddle checkout in Web Purchase Links
- Configure your Paddle account
- Create a Paddle config
- Configure purchase redemption on mobile with Redemption Links (optional)
- Create products and prices in Paddle (skip if already created)
- Import Paddle products to RevenueCat
- Create entitlements in RevenueCat
- Create an offering and packages in RevenueCat
- Create and configure a web purchase link
- Test the purchase flow in Sandbox
Use case 3: Using a Paddle checkout in an app-to-web flow with RevenueCat Paywalls
- Configure your Paddle account
- Create a Paddle config
- Create products and prices in Paddle (skip if already created)
- Import Paddle products to RevenueCat
- Create entitlements in RevenueCat
- Create an offering and packages in RevenueCat
- Create a RevenueCat paywall with a web purchase button
- Test the purchase flow in Sandbox
Use case 4: Using a Paddle checkout with the Web SDK
- Configure your Paddle account
- Create a Paddle config
- Configure purchase redemption on mobile with Redemption Links (optional)
- Create products and prices in Paddle (skip if already created)
- Import Paddle products to RevenueCat
- Create entitlements in RevenueCat
- Create an offering and packages in RevenueCat
- Implement the purchases-js Web SDK in your web app or landing page
- Test the purchase flow in Sandbox
Step-by-step instructions
Follow these sections according to the use case you're implementing (above).
This page is the canonical setup reference for Paddle provider configuration, required API key permissions, product import, and sandbox setup. Scenario guides, such as Paddle app-to-web purchases, link back here for provider-level settings.
Paddle has entirely separate sandbox accounts that should be created and configured as standalone accounts. Some of the instructions below need to be repeated for both Sandbox and Production accounts.
- 🟠 Sandbox dashboard URL: (https://sandbox-vendors.paddle.com/)
- 🟢 Production dashboard URL: (https://login.paddle.com/)
Configure your Paddle account
Configure registered payment domains
- Go to the Website approval page under Checkout
- Click Add a new domain
- Enter
pay.rev.cat - Click Submit for Approval
- If you're using RevenueCat's Web SDK to host purchases on your own domain, you should repeat the same steps with that domain.
In your production account, you'll need to wait for approval after adding the payment domain. No approval is required on sandbox accounts.
Set a default payment link
Go to the Checkout settings page under Checkout.
If your Paddle account does not already have a default payment link set, enter https://pay.rev.cat. If a default payment link is already configured (because you're using the account for other purposes) you can leave this unchanged. It will not affect your app-to-web purchases.
Disable abandoned cart emails
The RevenueCat Paddle Billing integration doesn't currently support Paddle's abandoned cart emails. You should disable them here
Add a new API key and define permissions
- Navigate to the Authentication page under Developer Tools
- Click the + New API key button
- Give the new key a suitable name and description
- Important: Set the key to NOT expire (differs from default)
- Set the permissions according to the list below
- Save the new key
- Copy the key to your clipboard
Minimum required API key permissions
| Permission | Read | Write |
|---|---|---|
| Addresses | ☑ | ☐ |
| Adjustments | ☑ | ☐ |
| Businesses | ☑ | ☐ |
| Client-side tokens | ☑ | ☑ |
| Customer portal sessions | ☑ | |
| Customer authentication tokens | ☐ | |
| Customers | ☑ | ☐ |
| Discounts | ☑ | ☐ |
| Notification settings | ☑ | ☑ |
| Notifications | ☑ | ☐ |
| Notification simulations | ☐ | ☐ |
| Payment methods | ☑ | ☐ |
| Prices | ☑ | ☐ |
| Products | ☑ | ☐ |
| Reports | ☐ | ☐ |
| Subscriptions | ☑ | ☐ |
| Transactions | ☑ | ☑ |
Paddle only embeds authenticated session tokens inside subscription management URLs when the API key has the Customer portal sessions (Write) permission. Without it, RevenueCat can't generate the URLs customers need to manage or cancel their subscription, and these requests will fail.
If you close the modal showing the full API key, you will no longer be able to copy it — we recommend you leave this window open until you've saved the key in the RevenueCat config.
Create a Paddle config and configure purchase tracking
- Log into your RevenueCat account
- Go to your project
- Go to Web in the lower section of the project dashboard
- Create a web config for Paddle
- Click Set secret, paste your Paddle API key and click Set
- Configure purchase tracking:
For most use cases, we recommend selecting the following:
- Automatic purchase tracking — this tracks all purchases from the Paddle account using webhooks, with no additional setup required.
- Autogenerated user IDs — because we're sending users directly from the mobile app, an app user ID will already be provided and associated to the purchase. Read more about tracking purchases from server-to-server notifications.
Finally, click Connect to Paddle to initiate and test the connection.
Manual purchase tracking (optional, advanced)
You can send your Paddle subscriptions to RevenueCat through the POST receipt endpoint.
The only required fields when sending your Paddle purchase to the RevenueCat API are the following:
fetch_token: Your Paddle subscription ID (sub_...) OR your Paddle transaction ID (txn_...)app_user_id: The App User ID that the subscription should be applied to
Headers
X-Platform: Should be set topaddle.Authorization: It should beBearer YOUR_REVENUECAT_PADDLE_APP_PUBLIC_API_KEY
- Code
curl -X POST \
  https://api.revenuecat.com/v1/receipts \
  -H 'Content-Type: application/json' \
  -H 'X-Platform: paddle' \
  -H 'Authorization: Bearer YOUR_REVENUECAT_PADDLE_APP_PUBLIC_API_KEY' \
  -d '{ "app_user_id": "my_app_user_id",
  "fetch_token": "txn_xxxxxxxxxx"
  }'
Configure purchase redemption on mobile with Redemption Links
If you're building a web-to-app flow and want to enable purchases without a login, where users are deep-linked into the app post-purchase, you should configure Redemption Links. Without this, you'd need to append user IDs to web purchase links to identify the user.
Follow the Redemption Links guide to configure the customer URL scheme and purchase redemption step in the mobile SDK.
Create products and prices in Paddle
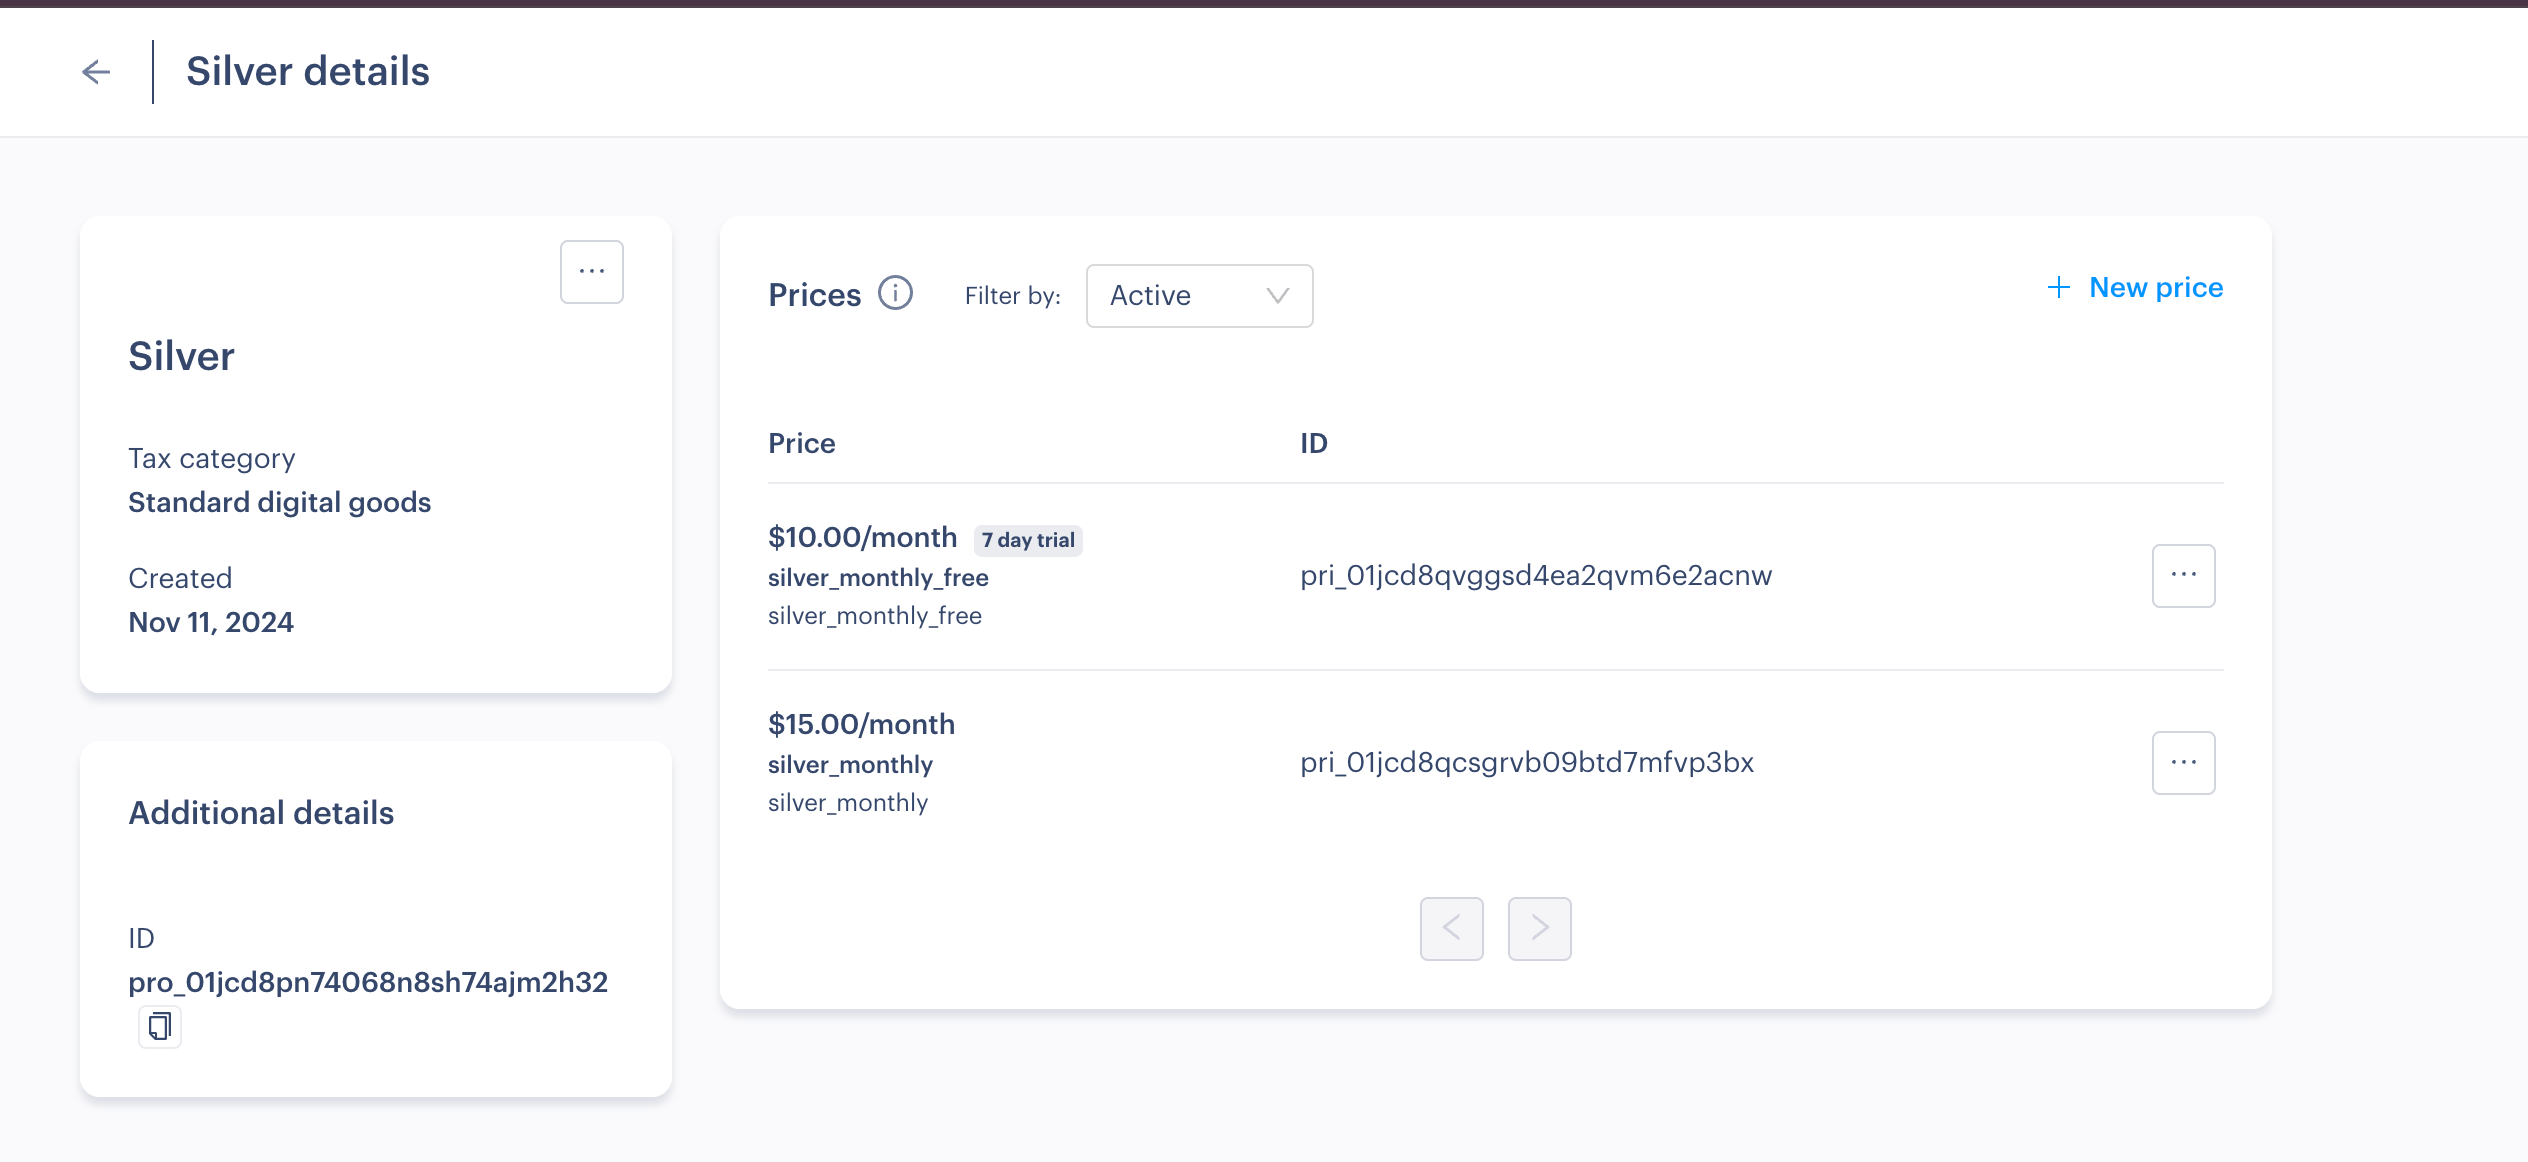
A Price in Paddle maps to a Product in the RevenueCat system. So for example, if you create two prices under the same Paddle product, when you import or manually create the products in the RevenueCat dashboard, you'll notice two separate products.

- Log in to the Paddle Dashboard
- To create a new product, expand the Catalog section in the sidebar and click Products.
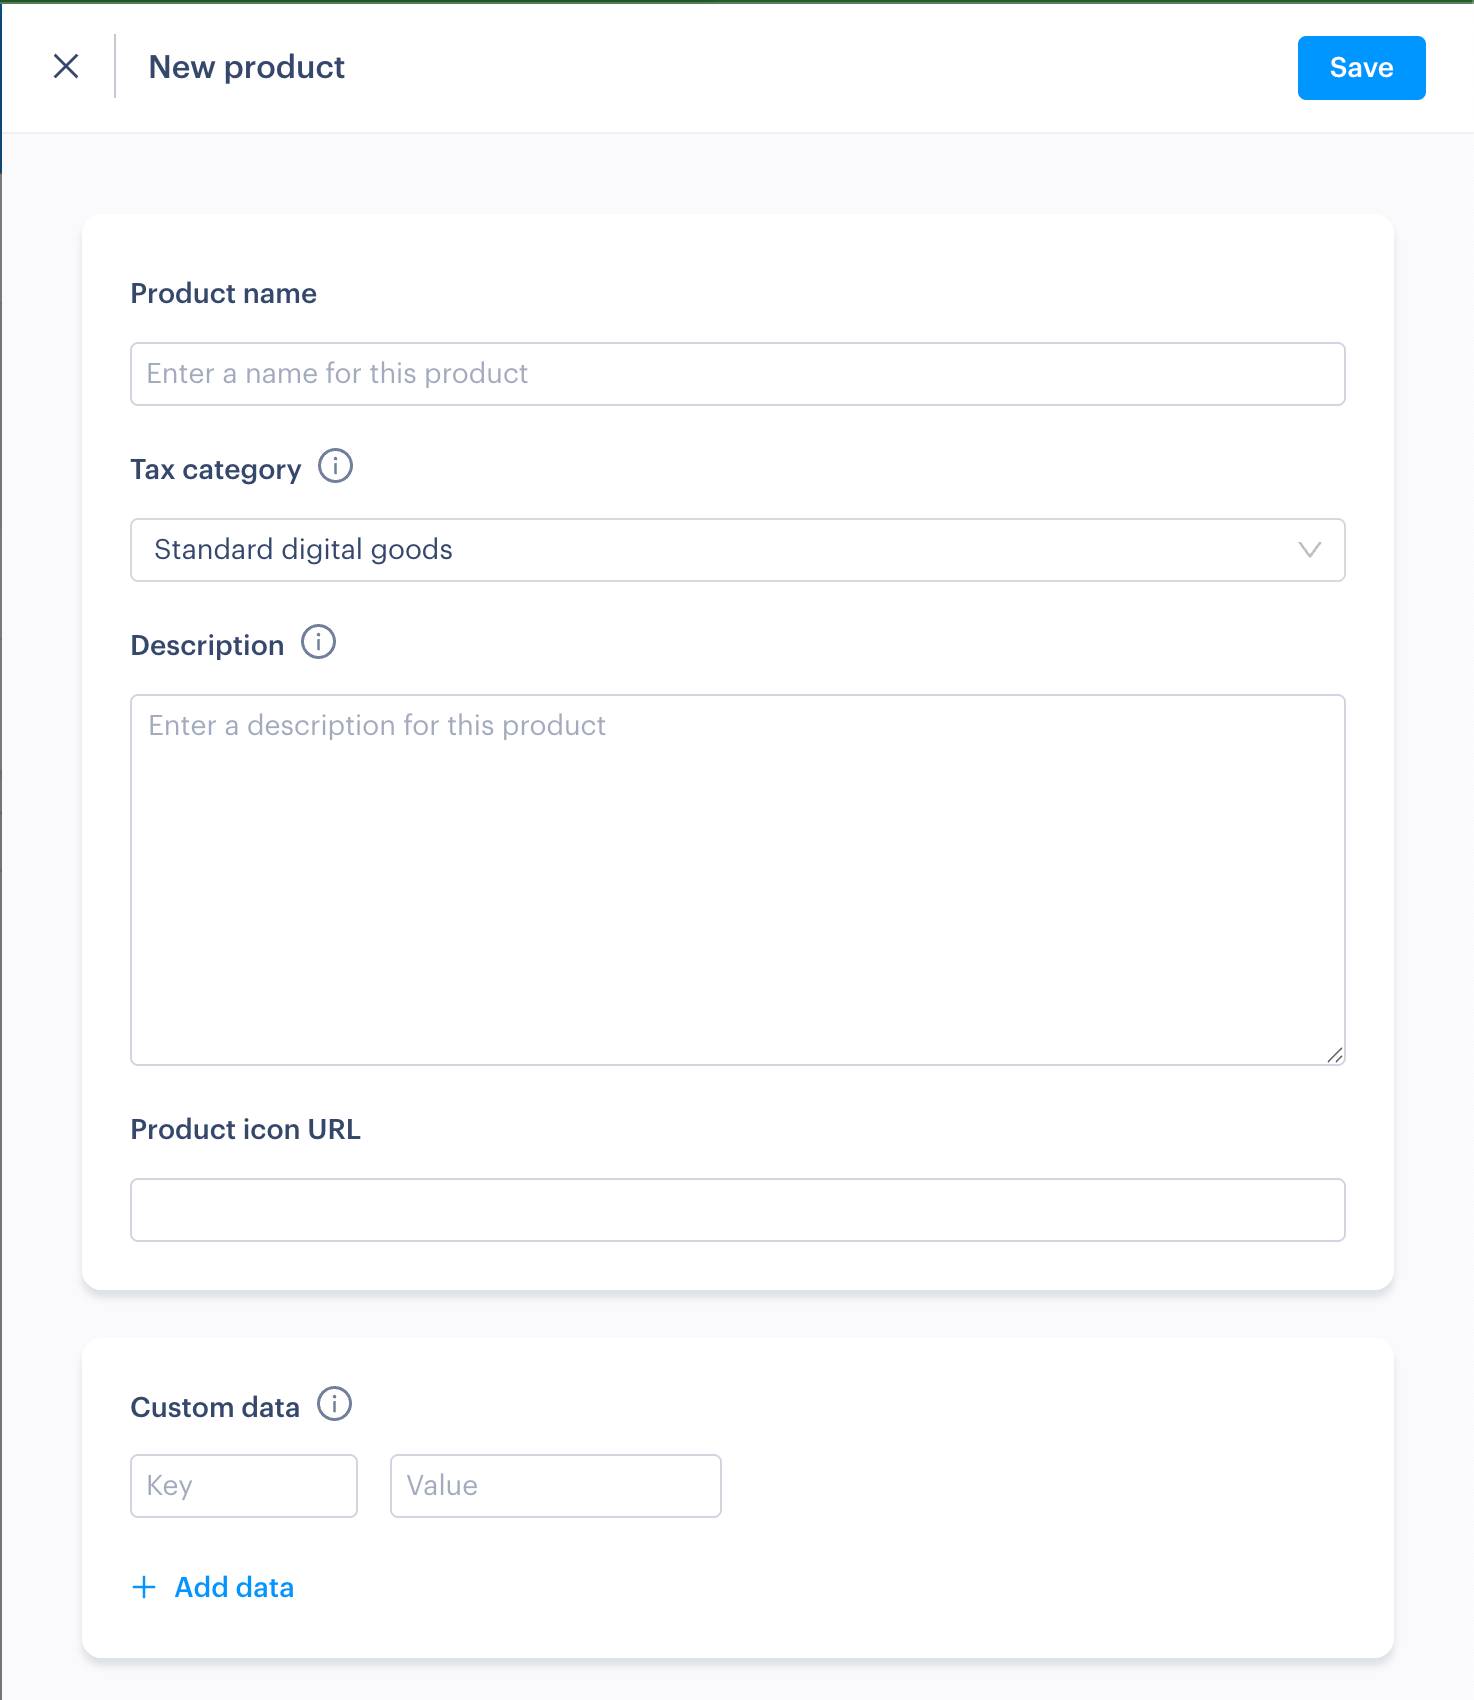
- On the top right corner of the page, click New Product.
- Enter the product name and any other optional details like a description then click Save.
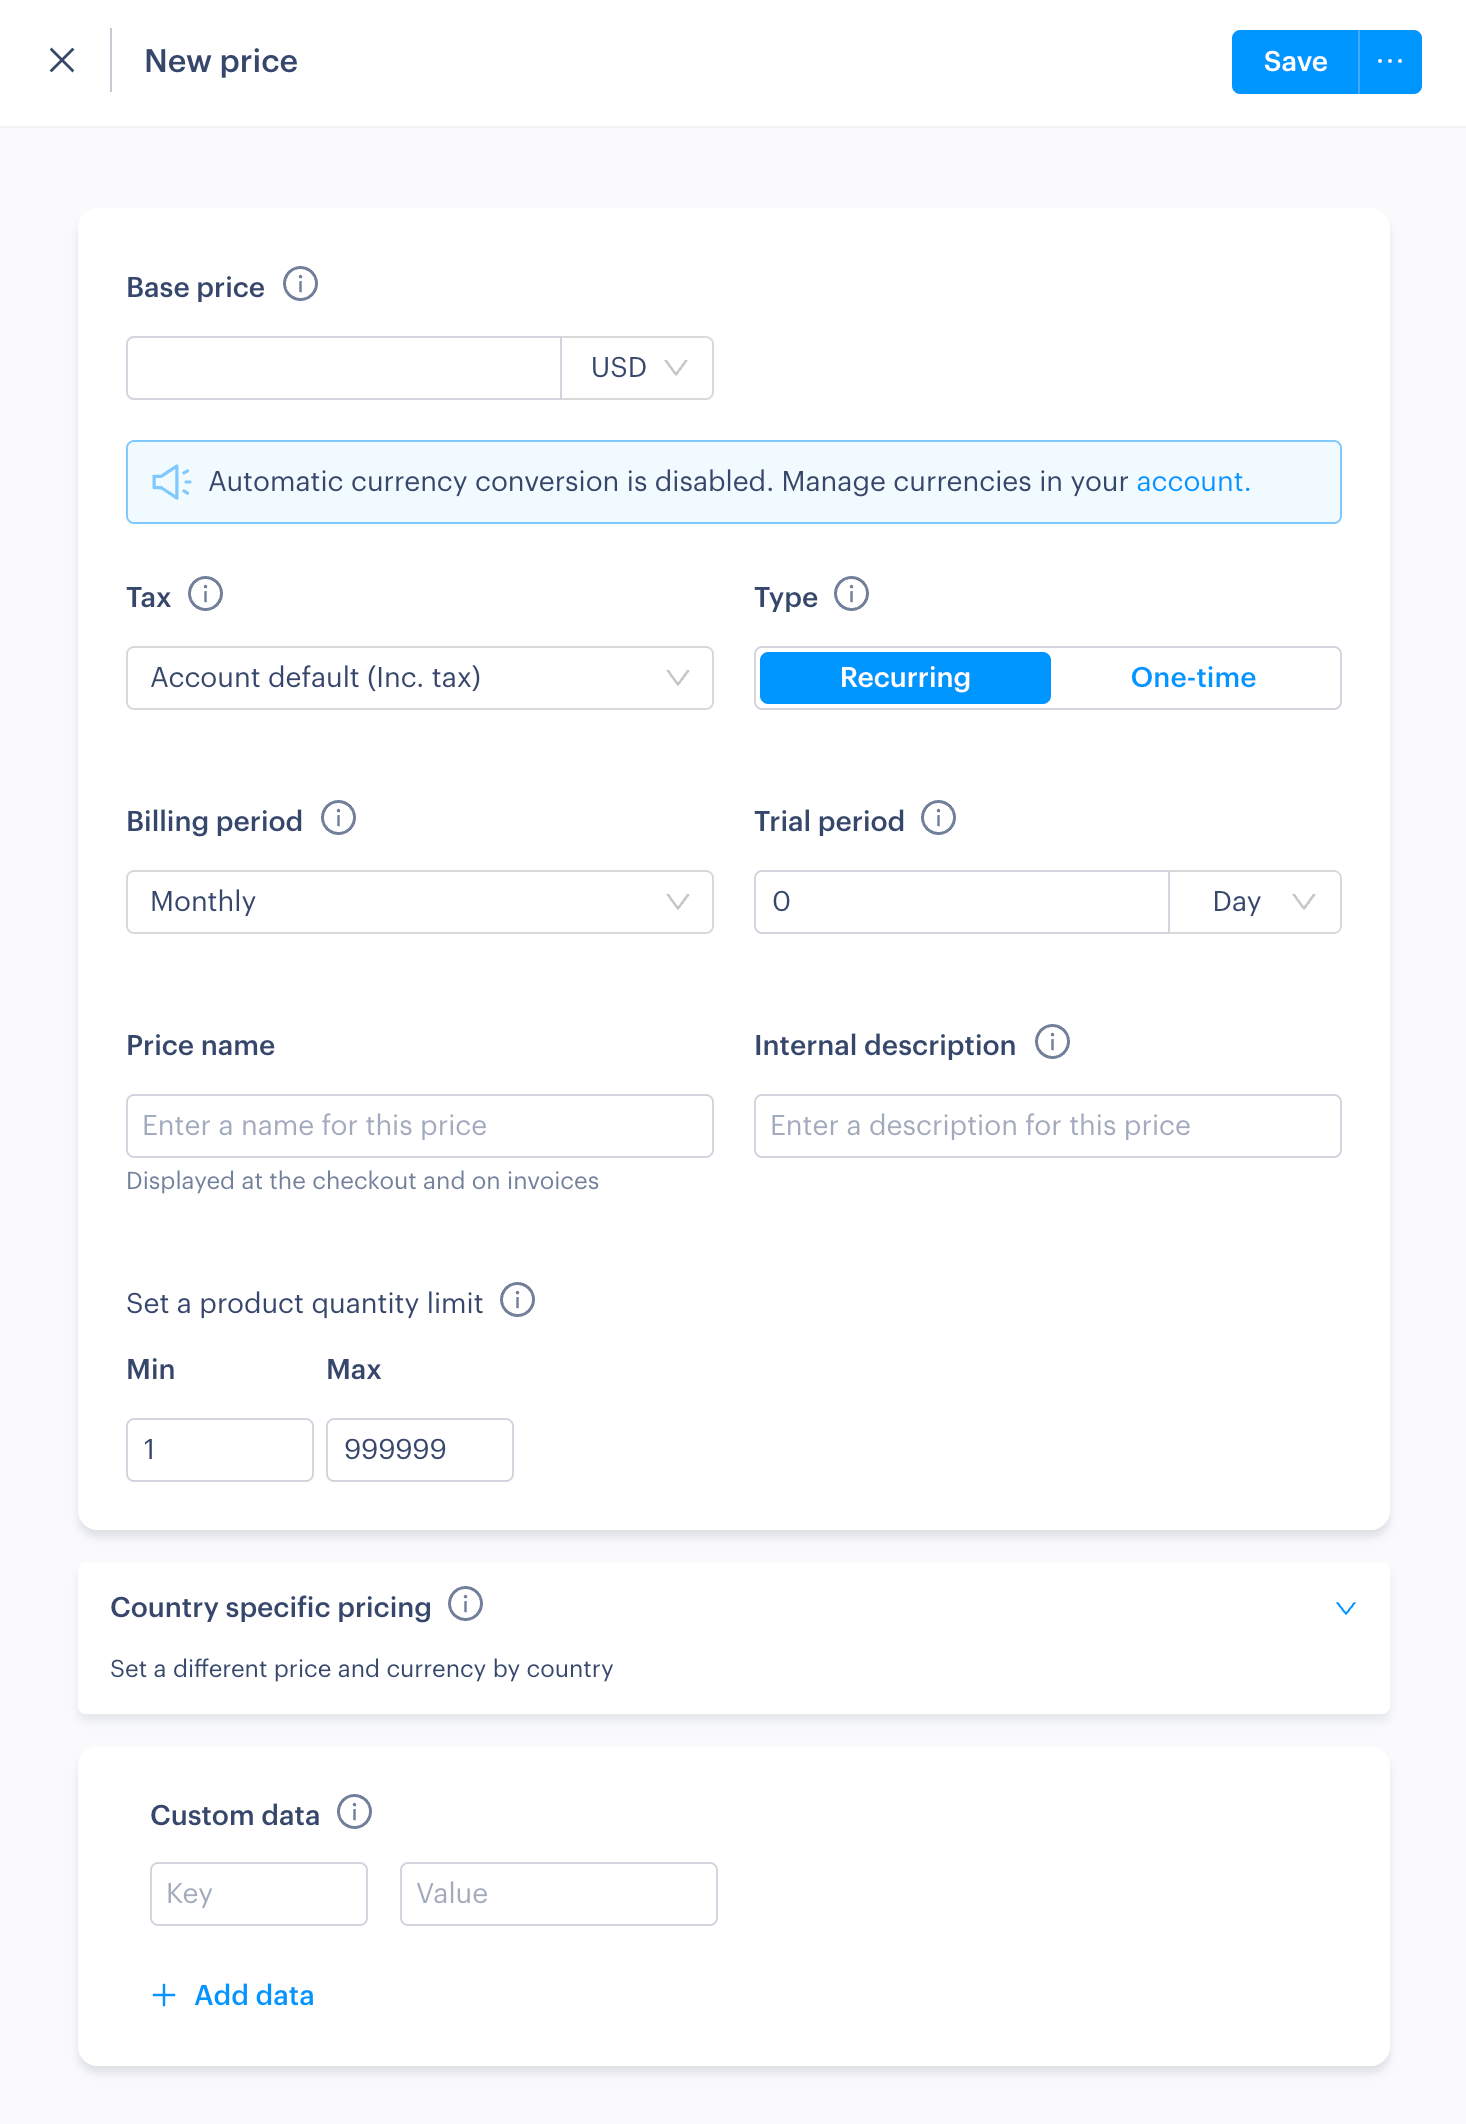
Then on the prices section, click New Price. Enter details like the base price, the type of pricing (recurring or one-time), the billing period, and any trial periods you are offering and click Save.
The "price name" field defines to what is shown to users in the checkout, as a representation of what they're purchasing.
You can read more about products and prices in Paddle's official documentation.
Import Paddle products to RevenueCat
- Go to the Product catalog in your RevenueCat dashboard, and select the Products tab
- Find your previously added Paddle provider, and click Import
- Check the products you want to use for your web purchases, and click Import
The imported products should now be displayed under your Paddle provider on the Products page.
If the import is not working, make sure that Paddle Billing is active. Log in to Paddle as an admin user and go to Paddle > Business Account > Account Settings > Get Paddle Billing to activate. See Paddle's docs here. After doing this you may also need to switch from "Paddle Classic" to "Paddle Billing" via the tab on the bottom of the sidebar.
Create entitlements in RevenueCat
What is an entitlement?
RevenueCat Entitlements represent a level of access, features, or content that a user is "entitled" to, and are typically unlocked after a user purchases a product.
Entitlements are used to ensure a user has appropriate access to content based on their purchases, without having to manage all of the product identifiers in your app code. For example, you can use entitlements to unlock "pro" features after a user purchases a subscription.
Most apps only have one entitlement, unlocking all premium features. However, if you had two tiers of content such as Gold and Platinum, you would have 2 entitlements.
Adding an entitlement
- Go to the Product catalog in your RevenueCat dashboard, and select the Entitlements tab
- Click + New entitlement
- Enter an identifier and description for the entitlement, and click Add
Attaching a product to your entitlement
- Go to your previously created entitlement and click Attach under associated products
- In the table, check the product from your Paddle provider, and click Attach
Create an offering & packages in RevenueCat
- Go to the Product catalog in your RevenueCat dashboard, and select the Offerings tab
- Click New offering to create a new offering
- Enter a suitable identifier and display name
- Under Packages, click + New Package
- Select an identifier that corresponds to the billing cycle of your subscription
- Enter a description
- In the products list, find your previously-created Paddle provider and select the corresponding Paddle product (this should correspond with the billing cycle you chose in the identifier)
- Click Save
Create and configure a web purchase link
- Go to Funnels in the project dashboard, then use the Purchase Links section to create a web purchase link
- For the Offering, choose the offering you created earlier
- For the Payment provider, choose the Paddle config you created earlier
- Enter a suitable header and subheader for the package selection page, along with a link to terms & conditions
When linking to a web purchase from a RevenueCat paywall, by default the package selection page will be skipped and subscribers will land directly on the checkout with the package selected.
Configure the success redirect
To redirect the subscriber back into to your app after the purchase, you can use a custom URL scheme (see instructions below). You could alternatively redirect the subscriber to a Universal Link, or your own custom page.
To add a custom URL scheme in iOS:
- In Xcode, find your xcodeproj file — Info tab — URL Types section.
- Then add your custom scheme in the URL Schemes field.
Adding your custom URL scheme in the web purchase link redirect:
Select the Redirect to a custom success page option, and enter your URL scheme in the format YOUR_CUSTOM_SCHEME://.
In order to use a URL scheme on production, your users must be using a version of your app that has the URL scheme configured. Distribute app updates before enabling this feature.
Configure the repeat purchase behavior
Define what happens when customers try to purchase a product while they already have an active subscription or entitlement. For the app-to-web use case, it's recommended to choose Show the success page.
Note that customers can't have more than one active subscription to the same product, or re-purchase a non-consumable product.
Create a RevenueCat paywall with a web purchase button
If you have an existing mobile paywall configured:
- Make sure your existing paywall is attached to the same offering you've configured for web purchases
- Add a web purchase button to your paywall (Read more)
If you don't have a mobile paywall configured:
- Go to Paywalls in the RevenueCat dashboard
- Select + New paywall
- Choose the offering you created earlier in this guide and click Add
- follow this detailed guide on creating a paywall, and add the mobile packages you want to present.
- Add a web purchase button to your paywall (Read more)
Integrate the Web SDK into your web app
Follow the SDK integration guide to complete the integration.
Testing in Sandbox
To test the web checkout in sandbox mode, make sure that you:
- Have a paddle config created connected to a Paddle sandbox account
- Have products and entitlements from that sandbox account
- Have configured an offering
- Have created a web purchase link to present your products & packages (not required for Web SDK integrations)
Testing with a sandbox Web Purchase Link
You can find the sandbox purchase URL by
- Go to Funnels in the project dashboard, then use the Purchase Links section
- Click the name of your web purchase link
- Click Share URL
- Append a user ID
- Click Copy sandbox URL
To complete purchases on sandbox, you can use Paddle's test cards to simulate a real transaction.